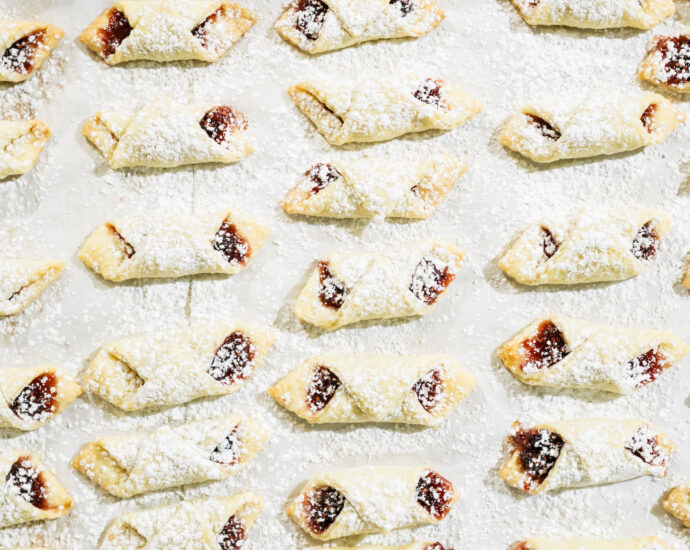
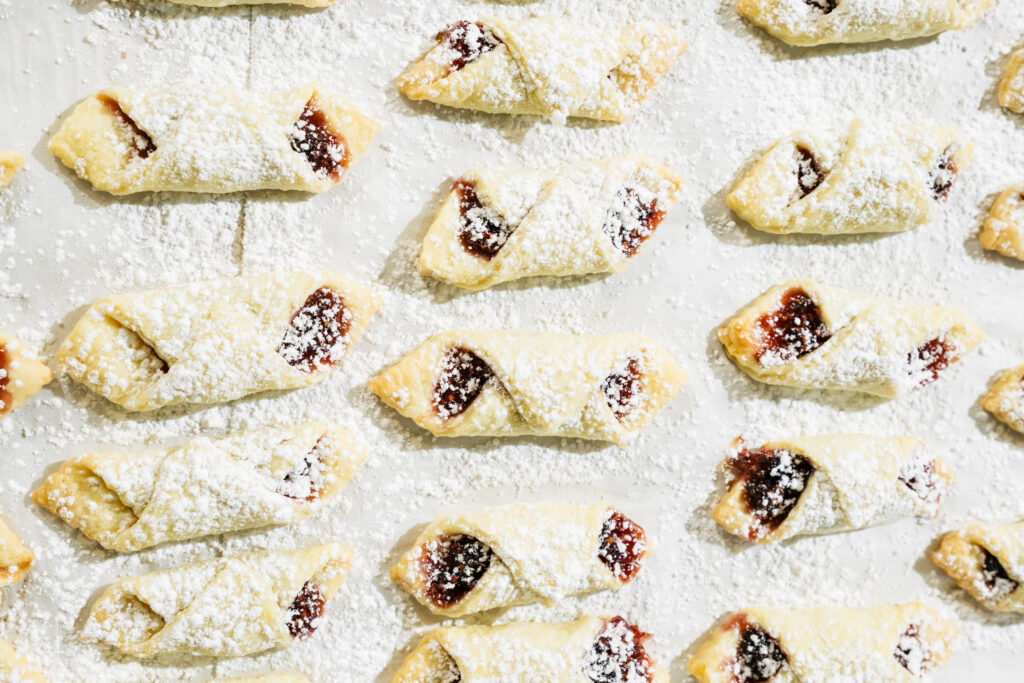
my family’s Austrian cream cheese cookies
Growing up, friends and family devoured these Austrian cream cheese cookies every Christmas, Easter, and even on holidays in between. They are light but textured, and traditionally filled with lekvar which is an Austrian prune butter or apricot jam. I filled these with a mixed wineberry and mulberry jam that I had made back in the summer from berries I picked locally, but apricot has always been my favorite.
The dough, which is somewhere between cookie and pastry, is rolled super thin. When baked, it puffs ever so slightly and becomes flaky.
Though I am an avid proponent of my kitchen aid stand mixer, I have found that the power of the mixer causes the gluten to develop, making the dough too tough for these delicate cookies. So just like my ancestors made it for generations, the dough must be made with your hands.
So squeeze away and get the added benefit of stress relief! Isn’t that what baking is really about anyway?
Makes about 5 dozen cookies
ingredients
- 1 cup (2 sticks) butter, softened
- ½ cup (4 ounces) cream cheese, softened
- 1 tablespoon sugar
- 2 egg yolks
- 2 cups flour
- 1 ½ cups jam or preserves
- Powdered sugar
steps
Mix the butter and cream cheese in a bowl. Add the sugar and egg yolks. Add in the flour and pinch and squeeze the dough with your hands until it comes together. Wrap in plastic wrap and refrigerate overnight.
When ready to bake, preheat the oven to 350°F. Cut the dough in quarters and working with one piece at a time, roll out dough as thinly as you can. Use a cookie cutter or knife to cut into squares.
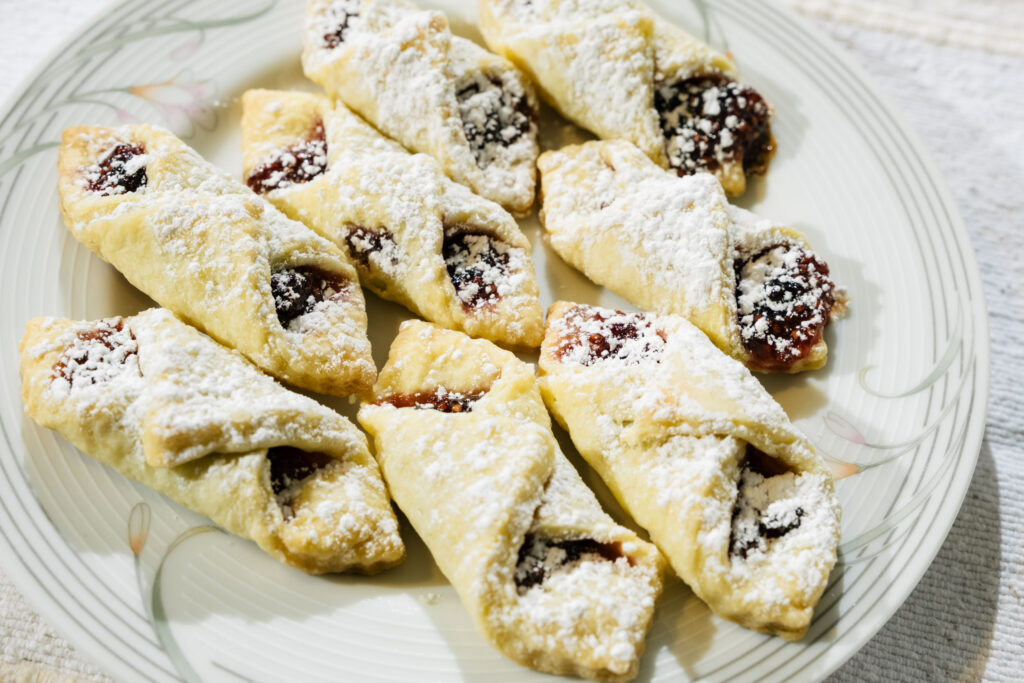
Fill each square with a dollop of jam at the center. Fold one side into the center then fold the other side over it. I keep a bowl of water nearby to wet the corners of the dough so they stick together.
Bake until golden, 16 minutes, and let cool. Dust with powdered sugar.
the best broccoli rabe
I am always trying to incorporate more vegetables into my diet, especially this time of year.
I’ve learned that broccoli rabe is a somewhat polarizing food. I remember being surprised by its bitter taste as a child (my Uncle Albert had it around all the time). My mom assured me that “it’s an acquired taste” and thereafter, wanting to acquire every taste, I grew to love it.
These days, my boyfriend and I eat broccoli rabe once or twice a week — it finds its way onto our pizzas, into our pastas, on toast, as a side to meat, poultry, fish, and even for breakfast with eggs. When we’re out of rabe, we know it’s time to go grocery shopping.
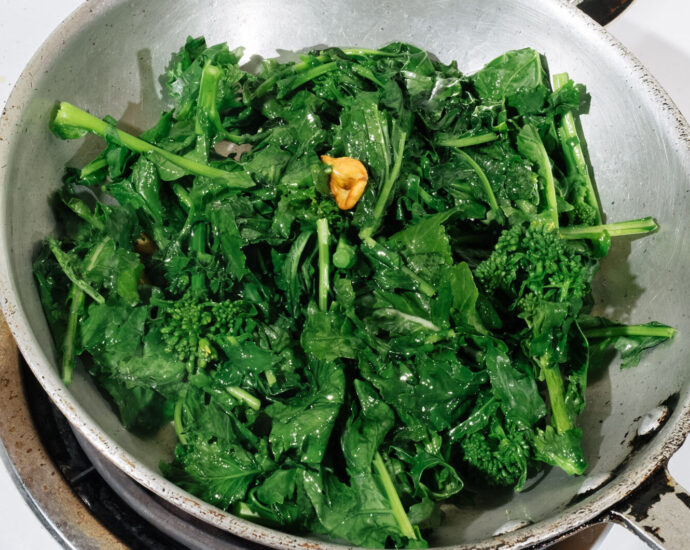
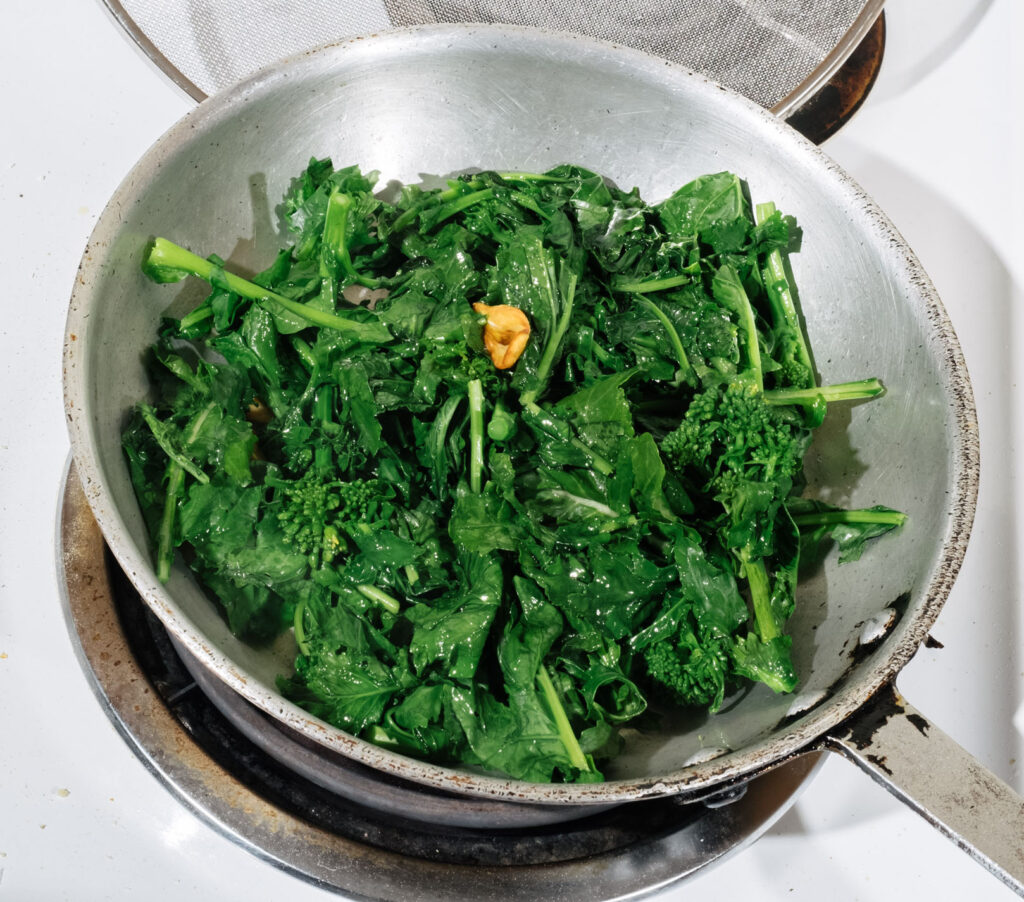
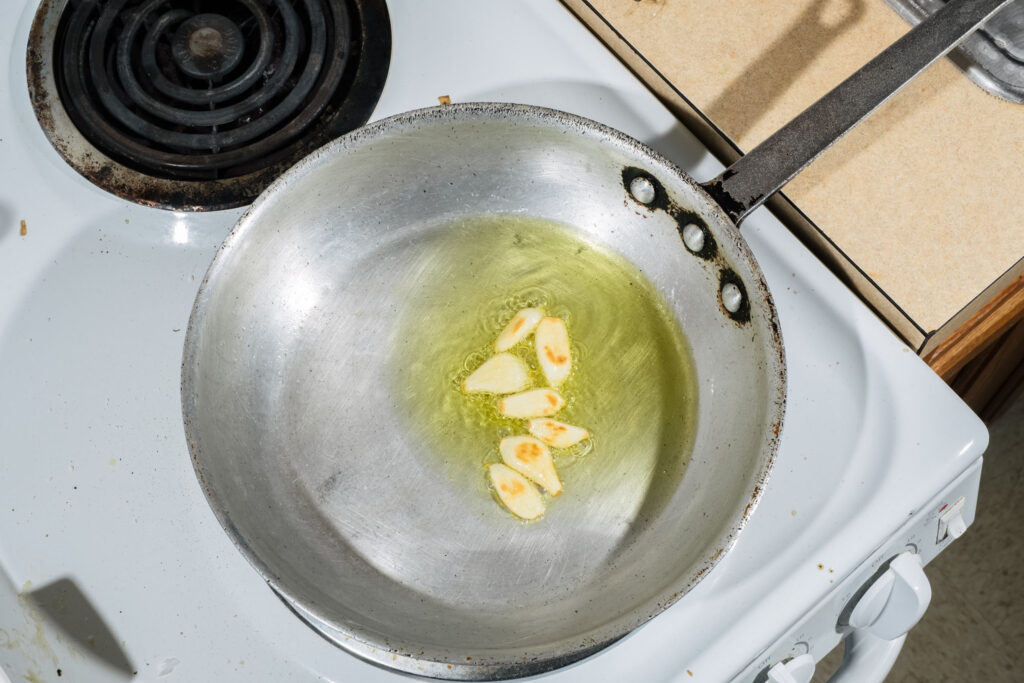
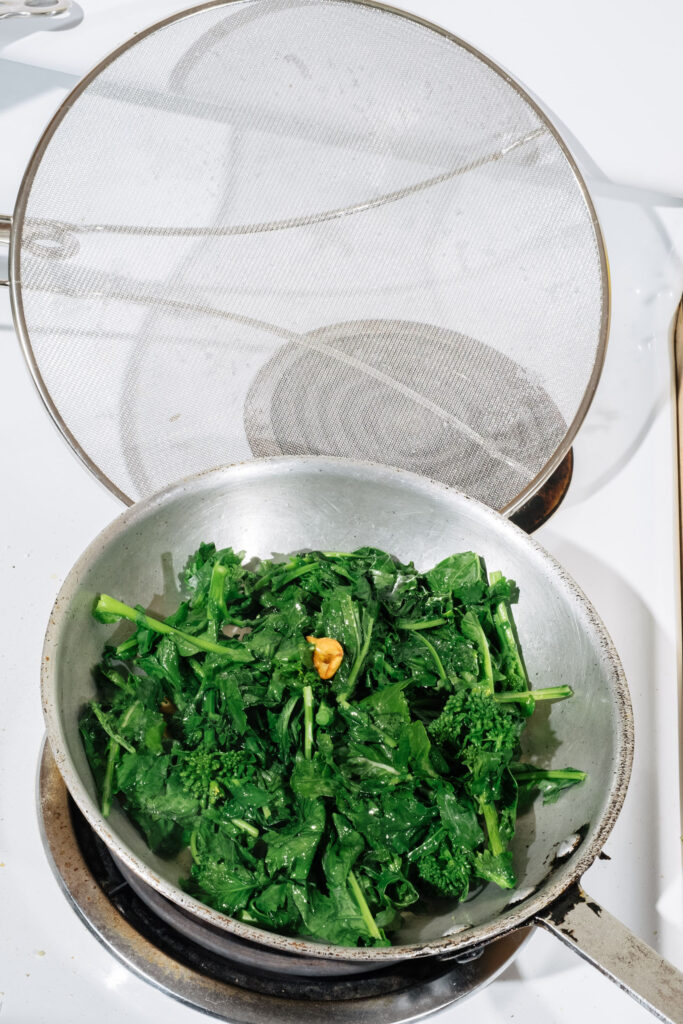
This is the cooking technique that we use. It is simple, versatile and ready in minutes, making it the perfect starting point for any broccoli rabe journey that you wish to embark on. Quick-blanching the rabe releases some of its famous bitterness.
Toss it with some lemon for a delicious side, add it to pasta, or top off a slice of crusty bread and ricotta with some rabe and you are set. The possibilities are endless!
Serves 2-3
ingredients
- 1 bunch broccoli rabe
- 1 tablespoon olive oil
- 1 garlic clove or shallot, sliced
- Salt and pepper to taste
steps
Fill a teapot or kettle with water and bring to a boil.
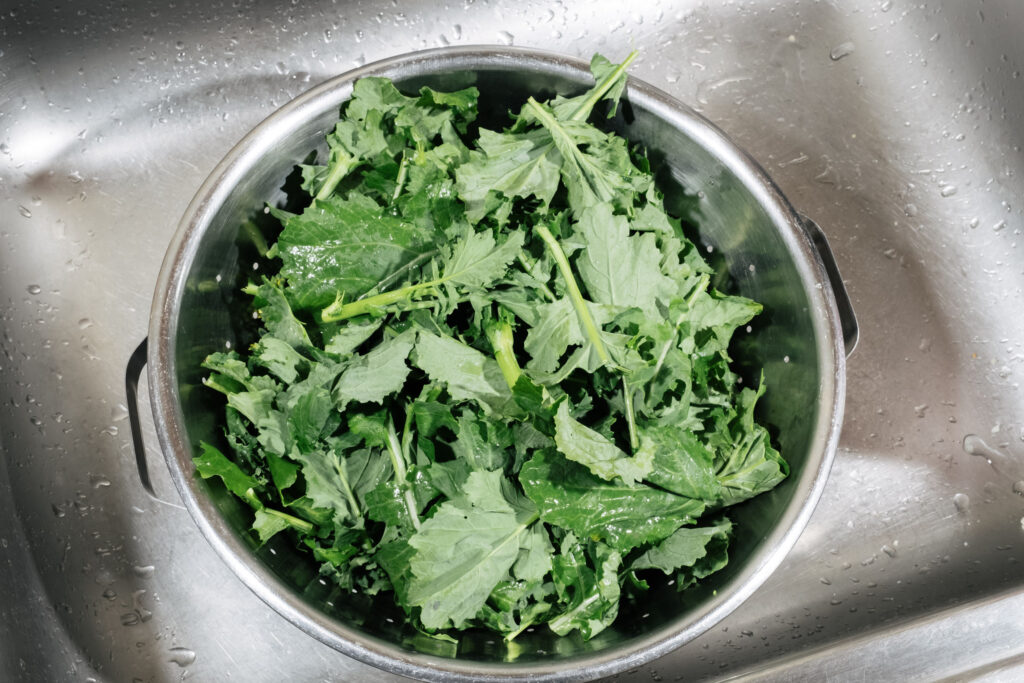
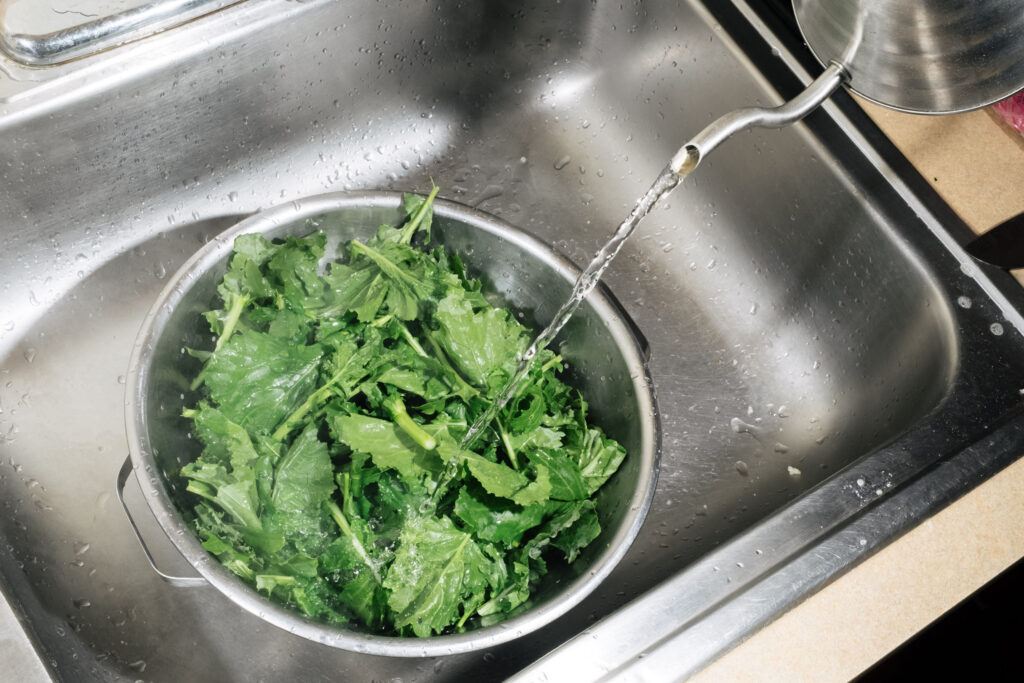
Trim the ends off of the broccoli rabe and discard. Roughly chop the remaining stems and leaves and place in a colander in the sink.
Meanwhile, heat 1 tablespoon of olive oil in a pan and add the garlic, salt, and pepper.
Pour boiling water over broccoli rabe in a colander and allow to strain then immediately add to pan with shallot. Cook uncovered until it softens, about 5 minutes.
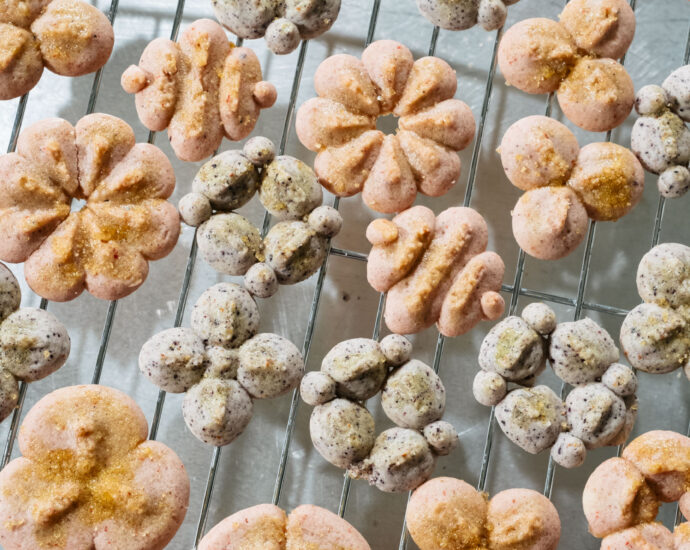
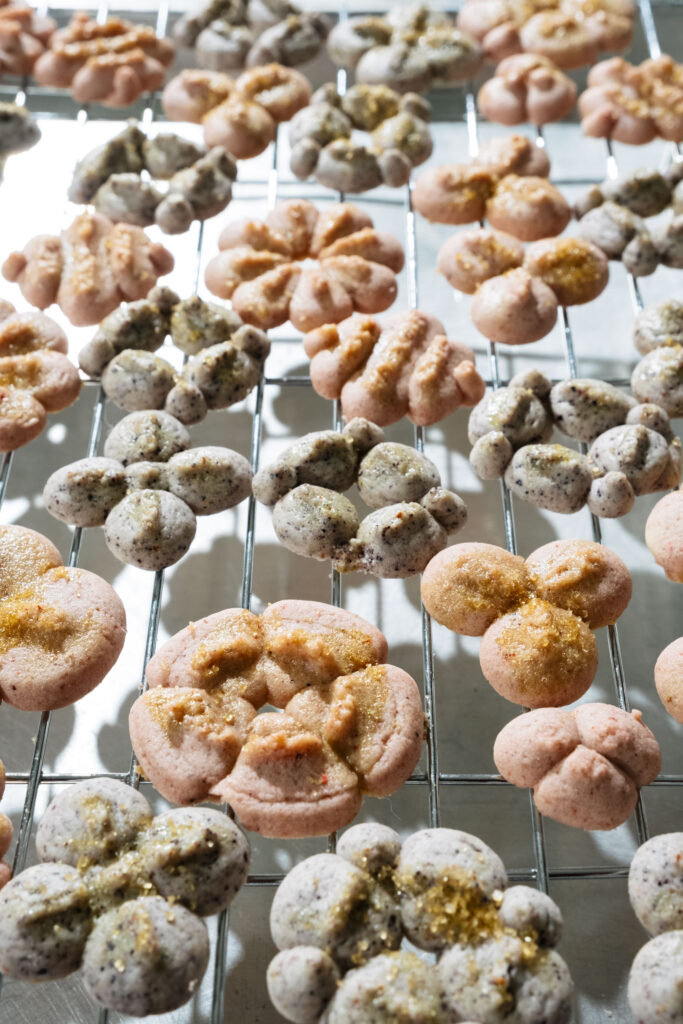
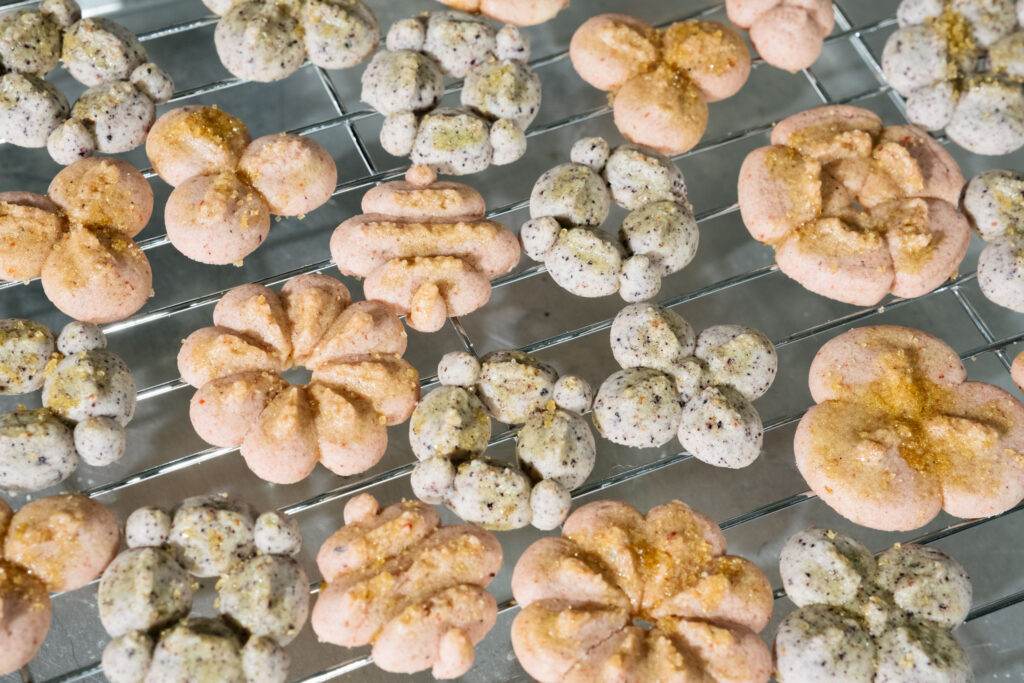
berry spritz cookies
Happy Winter Solstice, the shortest day of the year and the first official day of winter! With four days until Christmas, I’ve been baking a lot of cookies, including these berry spritz cookies.
Spritz cookies are a holiday classic. They are buttery, delicious and fun to make. The simple butter cookie dough is pushed through a cookie press directly onto a baking sheet to create the distinct shapes and designs.
Here, I replace traditional food coloring with freeze-dried berries, which are ground to a powder to add color and slight flavor! For these berry spritz cookies, I used strawberries and blueberries, but feel free to try other fun flavors like cranberry, pomegranate, or orange which create vivid, natural colors without added dye. Berry spritz cookies will add a touch of pastel to your holiday baking repertoire !
ingredients
for the cookie dough
- 1 cup butter, softened
- ½ cup sugar
- 2 ¼ cups all-purpose flour
- ¼ teaspoon salt
- ½ teaspoon almond extract
- ½ teaspoon vanilla extract
- 1 egg
- 2 tablespoons of ground freeze-dried sliced strawberries (about ½ cup unground)
- 2 tablespoons of ground freeze-dried blueberries (about ¼ cup unground)
for the topping
- 1 egg
- 1 tablespoon water
- Turbinado sugar
steps
Preheat the oven to 400°F.
In a medium-sized bowl, mix together the flour and salt.
Beat the butter and sugar until light and fluffy. Add the egg, almond extract, and vanilla extract. Slowly add in the dry ingredients. Beat until the dough forms.
Divide the dough in half and place one half in a separate bowl and the other half in the mixer bowl. Add the strawberry powder to mixer bowl and beat on medium speed until thoroughly combined and dough has turned pink.
Remove the strawberry dough from the mixer bowl and beat the remaining dough with the blueberry powder.
Whisk the remaining egg with 1 tablespoon of water.
Using a cookie press, press cookies directly onto a greased, unlined baking sheet. Brush with egg wash and sprinkle with turbinado sugar.
Bake for 6-7 minutes, rotating the pan once.
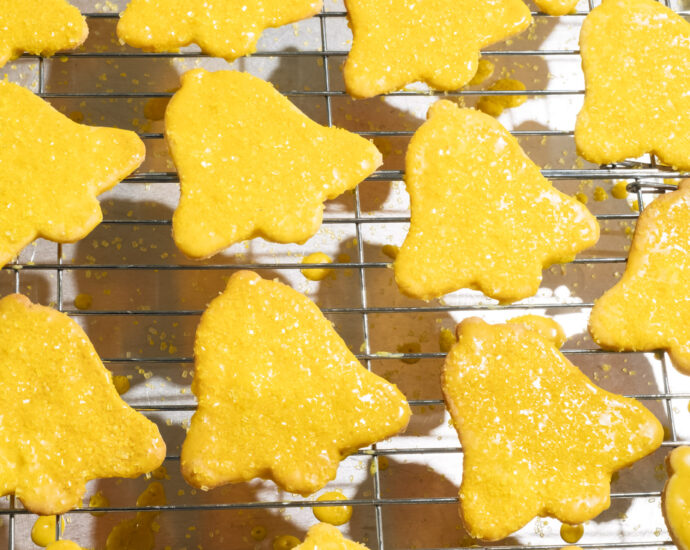
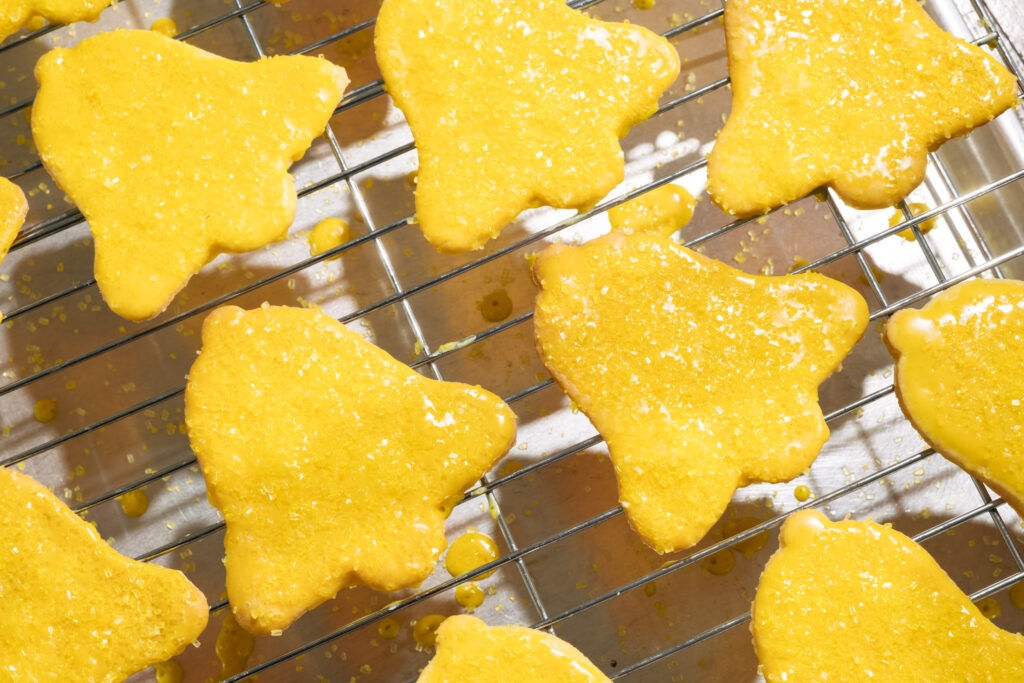
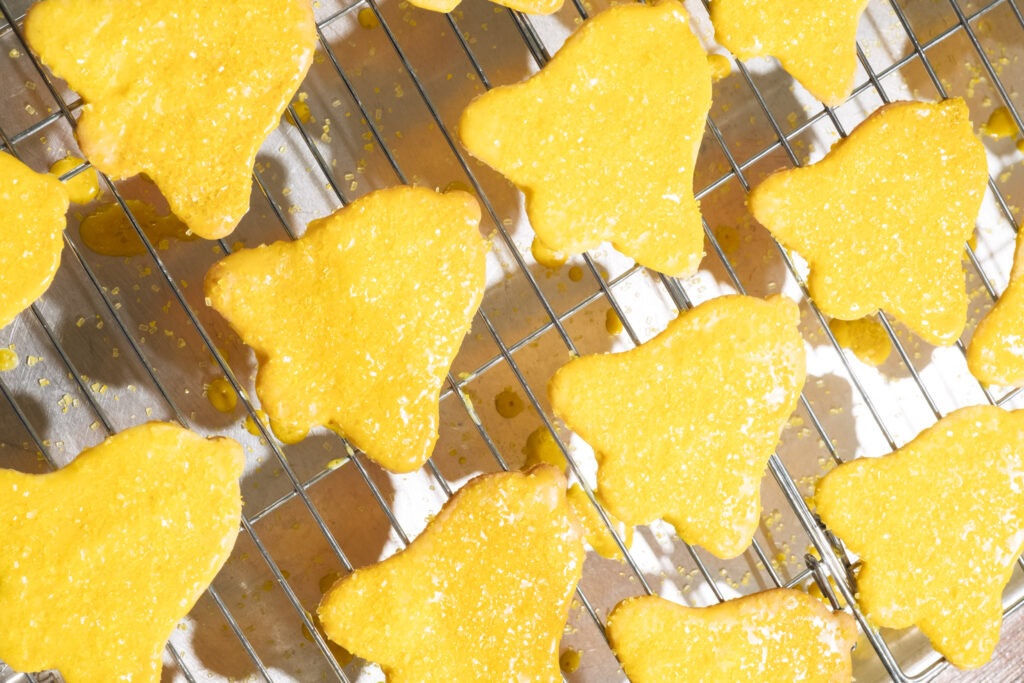
golden bell cornmeal cookies with almond glaze
I will take any excuse to bake with different flours/meals but corn is an all-time favorite of mine. These golden bell cornmeal cookies always get me feeling festive as the song “silver bells” starts playing in my head when I think of them.
I have been making this dough for cornmeal cookies for a while and used to roll it into balls, flatten them, and drizzle them with honey and flaky salt (you can totally try this too!). Then I decided to try the dough with cut-outs and it turns out, it works equally as well! Behold, the golden bells.
ingredients
for the dough
- ¾ cup butter
- ¾ cup sugar
- 1 egg
- 1 tsp. vanilla
- 1 ¼ cups flour
- 1 ¼ cups cornmeal
Pinch of salt
for the glaze and decoration
- ¼ teaspoon ground turmeric
- 1 tablespoon milk or half and half
- 1 teaspoon almond extract
- 1 cup confectioners sugar
- 1 tablespoon corn syrup
- 1 jar naturally-colored yellow sanding sugar
cookie dough steps
In a small bowl, mix together the flour, cornmeal, and salt. Set aside.
Beat the butter and sugar together in a stand mixer with a paddle attachment or using a hand mixer until creamy. Add in the egg and vanilla and continue mixing. Slowly add in the dry ingredients until the dough has formed. Everything should be evenly combined.
Shape the dough into a ball, wrap in plastic wrap, and refrigerate for 1-2 hours until firm. Refrigerating the dough will make it easier to roll out.
Preheat the oven to 375°F and line a baking sheet with parchment paper. Cut the dough into quarters and roll out one of the quarters, you will need extra flour. Use a bell-shaped cookie cutter to cut out bells (you can really do whatever shape you’d like!) and place on a parchment-lined cookie sheet.
Bake for 7-9 minutes until edges start to crisp and turn golden. Allow to cool completely.
glaze steps
Place all ingredients in a medium-sized bowl and whisk to combine. Dip the tops of the cooled cookies in glaze, flip over, and allow to set for about 3 minutes before covering in sprinkles.
I like to place the cookies on a cooling rack over a cookie sheet because it allows for easy clean-up! Letting the glaze set prevents the sprinkles from sinking into it. Cover with sprinkles and let harden completely.
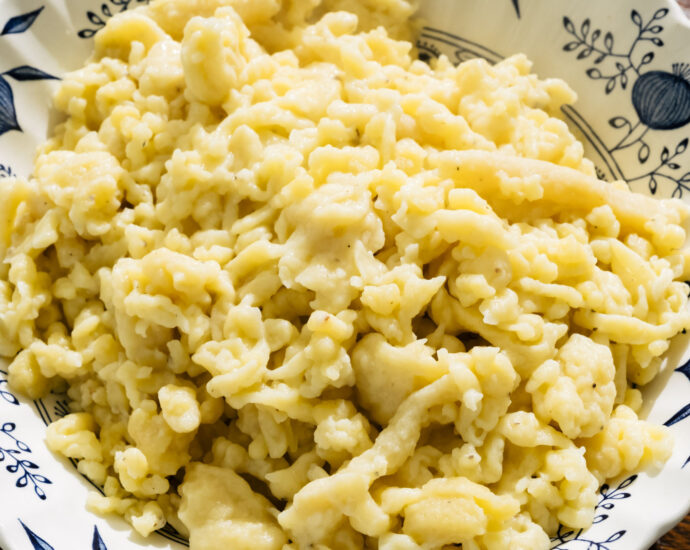
spaetzle
As the first major snowstorm of the season hits the east coast, I am grateful to be warm and snug indoors. I am also grateful to be cooking, and spaetzle is the ultimate snowstorm food – easy, cozy, and comforting.
Growing up, my grandma often made us a dish she called “cheese noodles.” It was exactly that: egg noodles with cottage cheese and a bit of butter, similar to the Austrian spaetzle that her mother made from scratch. I never met my great grandmother, but she was known for being an amazing cook and sharing many authentic dishes from her home country of Austria with her family. My mom remembers her spending full days drying out homemade egg noodles on the bed and stretching strudel dough paper thing to fill with apples, sweet cheese, nuts, and cabbage. More on that later.
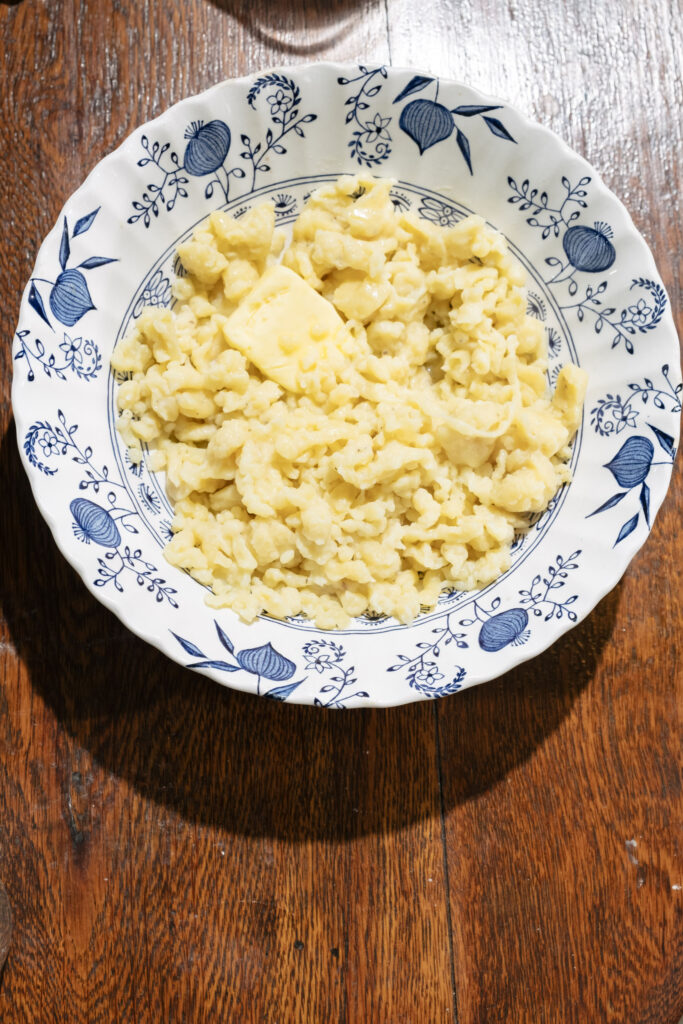
My mom frequently made frozen spaetzle when I was younger, and I’ve learned, over the years, that it’s actually pretty easy to make from scratch. I love it served simply, with butter, salt and pepper, an ode to my childhood. But feel free to jazz it up with greens, cheese, mushrooms, or meat!
The ingredients are simple, and the spaetzle cooking process comes with the added benefit of an arm workout.
Serves 4
ingredients
- 1 ½ cups flour
- 2 eggs
- ½ cup half and half (or milk)
steps
Fill a large pot with salted water and bring to a boil.
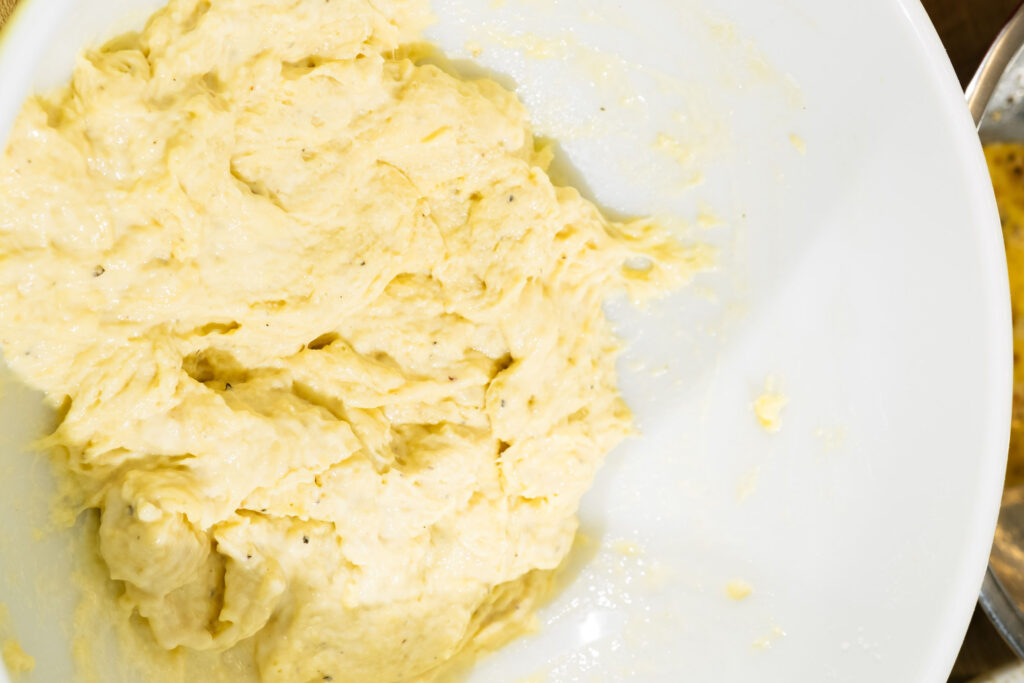
Place the flour into a bowl and add the eggs and half and half to the center. Mix until it forms a batter.
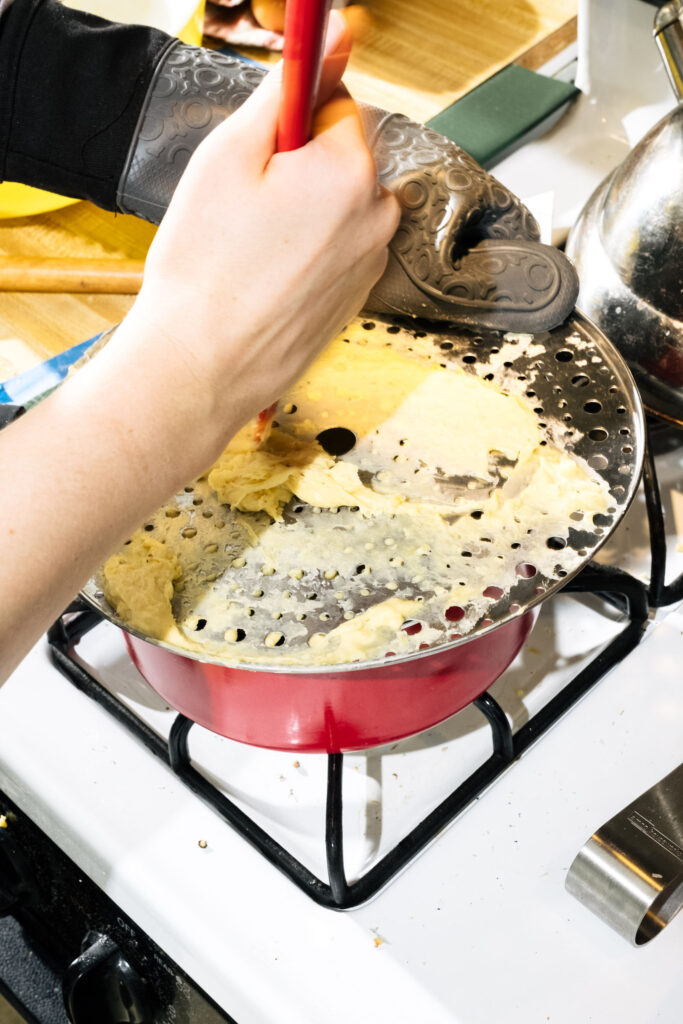
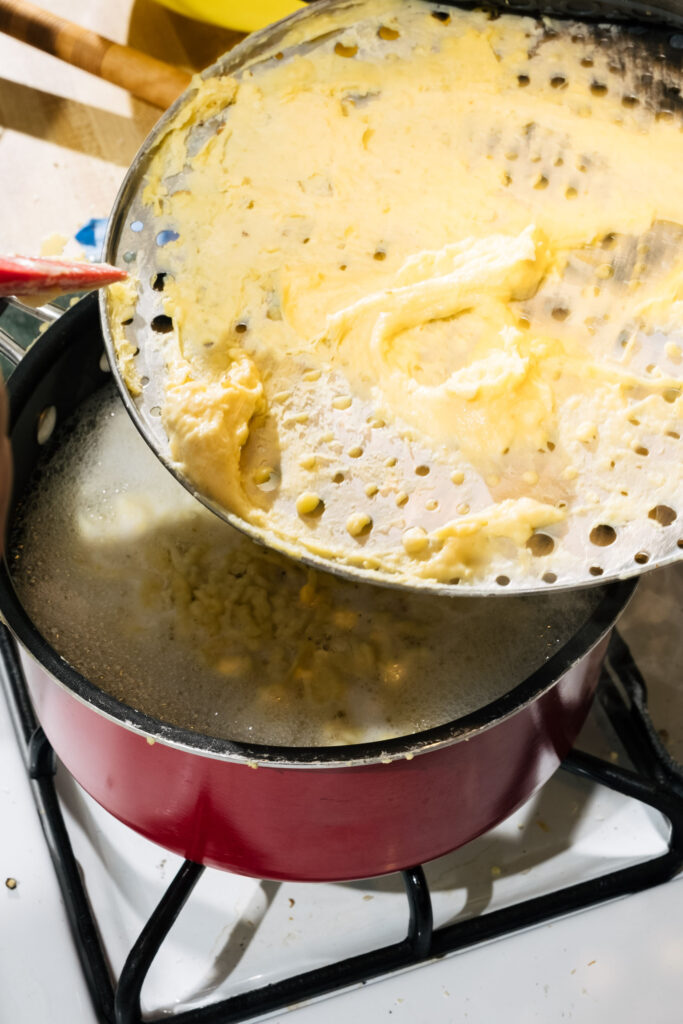
Place a colander with ¼ inch holes, a large slotted spoon, or a spaetzle board over the pot and press the batter through the holes directly into the boiling water. It helps to slightly wet the dough with the boiling water to help soften it as it moves through the holes.
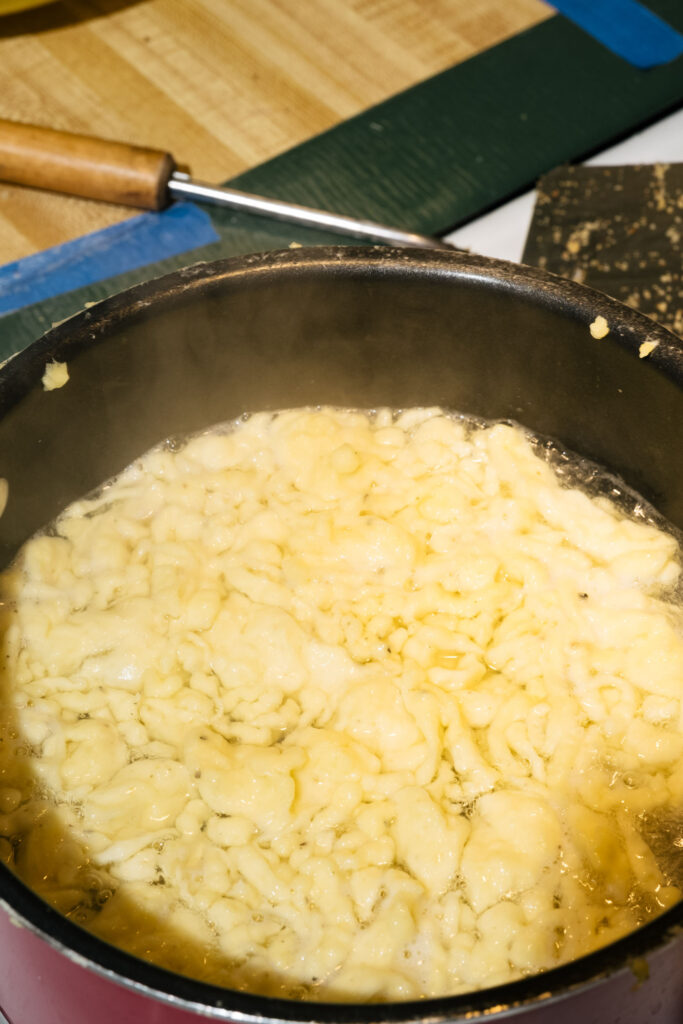
Cook the noodles until they float to the top, around 4 minutes.
Strain and add butter to prevent them from sticking together.
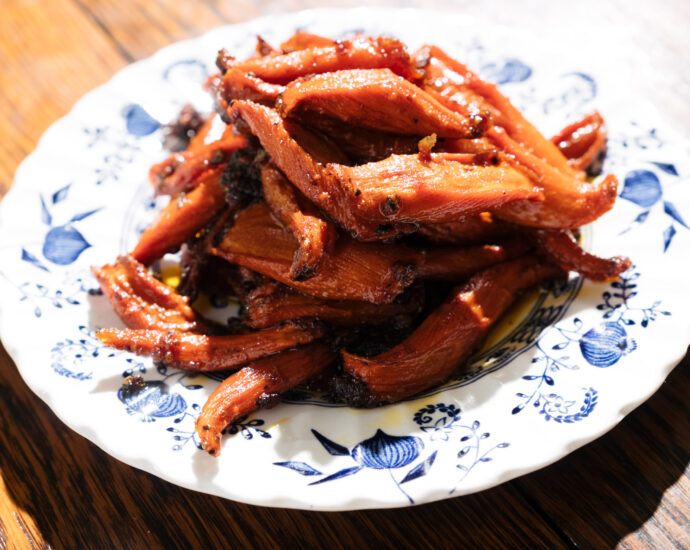
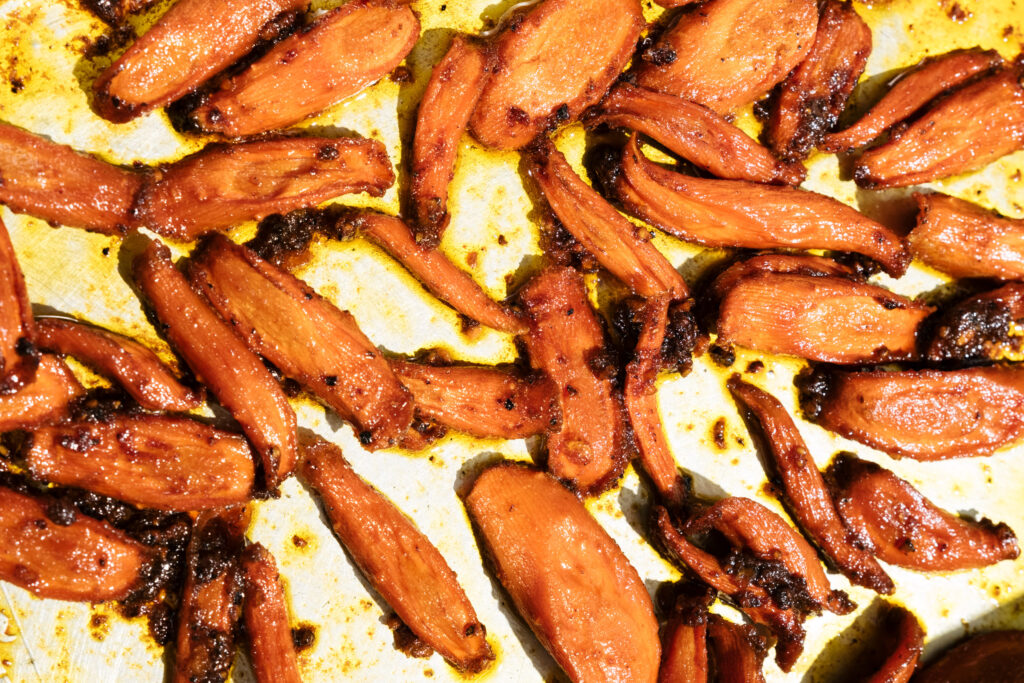
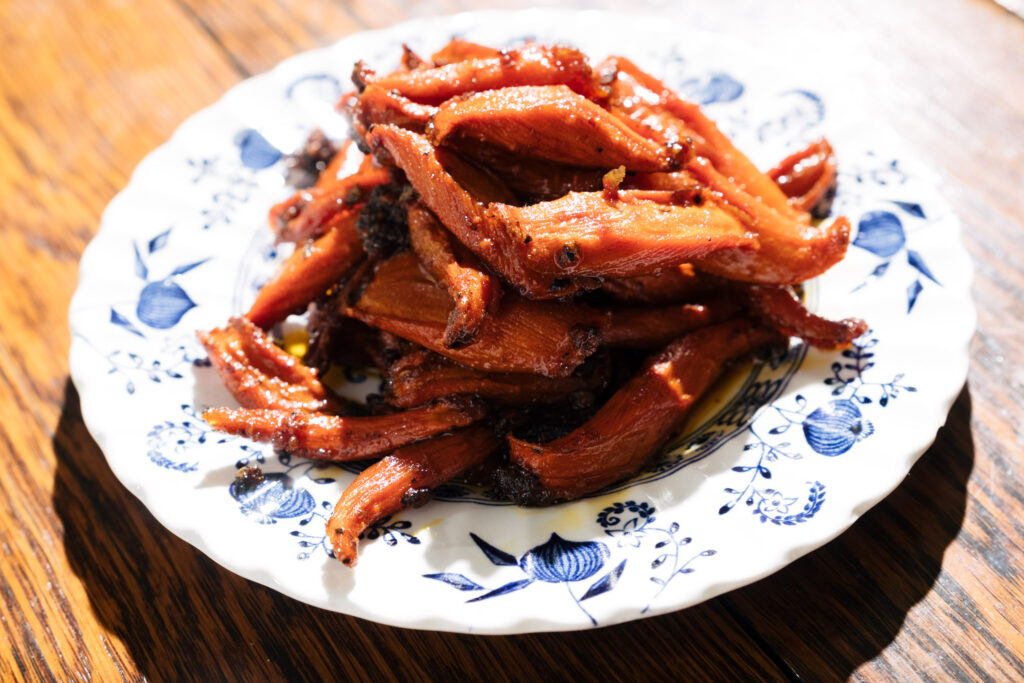
maple candied carrot confit
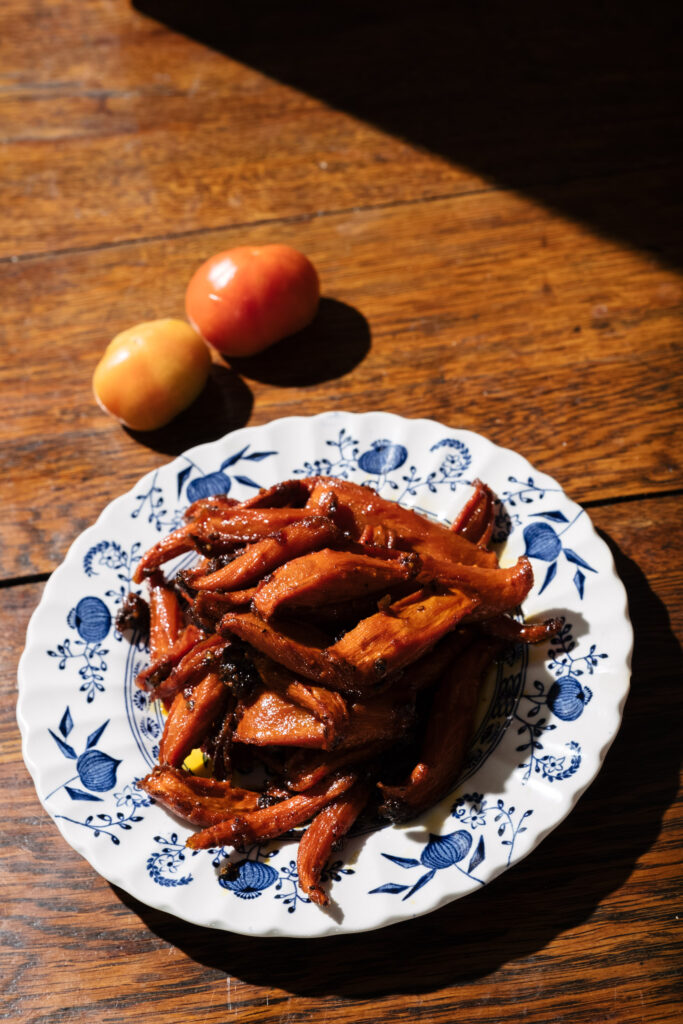
I almost always have carrots around. They are tasty and inexpensive and super versatile. In high school, I used to eat them at swim meets for a boost of natural sugar. Now I’ll have them raw with smoked salt or roasted with tahini, quick-pickled, in my dad’s carrot slaw, or as a stew or soup base in a mirepoix. And then, of course, there’s carrot cake. Here, I present maple candied carrot confit.
I love making carrot confit because it’s so straightforward and very low-maintenance. Just throw your pan in the oven, let the carrots cook slowly, and be amazed at their candy metamorphosis into maple candied carrot confit. Don’t forget to mix them every now and then!
Serves 2-4
ingredients
- 2 pounds of carrots, grated and diagonally sliced
- 4 tablespoons butter
- 4 tablespoons real maple syrup
- 1 teaspoon kosher salt
- ½ teaspoon pepper
- ½ teaspoon garlic powder
- ½ teaspoon smoked paprika
- 1 teaspoon orange zest
steps
Preheat the oven to 275°F. Melt the butter in a small saucepan. Add the maple syrup and stir until combined.
Place the carrots in pan and sprinkle salt, pepper, garlic powder, smoked paprika and orange zest over the top. Evenly pour the maple butter over the top of the carrots and mix using a rubber spatula. Shake the pan so that the carrots evenly cover the bottom of it.
Bake for 3 hours until the carrots are soft.

gluten-free coconut flour cut-out cookies
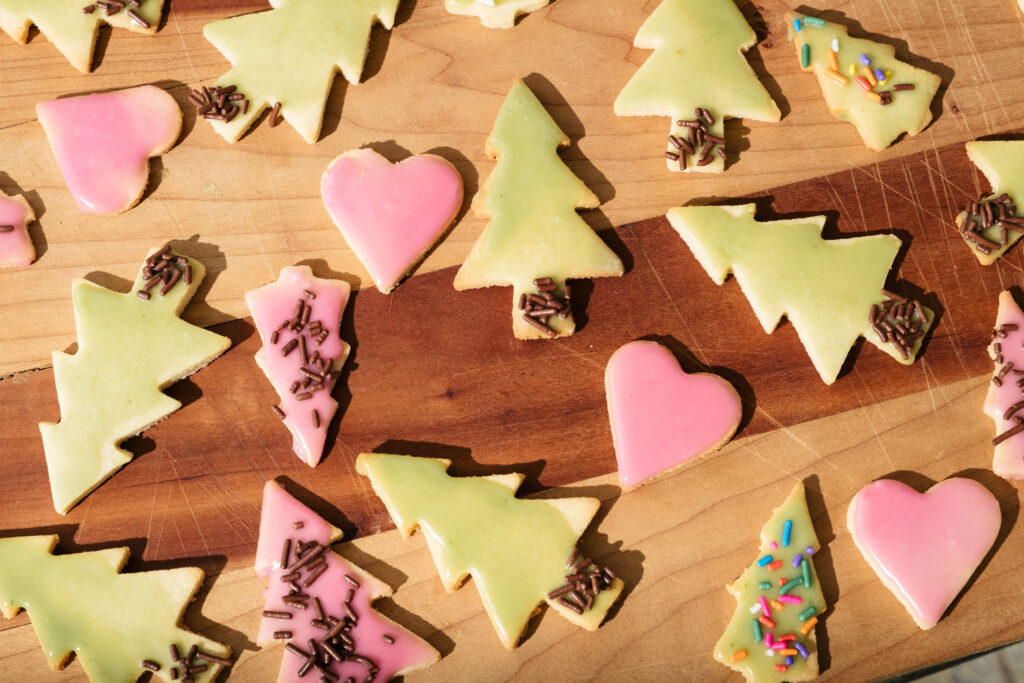
The rain from last night continued into the morning and has now turned into a clean powder that is coating everything in sight. A cozy, snowy day like this is perfect for one thing: baking. Today, coconut flour cut-out cookies.
These cookies will literally melt in your mouth thanks to the coconut flour. They are entirely wheat and gluten-free and even my boyfriend, who strongly dislikes coconut, is a fan. The naturally-colored glaze allows you to enjoy all the glory of Christmas cookie decorating without the harm of artificial additives. Coconut flour cut-out cookies are a semi-virtuous way to celebrate any holiday!
Makes about 2 dozen 2-inch cookies
ingredients
for the cookies
- ¼ cup (½ stick) butter
- 1/2 cup sugar
- 1 egg
- 1/2 cup + 2 tablespoons coconut flour
- ¼ teaspoon baking soda
- ½ teaspoon almond extract
- pinch of kosher salt
for the glaze
- 1 cup confectioners sugar, divided
- 3 teaspoons corn syrup, divided
- ¼ cup kale, roughly chopped
- 4 tablespoons water, divided
- ¼ cup raspberries (or mixed berries)
- ¼ cup sugar
cookie dough steps
In a small bowl, whisk together the coconut flour, salt, and baking soda. Set aside.
In a stand mixer with a paddle attachment or using a hand mixer, beat the butter and sugar until light and fluffy. Add the egg and almond extract.
Slowly add the dry ingredients into the wet ingredients mixing on low until evenly combined.
Form the dough into a ball and wrap with plastic wrap. Refrigerate for 1-2 hours.
Preheat the oven to 325°f. Roll out dough and cut with cutters. Place on a parchment-lined baking sheet and bake for 12 minutes.
Allow to cool completely.
glaze steps
make the red food coloring:
In a saucepan, heat the raspberries, sugar, and 2 tablespoons of water over high heat until they begin to bubble. Simmer, mixing and mashing until the berries start to break down, about 5 minutes. Strain through a mesh sieve.
make the green food coloring:
In a saucepan, heat the kale and remaining 2 tablespoons of water over high heat for about 3 minutes. Place the mixture in a blender and puree until smooth then strain through a mesh sieve.
In a small bowl, combine ½ cup confectioners sugar and 1½ teaspoons of corn syrup with 1½ teaspoons of berry liquid. Mix to combine. In another small bowl, combine the remaining ½ cup of confectioners sugar and 1½ teaspoons corn syrup with 1½ teaspoons green kale liquid. Mix to combine.
Dip the tops of the cookies into the glaze and flip over so they are resting on their bottom sides to let the excess glaze drip off the sides.
Place on cooling rack until glaze hardens.

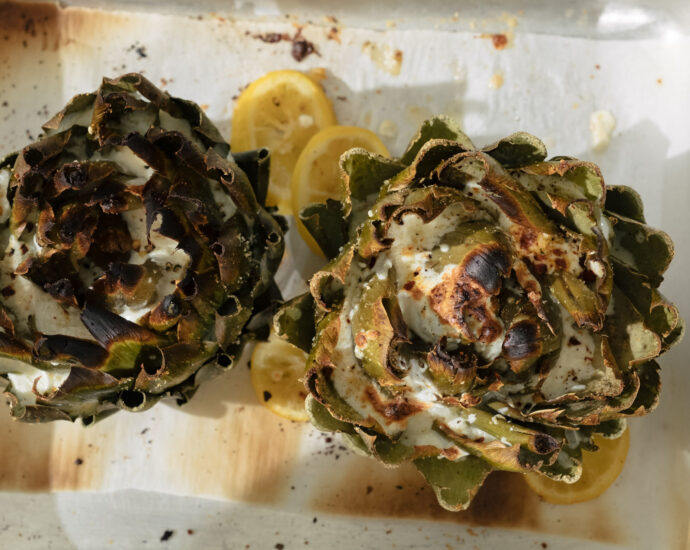
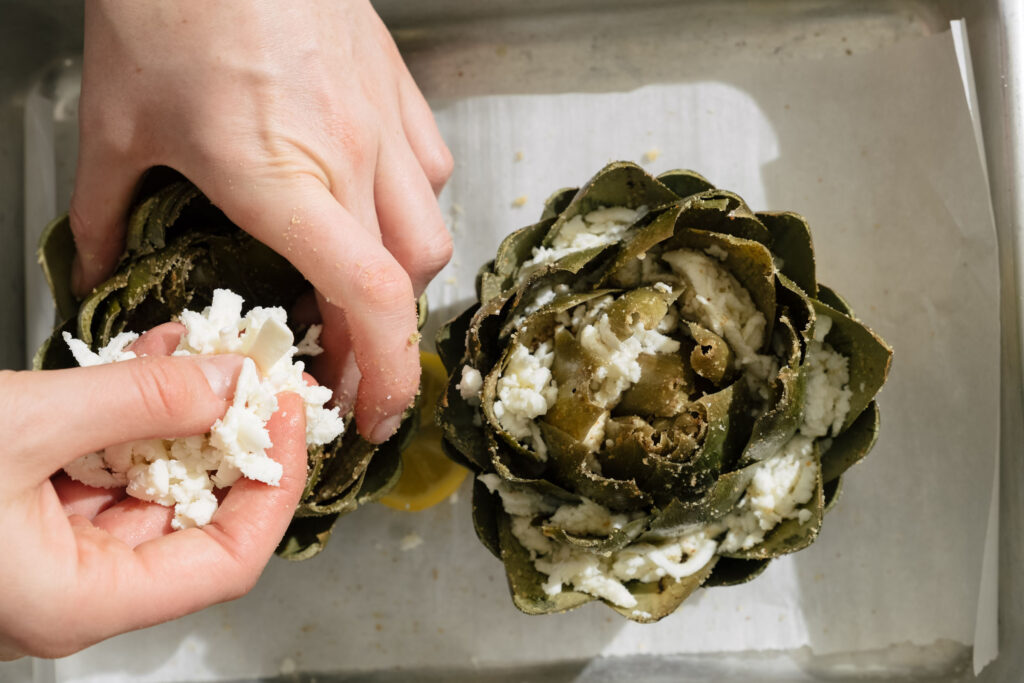
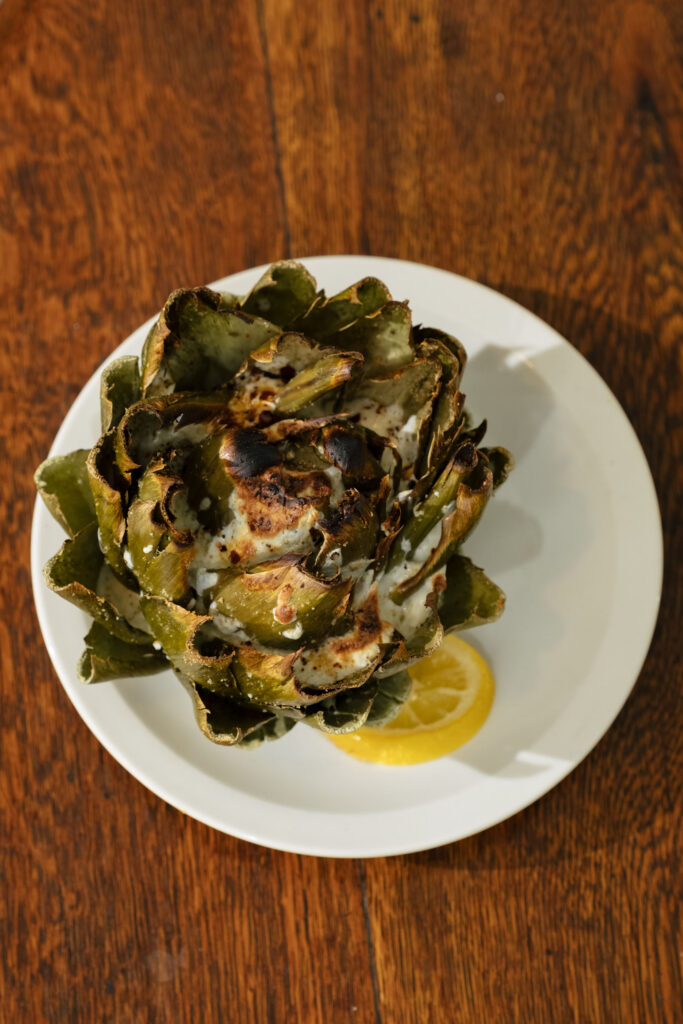
cheesy stuffed artichokes
Today we composted the outdoor gardens in preparation for the cold months ahead. Our community composts regularly and it is always incredible to see how food scraps and everyday waste are turned into nutrients for nature. Preparing for winter left me yearning for one of my favorite cozy dishes – cheesy stuffed artichokes.
I grew up eating this veggie, and though their season is at its peak in March, artichokes are basically available year-round these days. Cheesy stuffed artichokes became a family favorite of mine, as they always seemed so special whenever my parents served it. The recipe is, in fact, pretty simple.
I prepared this recipe for two, with a date in mind, but it can easily be doubled or tripled depending on the number of people you want to feed. Serve these cheesy stuffed artichokes as a side to a simple lemon pasta or as the main event with a glass of wine!
Note: If you only have plain breadcrumbs, you can season them at home with salt, pepper, garlic powder, onion powder, dried oregano, dried parsley, and crushed red pepper!
Serves 2
ingredients
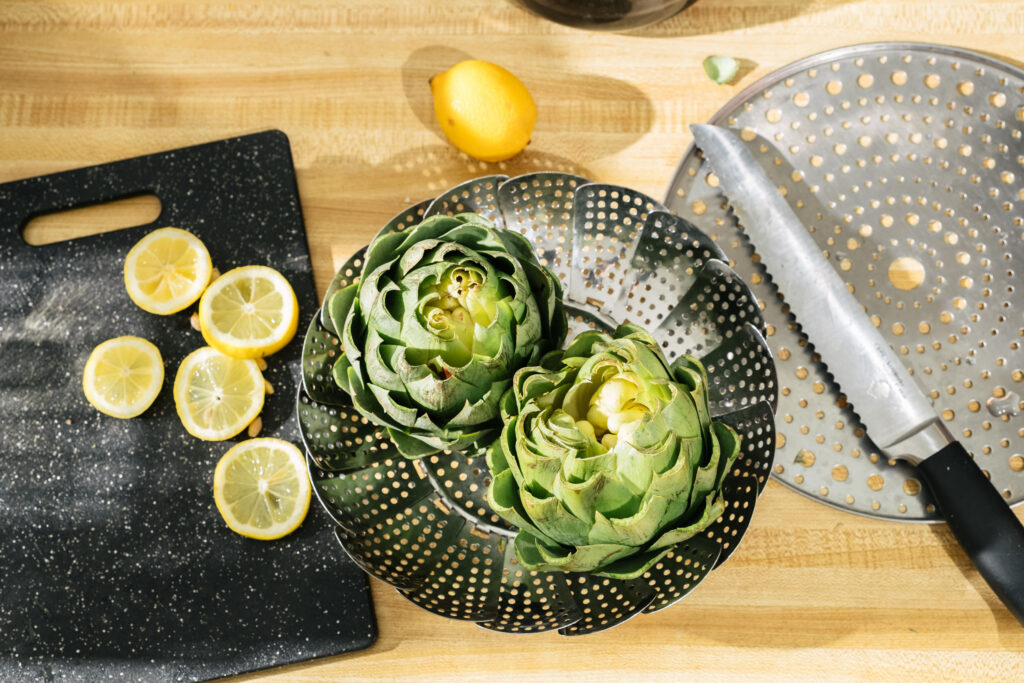
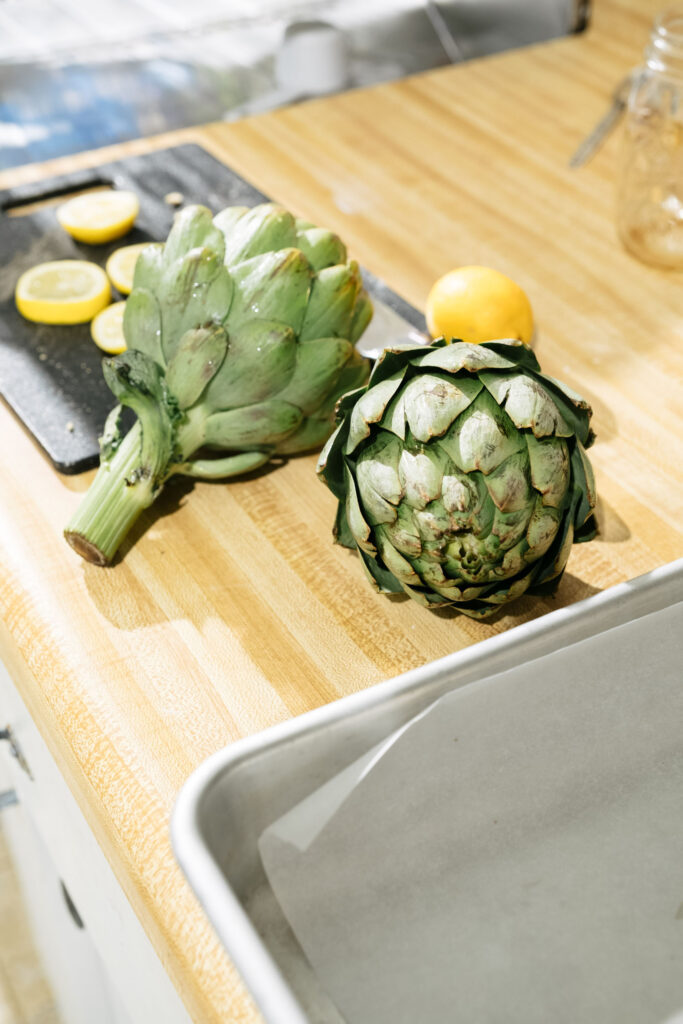
- 4 artichokes (I prefer artichokes with larger leaves as there is more room to stuff!)
- 1 lemon, sliced
- 4 teaspoons olive oil
- 1 cup seasoned breadcrumbs
- 1 cup shredded mozzarella
steps
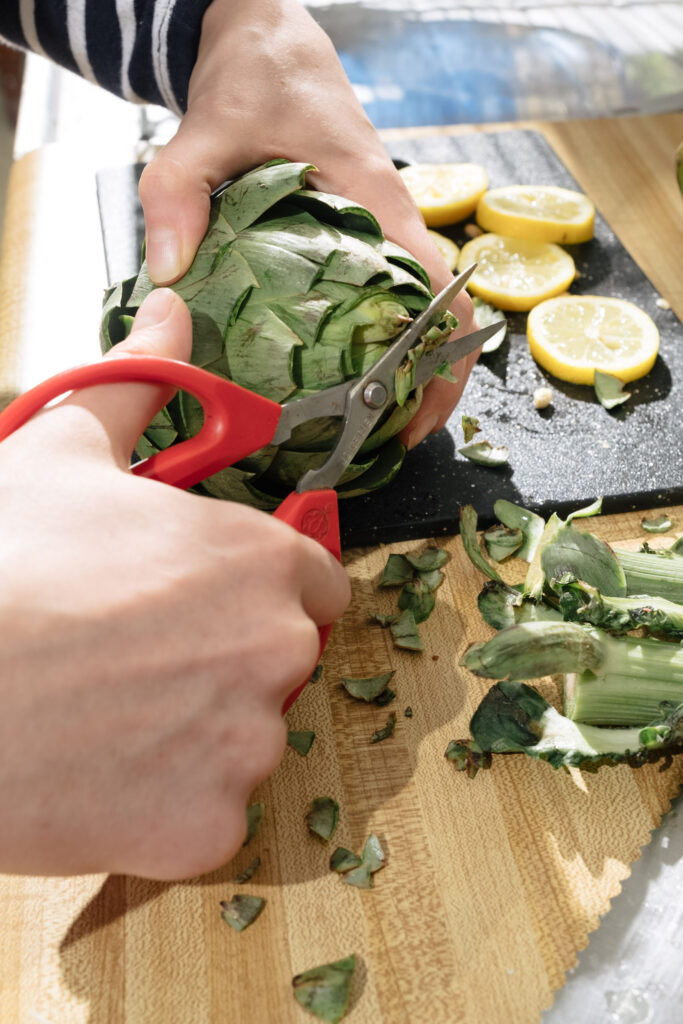
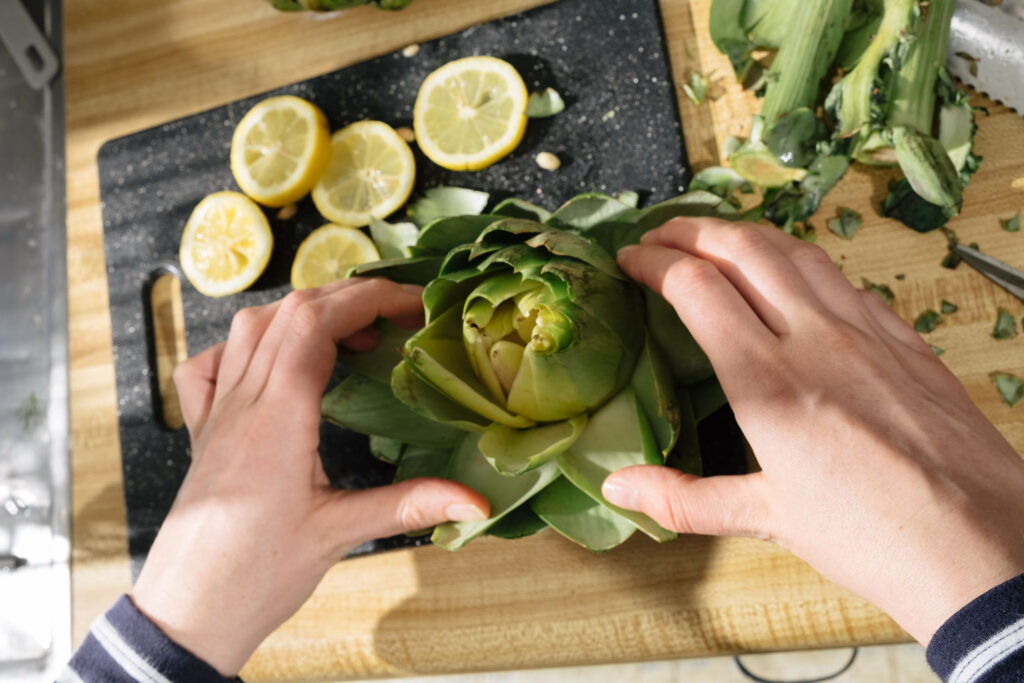
Turn the oven broiler on. Wash the artichokes, cut their stems to make flat bottoms, and snip the tops of artichoke leaves (they can be very sharp!) Pull back the leaves to loosen them.
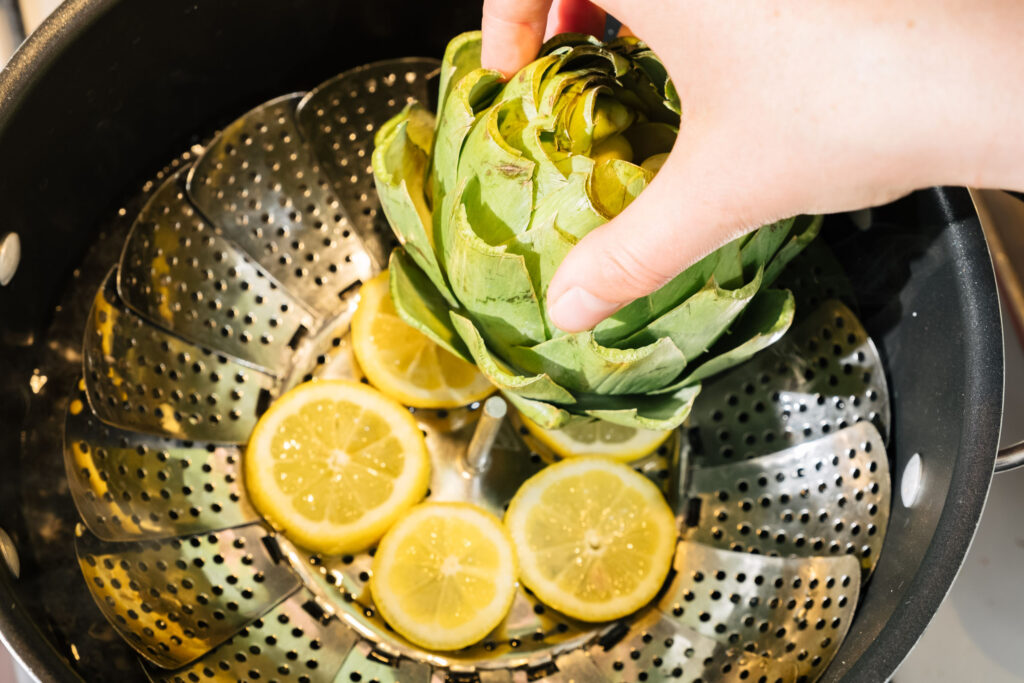
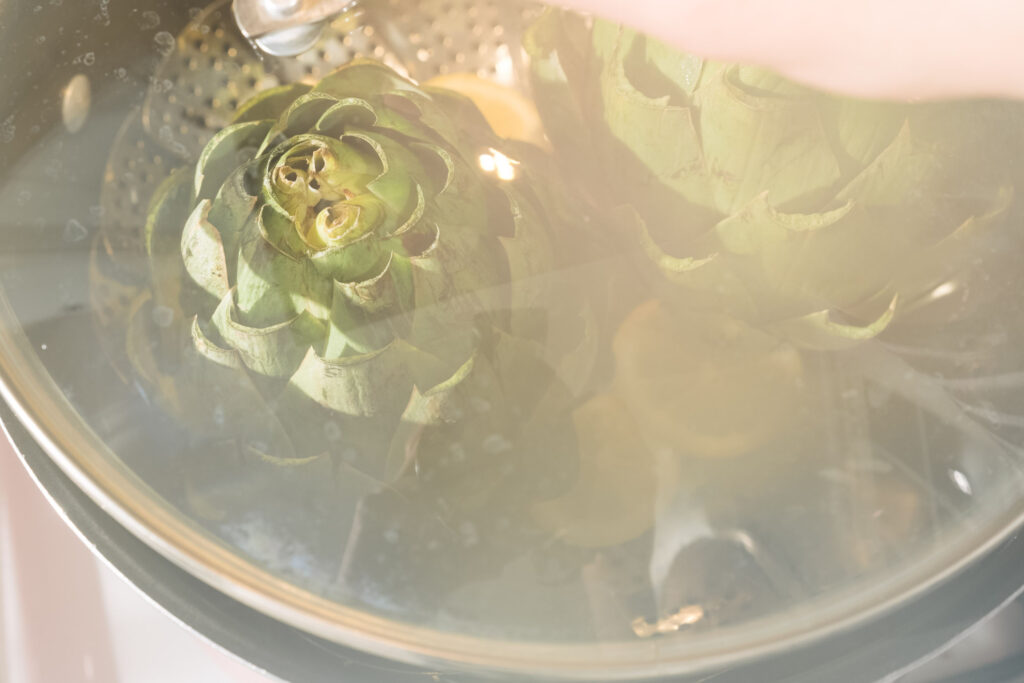
Bring a pot of water to a boil. Place a steamer basket or a colander inside. Lay slices of lemon directly on the steamer basket or colander and place artichokes directly on the lemon slices. Cover with a lid and steam for 20 minutes.
Remove the artichokes from the pot and let cool for 5 minutes or until they are cool enough to the touch without burning your fingers!
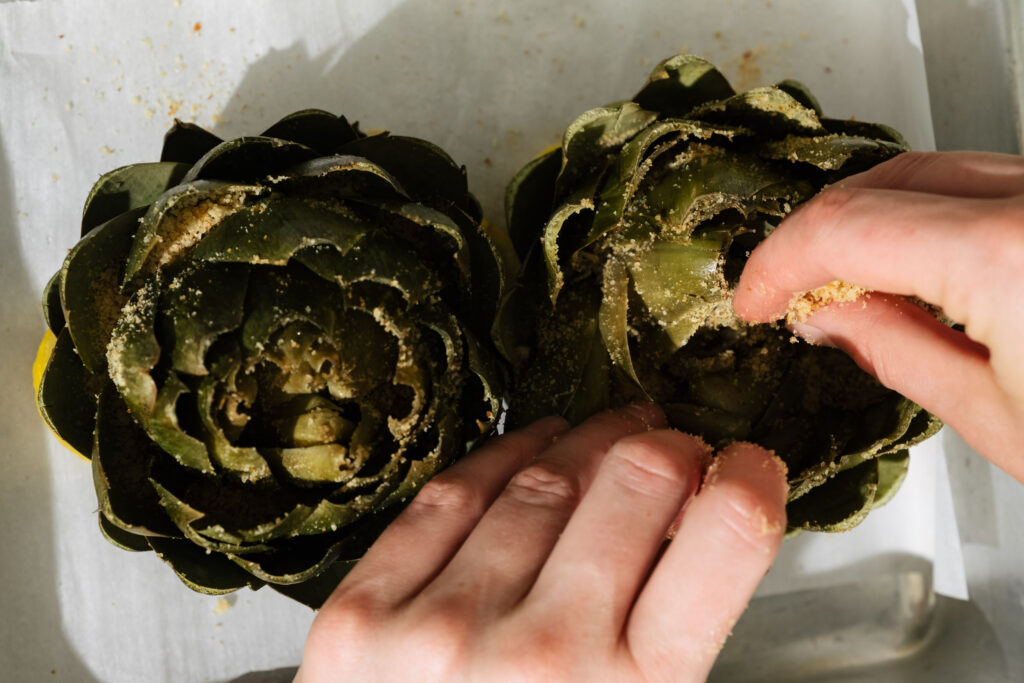
Place the steamed lemon slices beneath the artichokes on a pan lined with parchment paper. Separate the artichoke leaves and drizzle olive oil inside. Fill the leaves with seasoned breadcrumbs first, then tuck mozzarella inside the leaves. Be sure to evenly distribute the breadcrumbs and mozzarella among every leaf to ensure every bite is tasty!
Place in the broiler for 7-10 minutes until cheese is bubbly and browning and leaves are crisp.

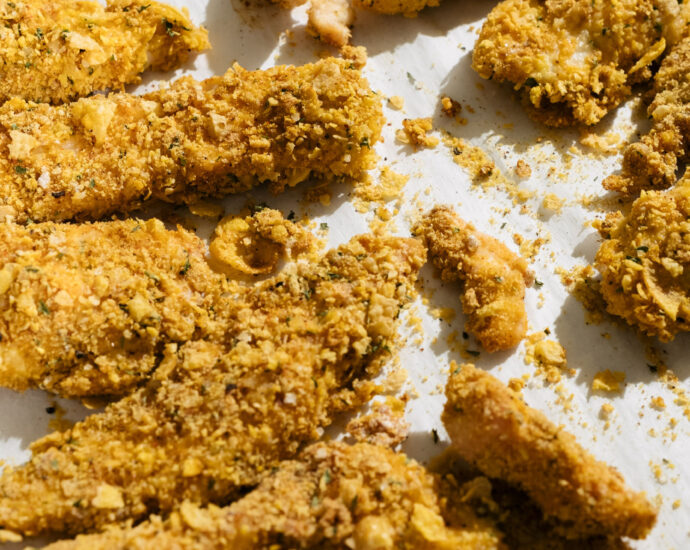
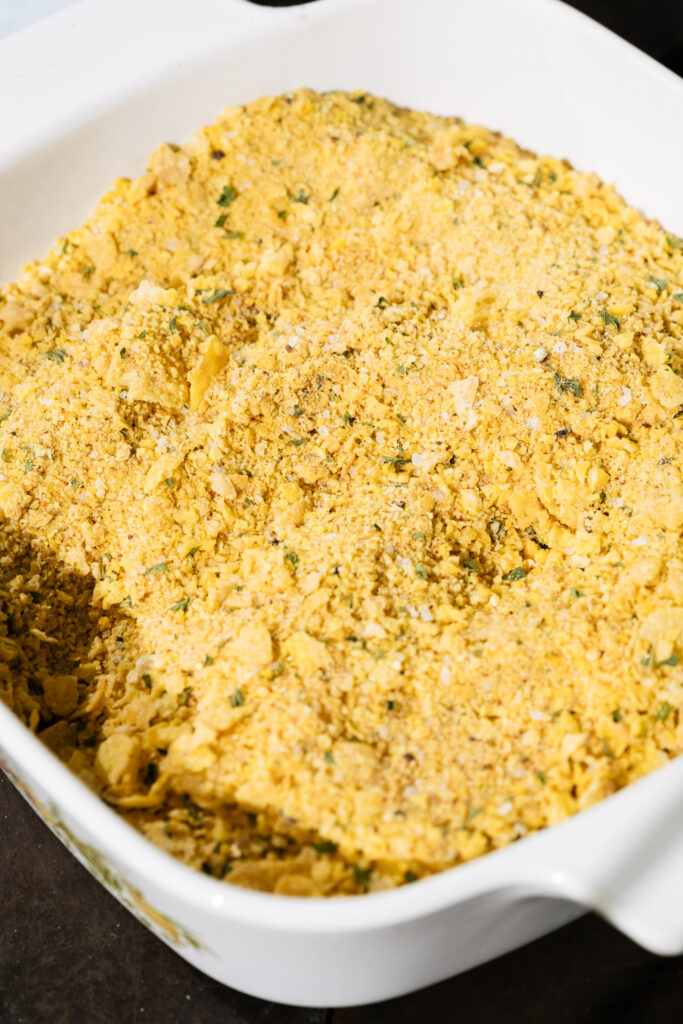
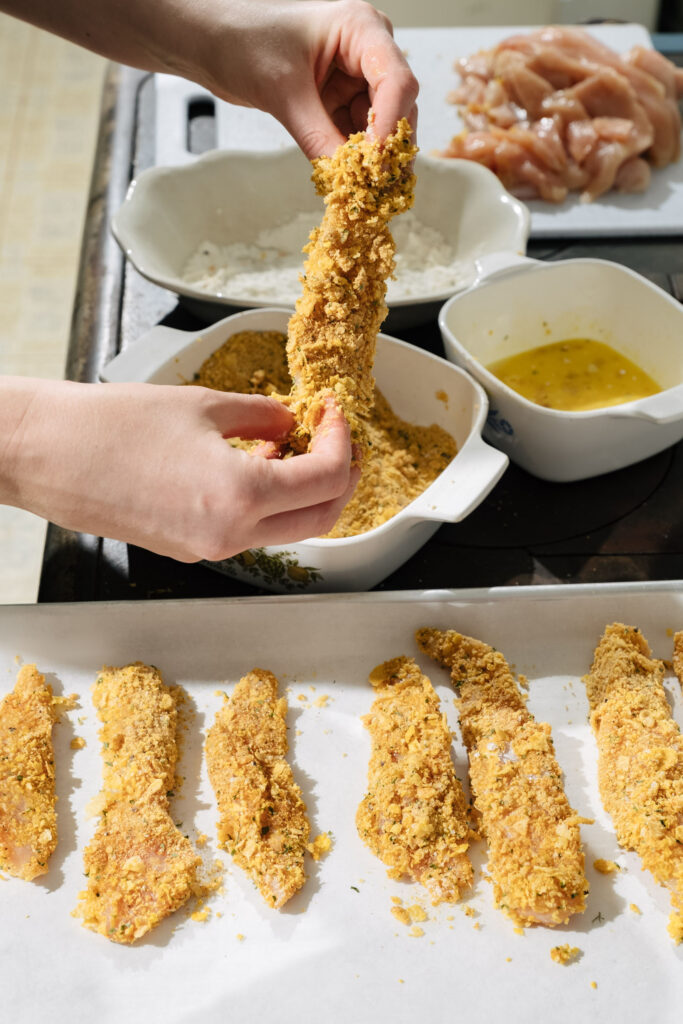
spicy cornflaked chicken tenders
Yesterday was the first snowfall of the winter season, and with festive decorations popping up everywhere, it officially feels like the holidays are in full swing. I am heartened by the amount of holiday spirit I have seen so far this season, despite the innumerable tragedies plaguing our world. In nearly every window I pass, there are twinkling lights and colorful decor to remind us that small wonders still exist!
For most of us, the holidays are synonymous with celebrations and parties, and parties are often synonymous with food and drinks. I love party food, any and all of it. Perhaps it is the mere association with festivities that makes it so full of flavor or the instant gratification that comes with popping it in your mouth.
When I was little, I remember parties being filled with classic finger-food appetizers like pigs and blankets, bacon wrapped scallops, stuffed mushrooms, mini quiches, and bite-size spanakopita. Be it the most interesting and unique canapés or retro snacks like deviled-eggs, I am a huge fan of indulging in party food.
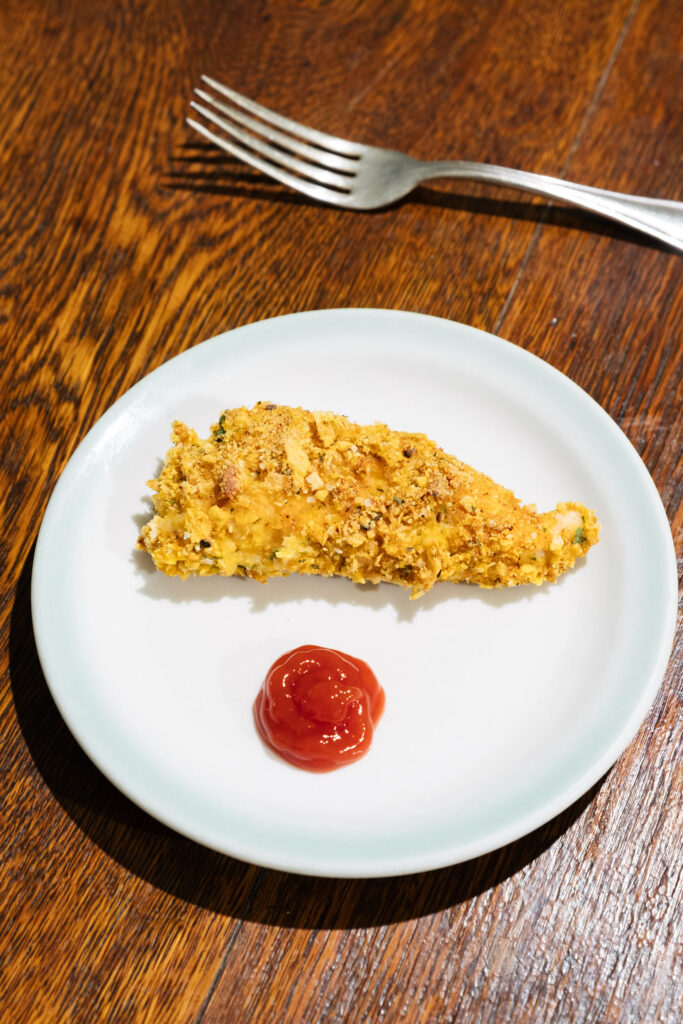
Even though our gatherings may be a bit quieter this year, we can still imagine ways to celebrate the season. These spicy cornflaked chicken tenders are a perfect menu item for any sized party. They are a twist on a timeless classic [chicken fingers!] that can be made ahead of time and scaled up or down, to suit the audience you are serving!
This recipe for spicy cornflaked chicken tenders is reliable and sure to please merrymakers of all ages. You can experiment with different spices, but this is the mixture that I feel accentuates the flavor best.
Note: Chicken tenders are really just boneless, skinless chicken breasts cut into that distinctive “tender” shape. You can save money by buying chicken breasts and cutting them into “tenders” yourself.
Serves 6
ingredients
- 2 ½ pounds boneless skinless chicken breasts
- 4 ½ cups of cornflakes
- 2 eggs
- ½ cup flour
- 1 teaspoon freshly ground black pepper
- 1 tablespoon kosher salt
- 1 tablespoon dried parsley
- 2 teaspoons garlic powder
- 2 teaspoons onion powder
- 1 teaspoon smoked paprika
- 1 teaspoon cayenne pepper
- 1 teaspoon chipotle pepper
steps
Preheat the oven to 400°F (200°C). Trim the chicken breasts and cut into long strips.
Place the eggs in a shallow bowl or dish and beat with a whisk until combined. Place the flour into a separate shallow bowl or dish and mix in 1 teaspoon of freshly ground black pepper.
Grind the cornflakes in a food processor or place in a large plastic freezer bag, seal, and roll with a rolling pin to make into a breadcrumb-like mixture.
Pour into a bowl and mix in salt, dried parsley, garlic powder, onion powder, smoked paprika, cayenne pepper, and chipotle pepper until evenly combined.
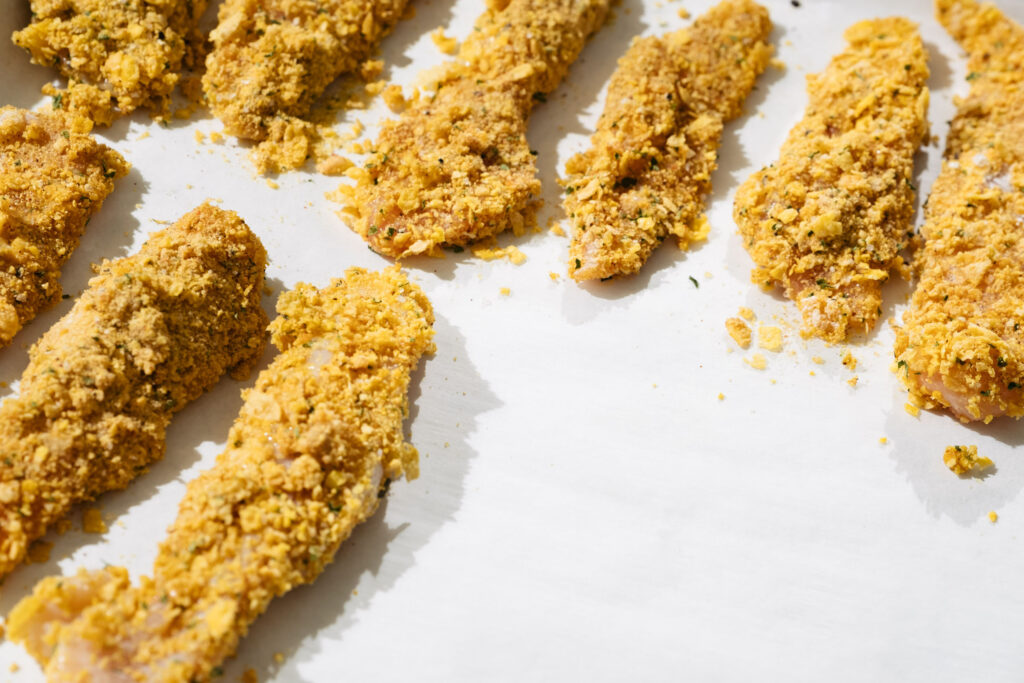
Dip one piece of the chicken into the flour, then into the egg, then into the cornflake mixture and place on a baking sheet lined with parchment paper. Repeat until all pieces of chicken have been thoroughly coated.
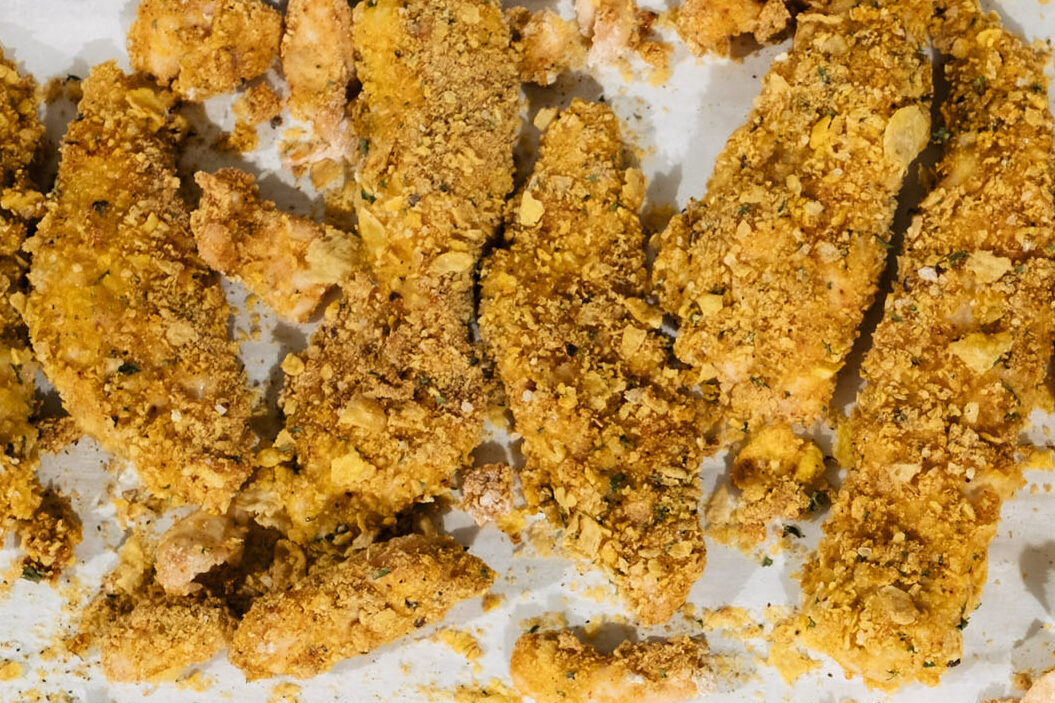
Bake for 22 minutes, flipping the chicken tenders after 10 minutes so both sides cook evenly. Rotate a third time and bake 2 more minutes for extra crunch.
Serve with any dipping sauce you’d like. I recommend ketchup, honey mustard, harissa aioli, yogurt ranch, anything your heart desires!


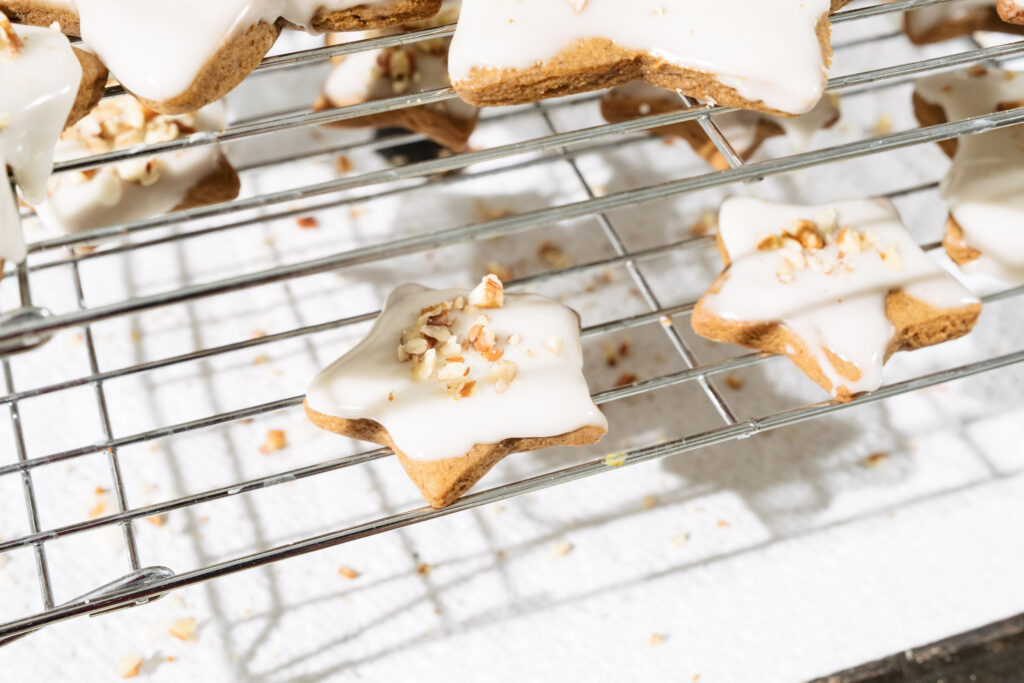
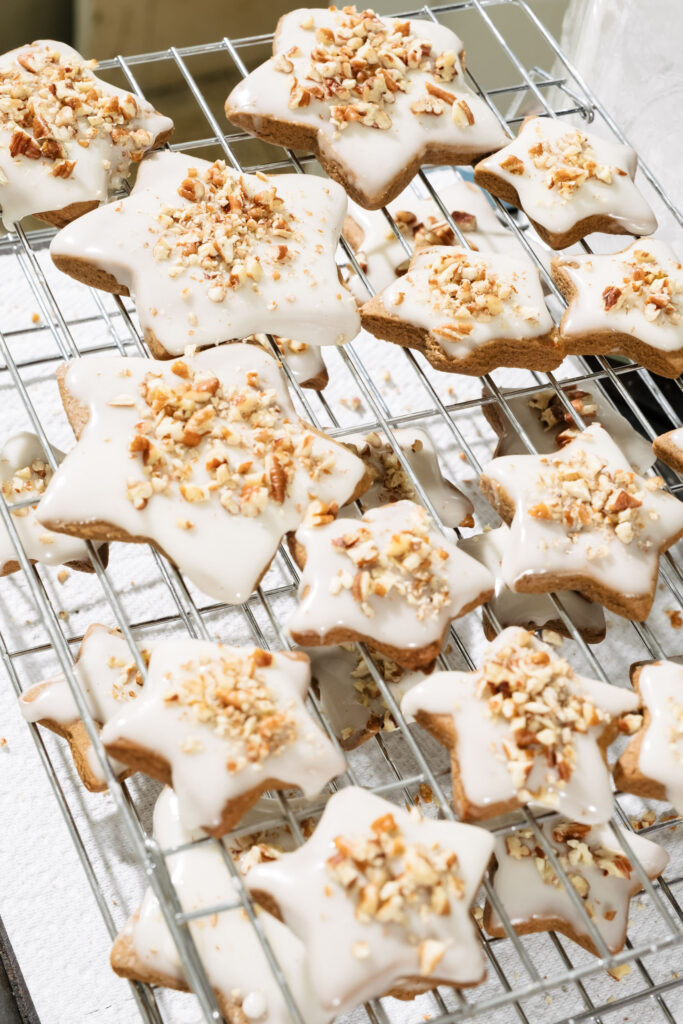
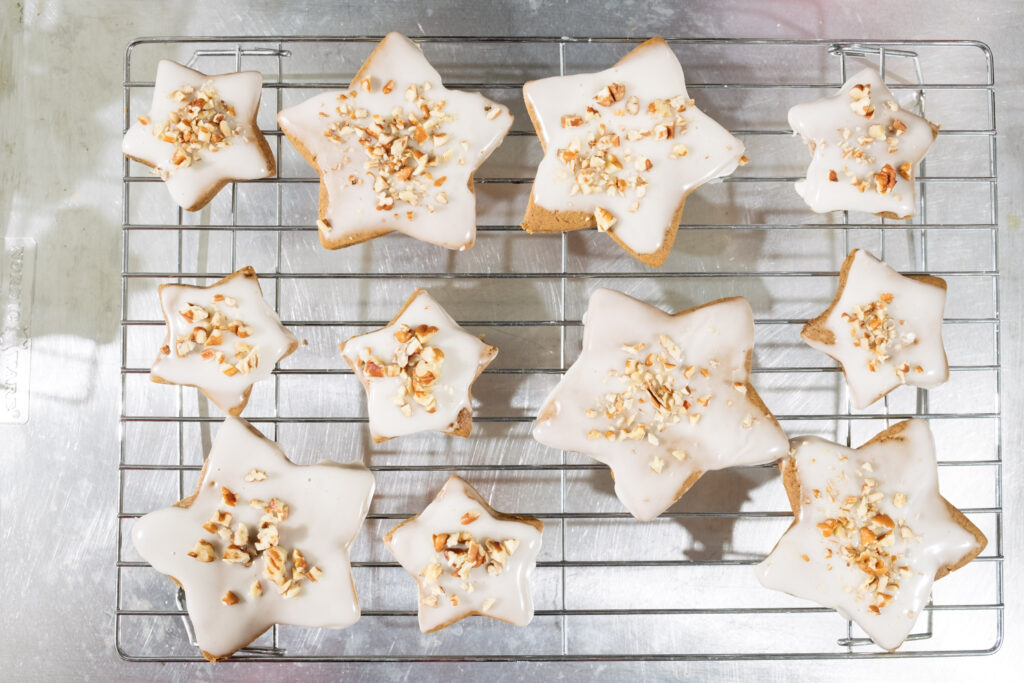
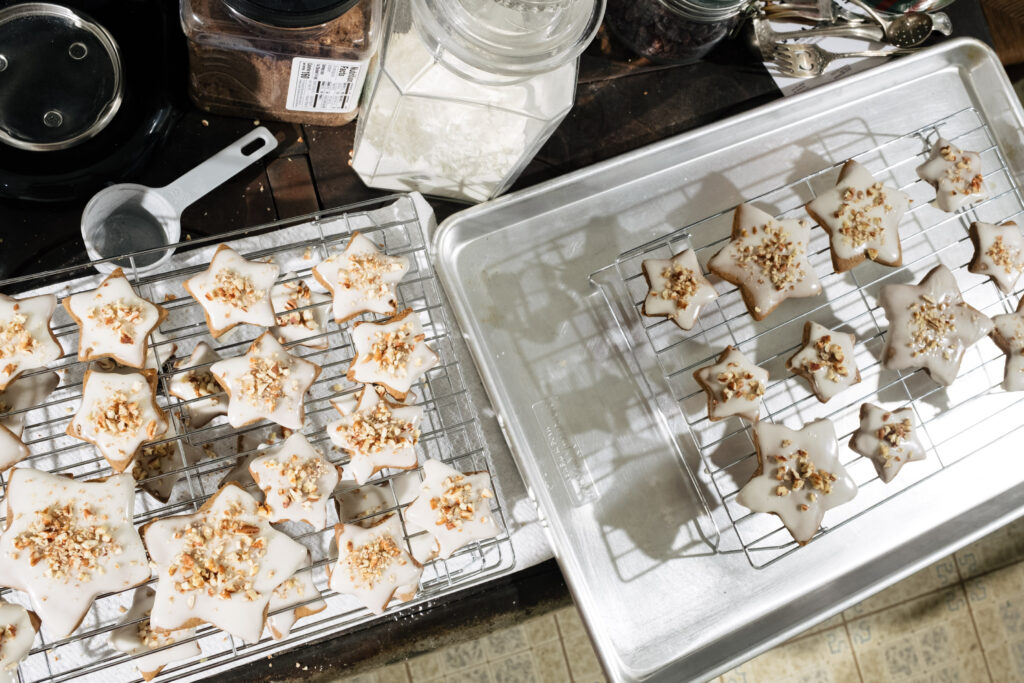
ginger molasses stars with maple pecan glaze
With all of the endless horrors going on in the world right now, I, per usual, have channeled the stress and nervous energy I am feeling into cooking and baking. For me, it is quite meditative and relaxing and most importantly, creative. Now more than ever, it is so crucial to find creative outlets and forms of expression to offload and expel anxiety, negativity, pain. Cooking and baking are also pretty physical activities, and for me, it is essential that I exercise and move, especially as the weather is cooling down and it feels uncomfortable to go outside.
To me, these ginger molasses stars are a winter wonderland in cookie form. The layers of warm and cozy spices create a super complex and nuanced flavor which evenly spreads throughout every bite. Toasting the pecans releases more of the buttery pecan flavor which complements the maple glaze well.
Feel free to experiment with your extracts here. I personally love maple, but vanilla, almond, chocolate, rum, etc could all work beautifully.
With these cookies, the thicker you roll out the dough, the chewier the ginger molasses stars will be.
***
Makes about 2 dozen cookies
Ingredients
for the cookies
- 3 cups all-purpose flour, plus more for work surface
- ½ teaspoon baking soda
- ¼ teaspoon baking powder
- 2 teaspoons ground ginger
- 2 teaspoons ground cinnamon
- ¾ teaspoon ground cloves
- ¼ teaspoon cardamom
- ½ teaspoon kosher salt
- ¼ teaspoon finely ground pepper
- ½ cup (1 stick or 1/4 pound) unsalted butter (at room temperature)
- ½ cup packed dark-brown sugar
- 1 large egg
- ½ cup unsulfured molasses
for the glaze and topping
- 2 cups confectioners sugar, sifted
- 2 tablespoons corn syrup
- 2-3 tablespoons half and half or milk
- 2 teaspoons maple extract
- ½ cup pecans, toasted and finely chopped
Cookie dough steps
In a medium bowl, whisk together the flour, baking soda, baking powder, spices, salt and pepper and set aside.
Beat the butter and brown sugar using an electric mixer with a paddle attachment or hand mixer until fluffy. Add in egg and molasses and beat until combined.
Slowly beat in the flour mixture until dough is evenly combined. Don’t overbeat.
Divide the dough into two and wrap separately in plastic wrap. Refrigerate for 1-2 hours
Preheat the oven to 350°F and line a baking sheet with parchment paper. Roll out dough on a floured surface to about ⅓ of an inch thick and cut into star shapes. Bake for 10-12 minutes. They will be soft when you remove them from the oven but will solidify and become chewy once they cool.
Glaze and topping steps
Place confectioners sugar, corn syrup, half and half, and maple extract in a bowl. Whisk to thoroughly combine. Dip tops of stars into glaze, allowing the excess to drip off the sides.
Sprinkle with pecans and place on cooling rack until glaze dries and hardens.