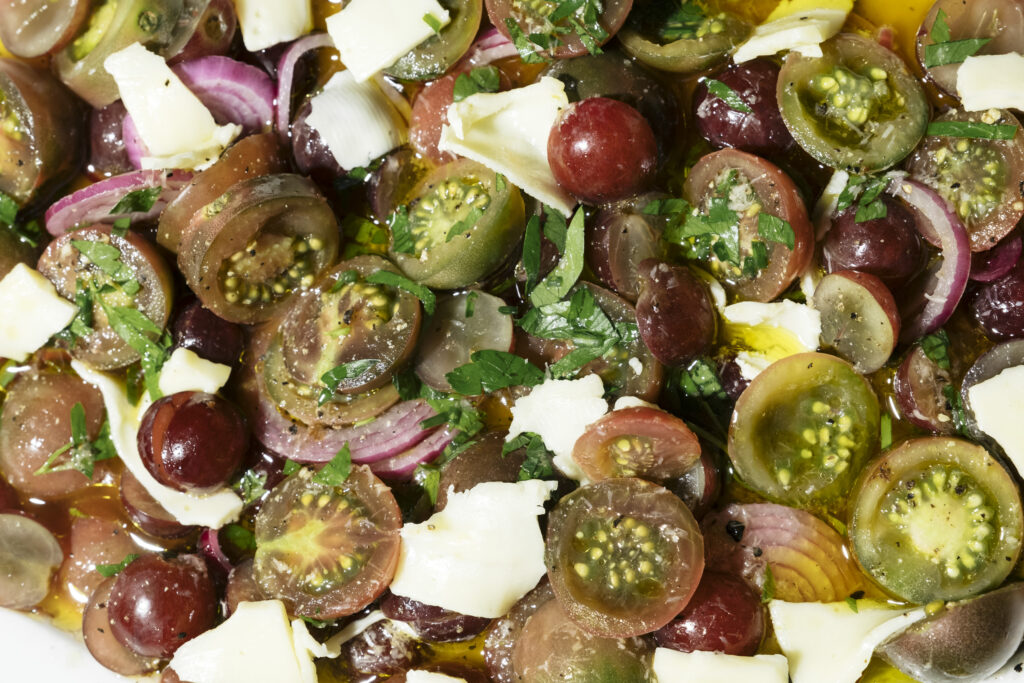
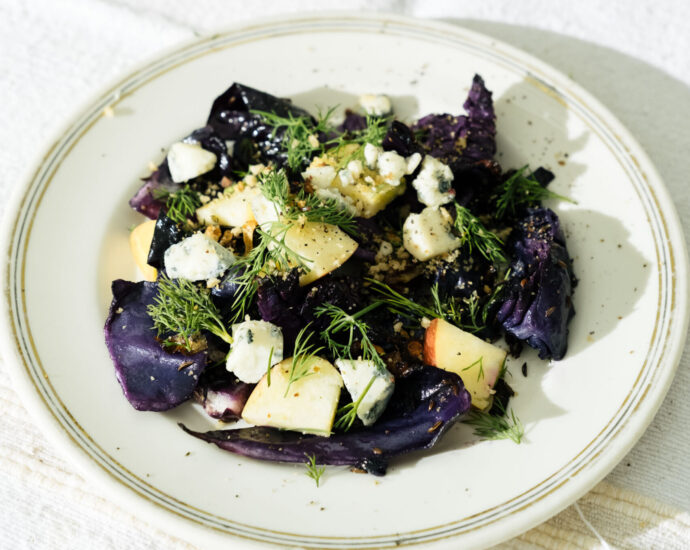
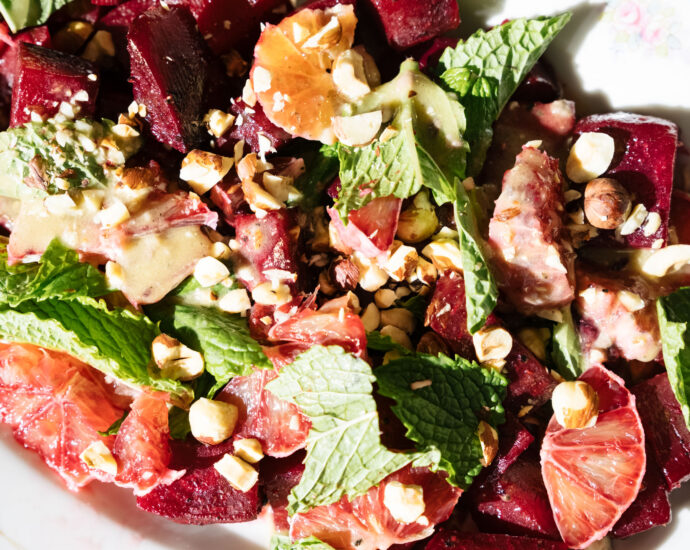
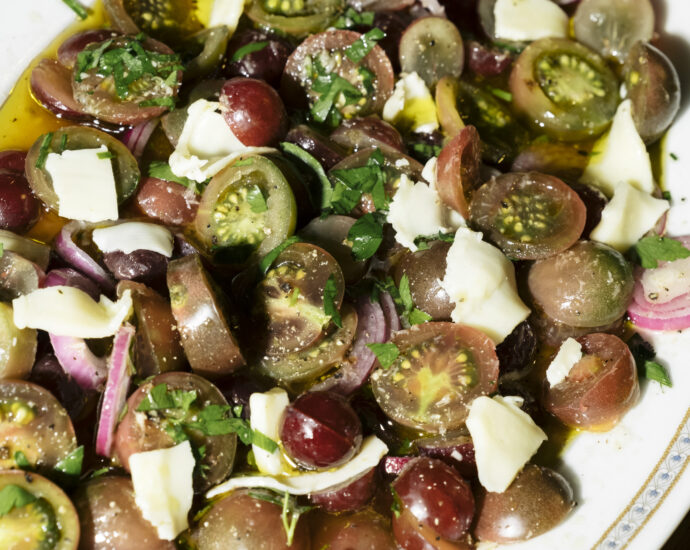
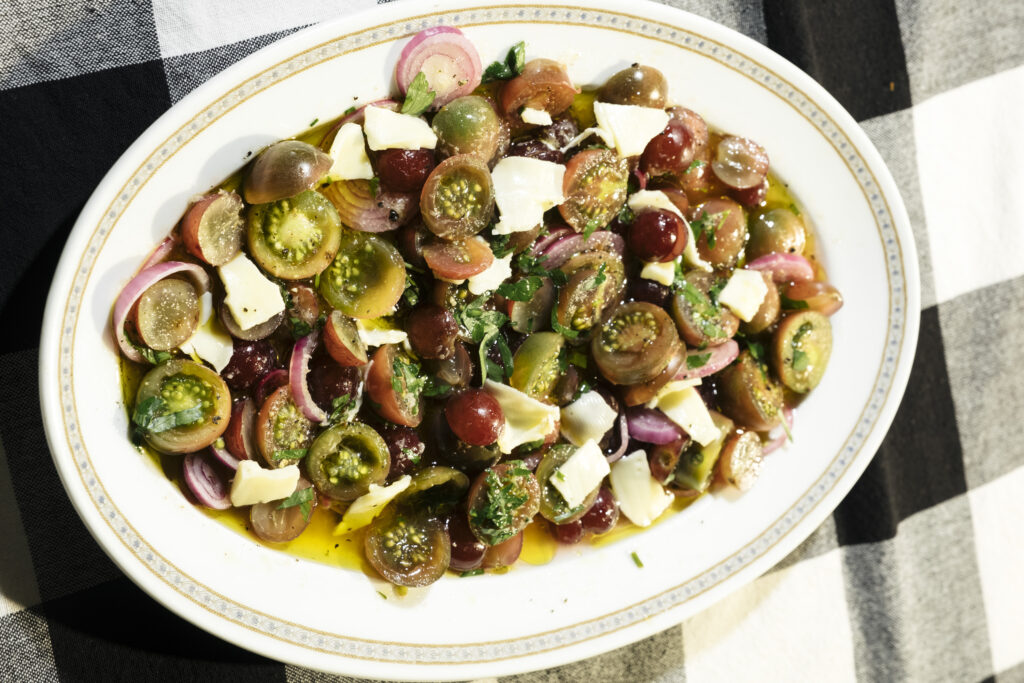
vegetables

Vegetables are the foundation of any healthy diet. I am constantly experimenting with creative ways to incorporate more vegetables into my daily meals. These are some of the recipes I have created which can be served as a snack, a side, or a main dish.

Chocolate tomatoes are a type of small heirloom tomato whose skin turns a purpley-brown color (hence, chocolate) that we grow in our garden. You can find them at local farm stands or farmers markets. They may be small, but they are full of deep flavor. Horseradish chocolate tomato and grape salad is tart and spicy and slightly sweet from the tomatoes.

Shaved horseradish cheddar and a horseradish vinaigrette make this salad savory and salty. The flavors are similar to that of a bloody mary which, I don’t know about you, but is one of my favorite cocktails. This tomato and grape salad includes remnants of summer with a hearty spice and comfort of winter. The purple hues are even similar to that of a fall mum, perfect for this time of year.

serves 3-4

ingredients

for the vinaigrette

  • 2 teaspoons prepared horseradish (I used hot)
  • ¼ cup red wine vinegar
  • ¼ teaspoon salt
  • ½ teaspoon freshly cracked black pepper
  • ¼ cup extra virgin olive oil

for the salad

  • 1 cup chocolate or grape tomatoes, some halved, some sliced
  • ½ cup red grapes, halved
  • 1 small red onion, sliced into rings

for the assembly

  • 4 ounces horseradish cheddar cheese, thinly shaved or sliced
  • 1/4 cup fresh basil, loosely packed, chopped
  • 1/4 cup fresh parsley, loosely packed, chopped

steps

Prepare the vinaigrette and let it sit while you arrange the salad by whisking together the horseradish, red wine vinegar, salt, and pepper in a bowl. Slowly drizzle in the olive oil as you continue to whisk to allow the dressing to properly emulsify. Set it aside and arrange the tomatoes, grapes, and red onion on a large plate or dish. Scatter the horseradish cheddar cheese, basil, and parsley over the top of the salad then pour the vinaigrette over the top of the salad. Let the salad sit for 30 minutes to 1 hour before serving. This salad is best when enjoyed day-of.

Orange and a blend of spicy red pepper is one of my favorite flavor combinations to prepare chicken with. The sweetness and acid of the orange balances the heat and punch of the red pepper, creating a a marinade that is kind of like a spicy margarita, with equal parts sweetness, spice, and salt. This dish of spicy orange chicken, blistered corn and green peppers, and flat fries with spicy orange aioli incorporates that flavor combo into a meal complete with a bounty of summer vegetables. This is a very forgiving recipe, as it can be made in a variety of vessels, grilled, roasted or seared in a pan, but the flavors are the consistent stars.

The key is to marinate the chicken for a few hours before cooking, as the acid really gets the juices flowing and tenderizes the meat. It almost jump-starts the cooking process. The aioli can be made in advance, while the chicken, vegetables, and flat fries are best when served hot. I used green bell peppers here, which I believe are highly underrated, but any pepper would benefit from this flavor and blistering process. This spicy orange chicken marinade infuses the chicken with heat and flavor which when cooked, retains its juicy seasoning.

serves 4

ingredients

for the spicy orange chicken

  • 1 cup freshly squeezed orange juice
  • ¼ cup orange zest
  • 2 garlic cloves, minced
  • 1 tablespoon maple syrup
  • 1 tablespoon chili powder
  • 1 tablespoon smoked paprika
  • 2 teaspoons cayenne pepper
  • 2 pounds boneless skinless chicken breasts, sliced horizontally into thick strips
  • 1 tablespoon olive oil

for the spicy orange aioli

  • 1 egg yolk
  • 2 garlic cloves, minced
  • 1 tablespoon lemon juice
  • 2 teaspoons mustard
  • ½ cup neutral oil
  • 1 teaspoon chili powder
  • 1 teaspoon smoked paprika
  • ½ teaspoon cayenne pepper
  • ¼ teaspoon freshly cracked black pepper
  • 1 teaspoon orange zest

for the flat fries

  • 2 pounds yukon gold potatoes, sliced into ¼ inch rounds
  • 2 gallons of water
  • ¼ cup baking soda
  • ¼ cup olive oil
  • 2 teaspoons salt
  • 1 teaspoon freshly cracked black pepper

for the corn and green peppers

  • 2 tablespoons neutral oil
  • ½ red onion, diced 
  • 4 ears of corn, husked and with the corn sliced off
  • 2 green bell peppers, cut into 2-inch chunks
  • ¼ cup freshly squeezed lime juice, divided
  • 1 teaspoon salt, divided 
  • ½ teaspoon freshly cracked black pepper, divided
  • ¼ teaspoon crushed red pepper flakes

for assembly

  • 1 bunch cilantro, chopped
  • Juice of 1 lime

chicken steps

2-4 hours before you are ready to begin cooking, whisk together the orange juice, orange zest, garlic, maple syrup, chili powder, smoked paprika, and cayenne. Place the chicken in a large dish or bowl and cover with the marinade. Let sit for 2-4 hours until you are ready to cook.

Once the chicken has marinated, heat a large skillet over medium high heat and add the olive oil. Place the chicken in a flat even layer on the pan and cook for 10-12 minutes on the first side, then flip and cook for another 10-12 minutes.

spicy orange aioli steps

In a large bowl, whisk together the egg yolk, garlic, lemon juice, and mustard until combined. Slowly drizzle in the oil, while continuing to whisk vigorously until the mixture comes together, this is called emulsification. Add in the chili powder, smoked paprika, cayenne, black pepper, and orange zest. Set aside. 

flat fries steps

Preheat the oven to 425°F. Place the sliced potatoes in a large bowl and cover them in the water and baking soda, allowing them to soak for 30 minutes to an hour. This helps extract some of the starch, allowing the potatoes to be their crispiest when cooked. After they are finished soaking, rinse and pat them dry with a paper towel, and transfer them to a baking sheet lined with parchment paper. Drizzle them with the olive oil, salt, and freshly cracked black pepper. Bake the potatoes for about 35 minutes, shaking the tray halfway through to ensure even cooking.

corn and green peppers steps

In a large cast iron skillet, heat the oil over medium-high heat. Add the red onion and cook until it turns translucent, about 4 minutes. Add the corn, half of the lime juice, the salt, and the pepper, and cook for 7-10 minutes until it begins to slightly char. Remove from the pan and add the green peppers, skin-side down. Pour the remaining lime juice, salt, and pepper over the peppers and cook them for 7 minutes then flip them and cook for another 5 minutes until softened. The peppers will sizzle and the skin will blister.

assembly steps

Transfer the chicken, vegetables, flat fries, and aioli to a large plate or platter and dress with the lime juice and chopped cilantro.

My sourdough discard inspiration seems to know no bounds lately as I have been mixing discard into endless creations. This sourdough hashbrown pancake combines the starchy comfort of shredded potatoes and carrots, tangy sourdough discard, and aromatic alliums, herbs, and spices. Pan frying then baking the sourdough hashbrown pancake gives it a crisp and chewy crust and allows the insides to bake harmoniously. It is another fabulous use for turning sourdough discard into a meal that can be enjoyed with a side of eggs for breakfast or topped with yogurt and greens for a hearty lunch. Add some cheese or meat and call it dinner. It truly is that versatile.

ingredients

  • 1 tablespoon olive oil
  • 1 cup + 3 tablespoons sourdough discard
  • 2 ¼ cups carrots, shredded
  • 2 cups potatoes, unpeeled and shredded
  • 1 cup red onions, sliced (I used pickled)
  • ¼ cup scallions, sliced
  • ¼ teaspoon crushed red pepper flakes
  • 2 teaspoons smoked paprika
  • 2 tablespoons parsley 
  • 1 teaspoon cumin
  • ½ teaspoon salt
  • ½ teaspoon freshly cracked black pepper

steps

Preheat the oven to 350°F. 

In an oven-safe skillet, heat the olive oil over medium-high heat. Add 1 cup of the discard and place the shredded carrots, potatoes, and scallions on top. Then add the crushed red pepper flakes, smoked paprika, parsley, cumin, salt, and pepper. Let cook for 7-8 minutes then flip and cook for another 7-8 minutes.

Place the pan with the hashbrown in the oven and bake for 20-25 minutes until evenly cooked through. The exterior will crisp up nicely and the inside will be soft but cooked. Serve warm plain or with your choice of condiment!

You have probably heard of or seen hasselback potatoes, which are a style of preparing potatoes born from the Hasselbacken restaurant in Sweden. The concept involves slicing the potatoes, but not all the way through, so that the bottom strip remains attacked and the top pieces splay outward, becoming crisp on the top and creamy on the inside as the potatoes bake. Here, I have taken that concept and applied it to eggplant while stuffing the gaps with a flavorful turkey tomato sauce for stuffed hasselback eggplant with garlic herb labneh.

Making hasselback eggplant is a fun and different way to switch up eggplant preparation. This stuffed hasselback eggplant is a satisfying and complete meal which I would suggest having as a main course, on its own, with rice, or with some crusty bread. The hasselback eggplant cooks through and absorbs much of the flavor from the meat sauce. I used ground turkey to keep it lighter, but feel free to use ground pork, beef, or lamb or a combination!

ingredients

for the eggplant

  • 1 pound ground turkey
  • 4 tablespoons olive oil, divided
  • 1 medium onion, diced
  • 2 garlic cloves, minced
  • 2 medium eggplants
  • 2 teaspoons salt, divided
  • 1 teaspoon freshly ground black pepper, divided
  • 1 cup tomato sauce
  • 2 teaspoons aleppo pepper
  • 1 teaspoon crushed red pepper
  • 2 teaspoons parsley (dried or fresh is fine), divided
  • 2 tablespoons pine nuts, toasted

for the labneh

  • 1 cup (8 ounces) labneh
  • ¼ cup lemon juice
  • 1 garlic clove, grated
  • 1 teaspoon parsley
  • 1 teaspoon chives
  • ½ teaspoon salt
  • 1/ teaspoon freshly grated black pepper

eggplant steps

Preheat the oven to 425°F.

Heat a skillet over medium-high and add the turkey. Cook until browned, about 7 minutes. Don’t worry about undercooking here as the turkey will continue cooking later in the oven. 

As the turkey browns, place a wooden spoon alongside the front and back of an eggplant, lengthwise (see photo) and cut ¼ inch pieces horizontally along the eggplant. The wooden spoons will prevent from cutting all the way through the eggplant so that there will be a strip still attached at the bottom. This is the hasselback style. Repeat with the second eggplant then drizzle the insides of each with the remaining 2 tablespoons of olive oil and season with 1 teaspoon of salt and ½ of the freshly ground black pepper.

Meanwhile, remove the turkey from the pan, place it in a medium bowl, and set it aside. Add the olive oil to the pan that the turkey cooked in then add the onions and cook for about 4 minutes until they begin to brown. Add the garlic and cook for another 4 minutes. Return the cooked turkey to the pan and add the tomato sauce. Mix in the aleppo pepper, crushed red pepper, salt, black pepper, and 1 teaspoon of the parsley. Then add the pine nuts.

Spoon small amounts of the meat sauce in between the sliced eggplant until it is evenly distributed.

Bake for 45 minutes until the eggplant is tender. Sprinkle with the remaining teaspoon of parsley.

labneh steps

Combine the labneh and lemon juice and mix until smooth. Add in the grated garlic parsley and chives and mix then add the salt and freshly ground pepper.

Tuna steaks are a really versatile cut of fish. They are thick and generous yet light, virtuous, and satisfying. These lemon herb tuna steaks with balsamic vegetables are delectably herby and aromatic, accompanied by a lemony tang, and a hint of sweetness from the balsamic reduction. As the balsamic vinegar cooks and transforms into the reduction, the sugars emerge, leaving behind a sweet and syrupy glaze. The blistered peppers and onions then absorb all of this flavor.

I cook this dish on a grill pan, but you can use a real grill or a cast iron skillet if you don’t have a grill pan. Though I would highly recommend investing in one, as it is fairly inexpensive and can be used endlessly.  

Lemon herb tuna steaks with balsamic vegetables are simple and healthy. Give this dish a try to add some necessary color + brightness to your day during these final days of winter.

serves 4

ingredients

for the vegetables

  • 2 cups mini sweet bell peppers
  • 1 green bell pepper, sliced in 1-2 inch strips
  • 1 red onion, sliced into ½-inch rings
  • 1 cup balsamic vinegar, divided
  • 1 tablespoon olive oil
  • 1 teaspoon crushed red pepper
  • 1 teaspoon salt
  • ½ teaspoon freshly ground black pepper

for the tuna

  • 4 6-ounce tuna steaks
  • ¼ cup freshly squeezed lemon juice
  • ½ cup parsley, chopped
  • ¼ cup thyme, chopped
  • 1 tablespoon basil, chopped
  • 1 garlic clove, minced
  • 1 teaspoon olive oil
  • ½ teaspoon salt
  • ½ teaspoon freshly ground black pepper

steps

Marinate the peppers and onion in ½ cup of the balsamic vinegar, the olive oil, crushed red pepper, salt, and black pepper. Set aside.

Meanwhile, make the marinade for the tuna by combining the lemon juice, parsley, thyme, basil, garlic, olive oil, salt, and pepper. Coat both sides of the tuna with the marinade and let sit for 20-30 minutes. 

Place the remaining ½ cup of balsamic vinegar in a small pan over medium-low heat until it begins to thicken. This is known as a balsamic reduction, or balsamic drizzle, and it will dress the vegetables once they are cooked. I like to drain the marinade from the peppers, add it to the reduction, and continue reducing it so as not to waste anything!

Heat a grill pan or grill on high heat. Place the peppers and onions on the pan and grill for 6-7 minutes on the first side then turn them using tongs and cook for 6-7 minutes on the other side. Repeat until all of the vegetables have been cooked. 

Once all of the vegetables have been cooked, move the vegetables to a plate and drizzle the balsamic reduction over them. Place the tuna steaks on the grill and cook for 3 minutes on the first side then flip and cook for another 3 minutes. The tuna cooks fairly quickly, so pay attention so as not to overcook in (unless you prefer it that way).

Serve the tuna alongside the vegetables. Feel free to drizzle some of the balsamic reduction over the tuna as well!

As meals have become more vegetable-forward these days, with less of an emphasis on animal products, whole grains have really taken center stage. Whole grains, along with legumes, often comprise the bulk of many a veggie burger or veggie fritter, including these sorghum vegetable fritters. Sorghum is one on a long list of whole grains as a gluten-free, chewy, versatile option which contains many vitamins and minerals.

Sorghum hails from Africa and is popular in African and Indian cuisine. It is similar to Israeli couscous in size and texture and is hearty and comforting. Sorghum is the star of this recipe for baked sorghum vegetable fritters. They are chewy and earthy and a great way to incorporate a new whole grain into your day.

These baked sorghum vegetable fritters with yogurt sauce are a healthier alternative to fried fritters and taste just as delicious. The tangy yogurt sauce complements the bold, aromatic spices, making for a delicious and satisfying duo. These sorghum vegetable fritters also pair well with Chermoula.

Sorghum is a gluten-free + versatile whole grain
sorghum is a gluten-free + versatile whole grain

ingredients

for the fritters

  • 1 can chickpeas, drained, reserving the liquid (aquafaba) for another use
  • 2 tablespoons olive oil
  • 2 tablespoons lemon juice
  • 1 tablespoon lemon zest
  • 4 garlic cloves, minced
  • 2 tablespoons parsley
  • 1 ½ tablespoons cumin
  • 1 tablespoon crushed coriander seeds
  • 1 teaspoon smoked paprika
  • 1 teaspoon aleppo pepper
  • 1 teaspoon onion powder
  • 1 teaspoon salt
  • ½ teaspoon freshly ground black pepper
  • 2 tablespoons water
  • 1 egg 
  • 1 cup sorghum, cooked
  • 1 cup grated carrots

for the yogurt sauce

  • 1 cup full fat yogurt or labneh
  • 1 teaspoon lemon zest
  • 1 garlic clove
  • 2 teaspoons parsley
  • ¼ teaspoon salt
  • ¼ teaspoon freshly ground black pepper

fritter steps

Preheat the oven to 425°F. Place the drained chickpeas in the bowl of a food processor and add the olive oil, lemon juice, lemon zest, garlic, parsley, cumin, coriander seeds, smoked paprika, aleppo pepper, onion powder, salt, and pepper. Pulse until the mixture combines, slowly adding in the 2 tablespoons of water.

When the mixture has evenly combined, add in the egg and continue to pulse. The add in the cooked sorghum, ¼ cup at a time, pulsing after each addition. Once all of the sorghum has been fully incorporated, add in the carrots. 

Using a medium-sized ice cream or cookie scoop, portion out the fritters onto a baking sheet lined with parchment paper. Cook for 20 minutes on the first side then flip and cook for another 10 minutes on the other side.

yogurt sauce steps

While the fritters cook, combine the yogurt and lemon zest in a small bowl. Using a microplane or fine grater, grate the garlic clove into the yogurt. Add the parsley, salt, and freshly ground black pepper. Mix thoroughly and serve over the fritters.

Red cabbage is delicious, hearty, and brilliantly reddish-purple. I love it as a bright veggie amid winter greyness. Not only is red cabbage vibrant, but it is actually quite versatile, healthy and very inexpensive. I grew up eating it prepared in the classic Austrian/German way (rotkohl), which is shredded and braised with apple, vinegar, and onion sort of like a sweet sauerkraut. I love to eat it this way. I also love roasted red cabbage.

Roasted red cabbage is minimally bitter; as it cooks, it releases the sweetness hidden in its purple leaves. Caraway adds a nutty layer of flavor which complements the classic pairing of apple and blue cheese. You never would have thought red cabbage could taste so delicious!

ingredients

  • 1 head red cabbage, cored and chopped into 1-2 inch strips and wedges
  • ¼ cup + 2 teaspoons olive oil, divided
  • 2 tablespoons caraway seeds
  • 1 tablespoon salt
  • 3 teaspoons freshly ground black pepper, divided
  • 1 onion, sliced
  • 1 shallot, sliced
  • ¼ cup fresh breadcrumbs
  • 1 teaspoon oregano
  • ¼ cup blue cheese, crumbled
  • 1 apple, diced
  • ¼ cup fresh dill, chopped

steps

Preheat the oven to 425°F. Place the chopped cabbage in a large bowl and add the salt, 1 teaspoon of the pepper, ¼ cup of the olive oil, and the caraway seeds. Mix to combine and pour out onto a baking sheet. Leave space on about ¼ of the baking sheet and add the sliced onion and shallot. Drizzle with 1 teaspoon olive oil.

Roast in the oven for about 45-50 minutes. The cabbage will be soft but still chewy.

While the cabbage roasts, heat the remaining 1 teaspoon of olive oil in a skillet and add the breadcrumbs, oregano, and remaining teaspoon of freshly ground black pepper. Toast for 5 minutes until golden.

Remove the cabbage from the oven and serve warm, topped with apple, blue cheese, breadcrumbs, and fresh dill.

Squash — with its simplicity and heartiness — can brighten up any meal, especially in the winter months. And sautéed squash is both comforting and nutritious.

For this dish, I used yellow squash from the store and a kabocha squash that we grew in our garden, but the recipe works just as well with any kind of squash you can get your hands on. Reserving and roasting the squash seeds is a great way to add extra crunch + texture and use every part of the vegetable!

The fragrant spices in the sautéed squash and chickpeas pair beautifully with the cooling yogurt sauce, which adds a tangy flavor and protein. I use a microplane to grate the garlic and zest the lemon which ensures a fine, even texture.

ingredients

for the squash and chickpeas

  • 4 tablespoons extra virgin olive oil
  • 2 yellow squash, sliced
  • 1 kabocha squash, peeled and sliced, with seeds reserved
  • 2 ½ tablespoons kosher salt, divided
  • 1 ½ tablespoons freshly ground black pepper, divided
  • 1 can chickpeas, rinsed and drained
  • ½ teaspoon cumin
  • 1 teaspoon smoked paprika
  • 1 ½ teaspoons aleppo pepper
  • 1 teaspoon crushed red pepper
  • ¼ teaspoon juniper berries, crushed
  • ¼ teaspoon coriander seeds, crushed
  • ½ cup parsley, chopped

for the yogurt sauce

  • 1 cup whole milk greek yogurt
  • 1 garlic clove, grated
  • 2 teaspoons lemon zest
  • 2 tablespoons lemon juice
  • ¼ cup parsley, chopped
  • ½ teaspoon kosher salt
  • ½ teaspoon freshly ground black pepper

steps

Preheat the oven to 425°F. Rinse the squash seeds and place on a baking sheet lined with parchment paper. Season with ½ tablespoon kosher salt, ½ tablespoon black pepper, and ½ teaspoon of aleppo pepper. Roast until crispy and golden, about 15 minutes.

Meanwhile, heat 3 tablespoons of olive oil in a large skillet over medium heat. Add the cumin, smoked paprika, aleppo pepper, crushed red pepper, crushed juniper berries, and coriander seeds. Turn the heat to medium-high and add the first batch of squash, being careful not to overcrowd the pan. Cook on one side for 6 minutes, flip, then cook for another 6 minutes. Transfer to a sheet pan and cook the next batch of squash until all the squash has been cooked. 

Remove all of the squash from the pan and add the remaining tablespoon of olive oil. Add the chickpeas and cook over high heat until they begin to crisp, about 7 minutes.

While the chickpeas crisp up, make the yogurt sauce. Place the greek yogurt into a bowl and grate the garlic into it. Add salt, pepper, lemon zest, lemon juice, and ¼ cup parsley. Mix all the ingredients until they are evenly combined.

To serve, top the squash with roasted seeds, ½ cup chopped parsley for garnish, and dollops of yogurt sauce.

Polish stuffed cabbage, also known as Golumpki or Gołąbki, is a classic Central European dish. Everyone makes it slightly differently, but it is incredibly forgiving in that way. The cabbage is boiled in salty water which not only flavors and tenderizes it but also enhances its vibrant green color. The filling is sort of like a meatball or a meatloaf – it is filled with ground beef, spices, and rice, bound together by an egg.

This golumpki recipe is a true ode to the cruciferous vegetable and is versatile, economical, and delicious. My grandma always cooked stuffed cabbage on the stove, simmered in a covered pan, but I bake mine in the oven. Golumpki is a cozy, warming meal that will comfort and satisfy you.

ingredients

  • 1 cup rice
  • 1 medium white onion, diced
  • 1 ½ cups cheap white wine
  • 1 tablespoon olive oil
  • 1 large head green cabbage, cored
  • 1 tablespoon kosher salt
  • 1 ½ pounds ground beef
  • 1 teaspoon garlic powder
  • 2 teaspoons salt, divided
  • ½ teaspoon freshly ground pepper
  • 1 egg
  • 1 ½ cups tomato sauce 

steps

In a small pot, heat the olive oil. Add the onion and cook until translucent and beginning to brown. Add the rice and wine and bring to a boil. Turn down heat, cover, and simmer for 20 minutes. (You know it’s done when you can see that the onion is at the top and the liquid has absorbed into the rice).

Meanwhile, preheat the oven to 350°F. Bring a large pot of water and 1 tablespoon kosher salt to a boil. Add the head of cabbage and cook for 15 minutes, turning with tongs to ensure all sides are cooked. Remove loose leaves as they fall off and let cool.

Combine the raw ground beef, cooked rice, garlic powder, salt, pepper, and egg in a large bowl. Mix with your hands to ensure even combination. Fill a handful of meat mixture in a leaf of cabbage and roll it up, starting at the stem. Fold over the sides and tuck the stuffed cabbage into a pan lightly greased with olive oil. Thinly cover with tomato sauce.

Cover with lid or foil and bake for 50 minutes. Remove from the oven and let sit for 10 minutes. Sprinkle evenly with remaining 1 teaspoon of salt. 

I love beets. I love them boiled, roasted, pickled, in soup. I love their brilliant burgundy color. I love their subtle sweet flavor. I love their versatility. I love their countless health benefits. I want everyone to love roasted beets as much as I do.

Give these roasted beets a try if you are beet-curious or even beet-averse. Not only do the flavors blend harmoniously together but the colors are so beautiful and vibrant that you can’t help but marvel at the shades of red, pink, orange, maroon. 

This dish really accentuates all the wonders roasted beets have to offer, enhanced by blood orange in celebration of citrus season, crisp mint, earthy hazelnuts, and the salty tartness of lemon anchovy dijon. Who could resist?

Serves 4

ingredients

for the salad

  • 1 bunch beets, with greens reserved (use the greens at a later time)
  • 2 tablespoons olive oil
  • 1 tablespoon kosher salt
  • 1 teaspoon freshly ground pepper
  • 1 blood orange, peeled and sliced
  • ½ cup loosely packed mint leaves, torn
  • ¼ cup hazelnuts

for the vinaigrette

  • 2 tablespoons of lemon juice (from about 1 lemon)
  • 5 anchovies, chopped
  • 1 teaspoon dijon mustard
  • 1 teaspoon red or white wine vinegar 
  • ½ cup olive oil

steps

Preheat the oven to 425°F. Peel and chop the beets into 1-inch-sized pieces. Place the beets on a large piece of foil on a sheet pan. Drizzle with 2 tablespoons olive oil, 1 tablespoon kosher salt, and 1 teaspoon freshly ground pepper. Fold up beets so that they are completely wrapped up in the tin foil. Bake for 45 minutes.

Place hazelnuts on a separate baking sheet and toast for 10 minutes then remove from the oven, let cool, and chop.

Meanwhile, add the chopped anchovies to a bowl and mix in the lemon juice, dijon, and vinegar. Whisk to break down the anchovies. Slowly drizzle in the olive oil in a steady stream while whisking until the dressing has emulsified. Set aside.

Remove the beets from the oven and let cool slightly then transfer to a dish. Scatter with the blood orange slices and mint leaves. Pour the dressing over the dish and top with the toasted hazelnuts.