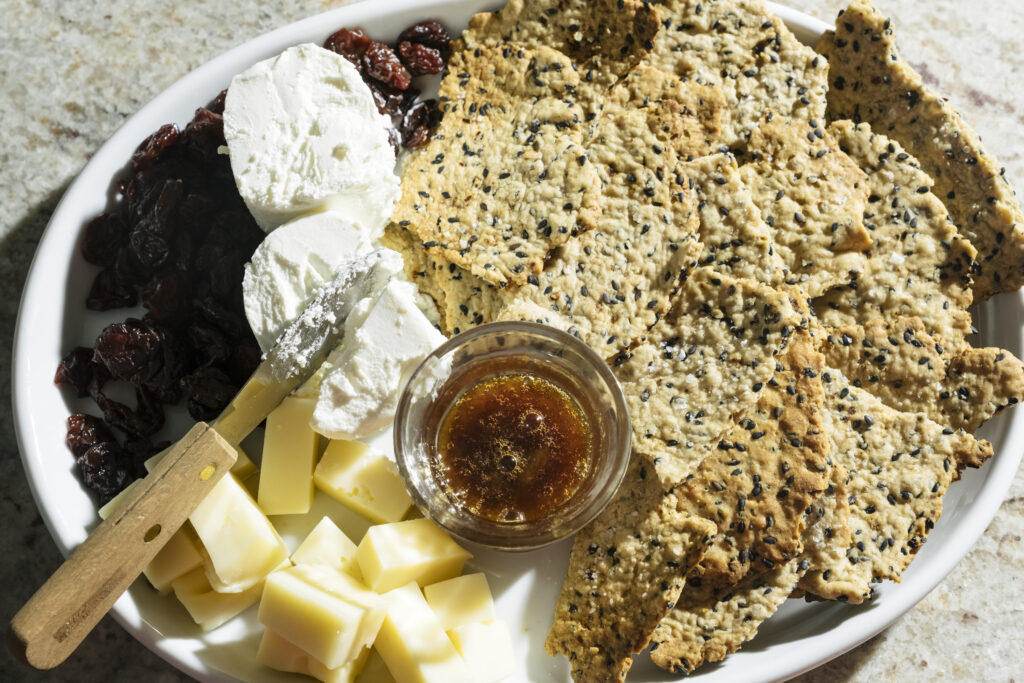
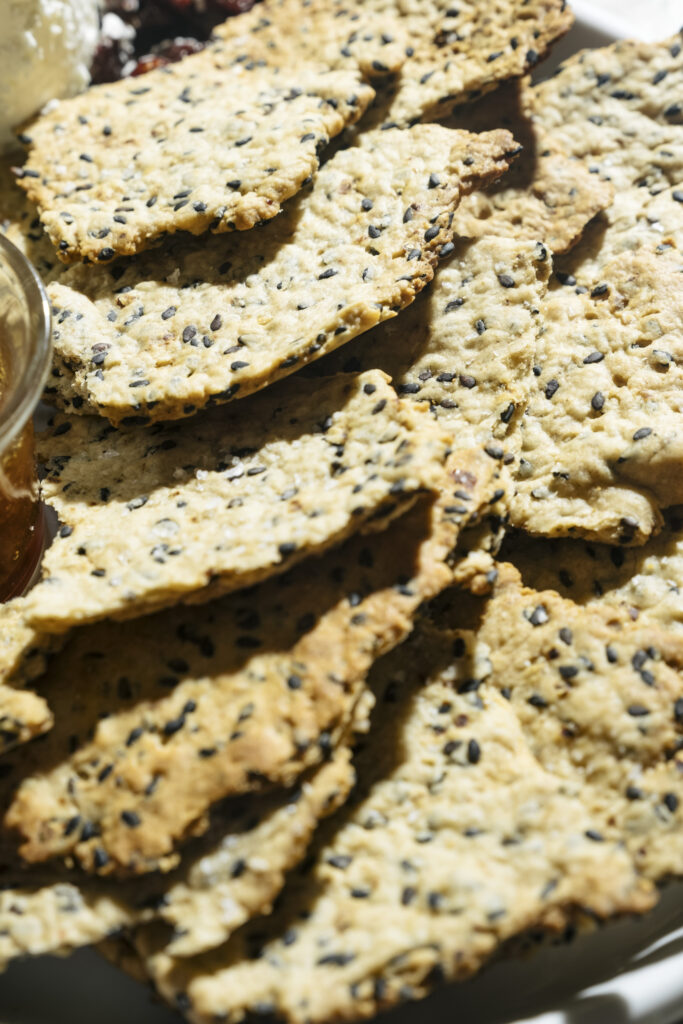
sourdough sesame aleppo pepper crackers
I love experimenting with different sourdough discard recipes. The possibilities seem endless, and the concept seems obvious – why waste precious, vibrant discard when you can use it to make a delicious new creation? In the vast world of sourdough discard recipes, sourdough crackers rank high on the list of favorites.
Sourdough sesame aleppo pepper crackers combine fruity spice and earthy nuttiness to augment the discard’s sour tang. Pair these with your cheese of choice, a sweet jam, or a charcuterie spread for a helping of flavor and crunch!
ingredients
- ½ cup sourdough starter discard
- 2 tablespoons olive oil
- ¾ cup all-purpose flour
- ½ teaspoon salt
- ¼ cup sesame seeds
- 1 tablespoon aleppo pepper
- 1 tablespoon neutral oil
- Flaky salt for dusting
steps
Place the starter and olive oil in the bowl of a stand mixer and mix on medium low with the dough hook. Gradually add in the flour and salt and mix until it is evenly combined, then add in the sesame seeds and aleppo pepper. Transfer the dough to a bowl brushed with the neutral oil, cover with plastic wrap, and let sit for 2 hours.
After the dough has rested for 2 hours, preheat the oven to 350°F. Divide the dough into 3 or 4 pieces and working with one piece at a time, roll it out using a rolling pin and place on a baking sheet lined with parchment paper. Bake for 25-30 minutes until crisp and golden.

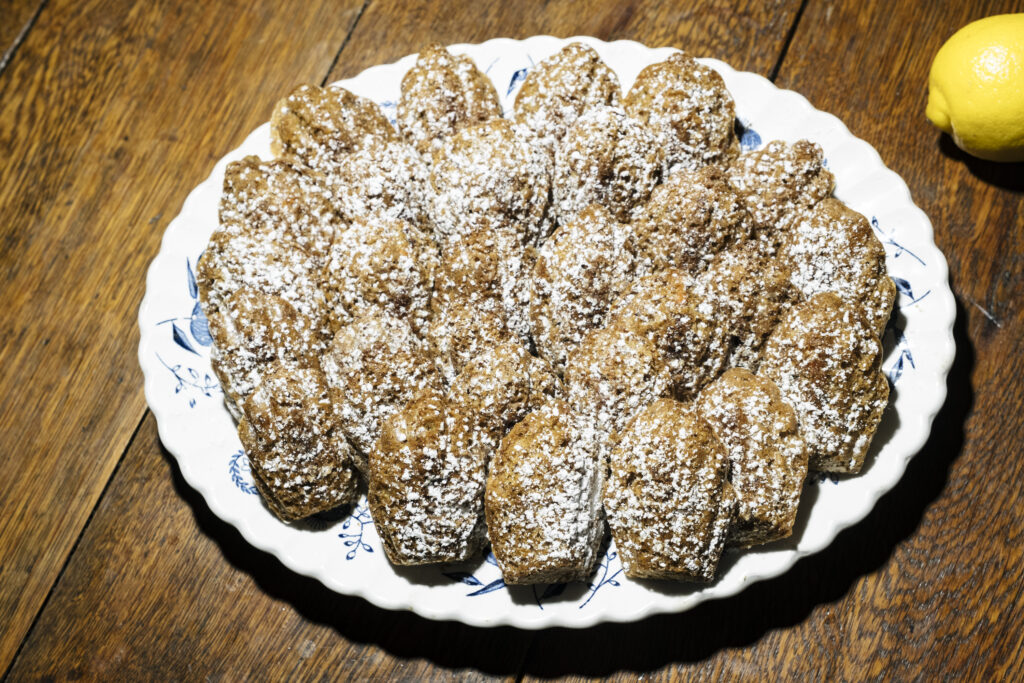
carrot cake madeleines
I have mentioned before that classic madeleines are one of my absolute favorite treats to bake (and eat!). Additionally, carrot cake is a childhood favorite. It is, in my opinion, a total special occasion dessert. Recently, while making carrot cake for my boyfriend’s aunt’s birthday, I shredded too many carrots, so I decided to try making some carrot cake madeleines!
This recipe for carrot cake madeleines is slightly different than that of a classic carrot cake (less leaven) but just as delicious. Carrot cake madeleines are evenly spiced in every bite with succulent texture from the walnuts and golden raisins. The best part of carrot cake madeleines is you can enjoy the delights of carrot cake without having to make a giant cake.
ingredients
- 1 cup all-purpose flour
- ¼ teaspoon baking soda
- ½ teaspoon salt
- 1 teaspoon cinnamon
- ½ teaspoon ginger
- ¼ teaspoon nutmeg
- Pinch of ground cloves
- 2 eggs
- ¾ cup granulated sugar
- 1 cup grated carrots
- ¼ cup walnuts, finely chopped
- ½ cup golden raisins
- ½ cup neutral oil
- Powdered sugar
steps
Preheat the oven to 350°F.
In a large bowl, mix together the flour, baking soda, salt, cinnamon, ginger, nutmeg, and cloves and set aside. Vigorously whisk the eggs and granulated sugar. Mix in the flour and spice mixture until evenly combined. Add in the carrots, walnuts, and raisins. Slowly drizzle in the oil while constantly mixing the batter until all of the oil has been incorporated.
Fill a greased madeleine mold with 1-2 tablespoons of batter. Bake for 15-17 minutes until golden. Let cool slightly then dust with powdered sugar.
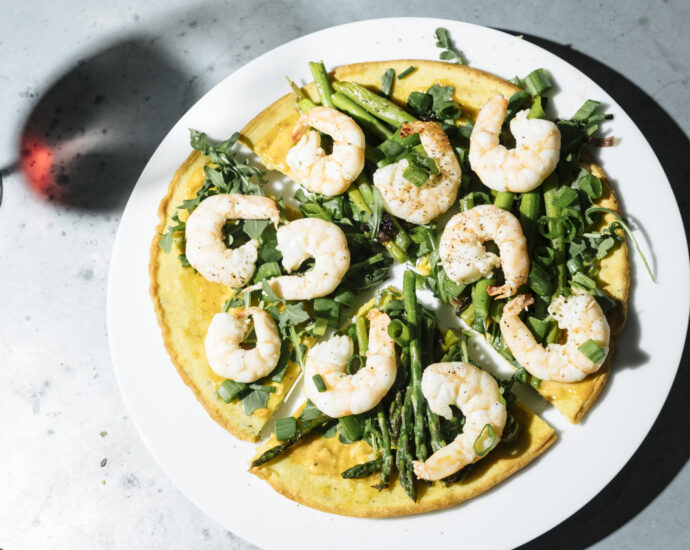
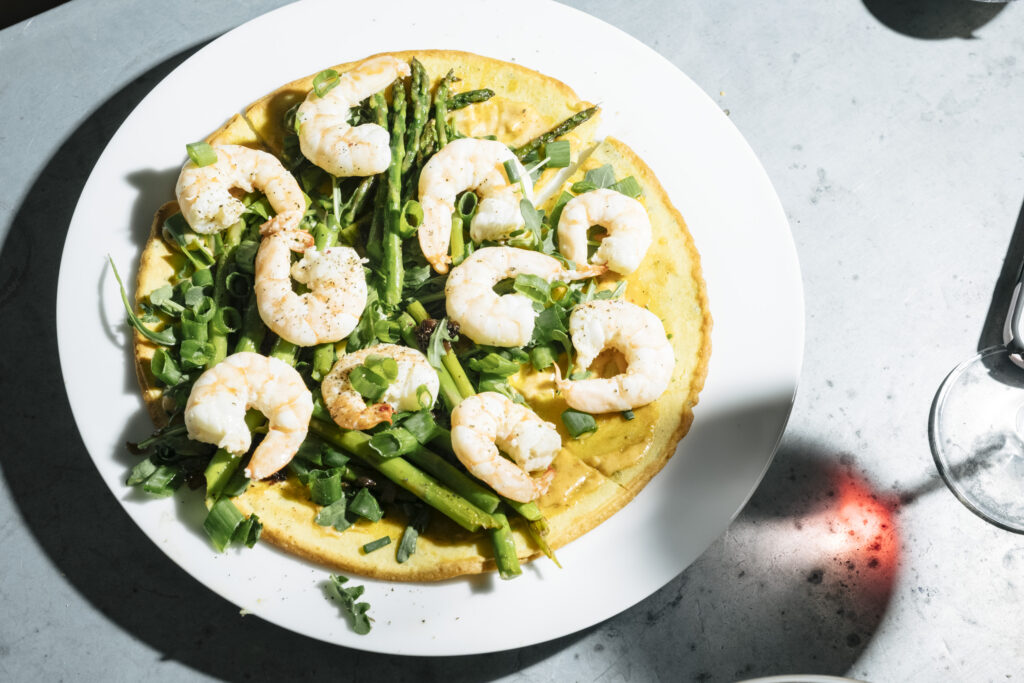
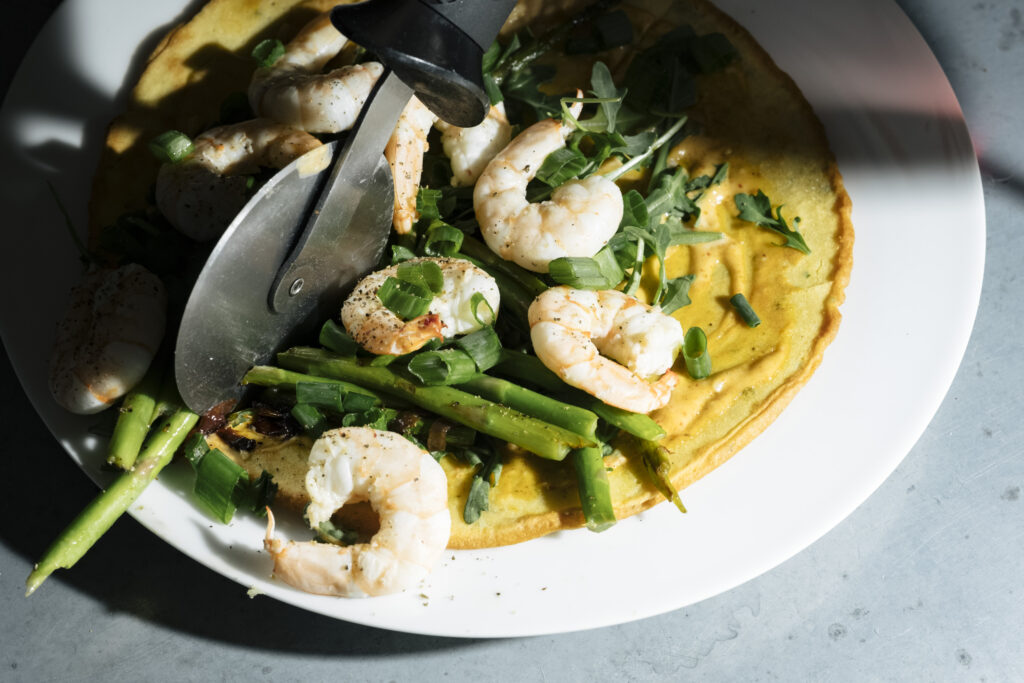
socca with harissa aioli shrimp asparagus and arugula
Socca is a giant chickpea flatbread from the south of France and the Ligurian coast of Italy, where it is known as farinata. I really enjoy serving it for dinner parties because it is a delicious base on which to pile vegetables and protein and it is gluten-free and vegan which means highly inclusive. Here is one flavor pairing I really enjoy – socca with harissa aioli, shrimp, asparagus, and arugula.
Coating the socca with a layer of harissa aioli creates a sort of adhesive for the vegetables. Caramelized red onion adds a hint of sweetness and peppery arugula and scallions complement the crisp asparagus and delicate shrimp. Socca with harissa aioli, shrimp, asparagus, and arugula is a delicious meal in celebration of spring.
serves 4-6 (6 with another side)
ingredients
for the harissa aioli
- 2 cloves garlic
- 1 egg
- 1 tablespoon dijon mustard
- 2 tablespoons lemon juice
- 1 cup neutral oil
- 2 tablespoons harissa paste
for the socca
- 2 cups chickpea flour
- 2 cups warm water
- 5 tablespoons olive oil, divided
- 2 teaspoons salt
- 1 teaspoon freshly ground black pepper
- 2 tablespoons parsley
for vegetables & shrimp
- 1 pound shrimp, deveined with the tails removed
- ½ cup freshly squeezed lemon juice
- 5 tablespoons olive oil, divided
- 2 teaspoons salt, divided
- 2 teaspoons freshly ground black pepper, divided
- 1 medium red onion, sliced
- 1 bunch asparagus, trimmed (bend the ends off and wherever they snap is where to trim them)
- 2 cups arugula
- ¼ cup scallions, sliced
harissa aioli steps
Place the garlic cloves in a food processor and pulse until chopped. Add the egg, mustard, and lemon juice and pulse until blended. Slowly drizzle in the oil while the food processor runs to ensure the mixture fully emulsifies. Once the consistency thickens, mix in the harissa. There will definitely be extra harissa aioli from this recipe, so feel free to use it on any bread, vegetables, potatoes, meat, etc. The harissa aioli will keep for 3 months in the refrigerator.
socca steps
Combine the chickpea flour, warm water, 4 tablespoons of the olive oil, salt, pepper, and parsley in a large bowl and whisk until you have an even consistency without lumps. Let the batter sit for 30 minutes to an hour.
While the batter nears the end of its resting, preheat the oven to 450°F, and place a 10 or 12-inch cast iron skillet in the oven as it heats up. After 20 minutes, drizzle the remaining 1 tablespoon of olive oil in the pan and swirl it around. Pour ¼ of the batter (about 1 cup) into the pan. Place in the oven and bake for 12 minutes until it begins to brown on the edges and can be lifted from the pan. I like to flip it and cook it for an additional 3 minutes on the other side, but you don’t have to do that.
Repeat with the remaining batter and while the remaining socca cook, prepare your vegetables and shrimp.
vegetables & shrimp steps
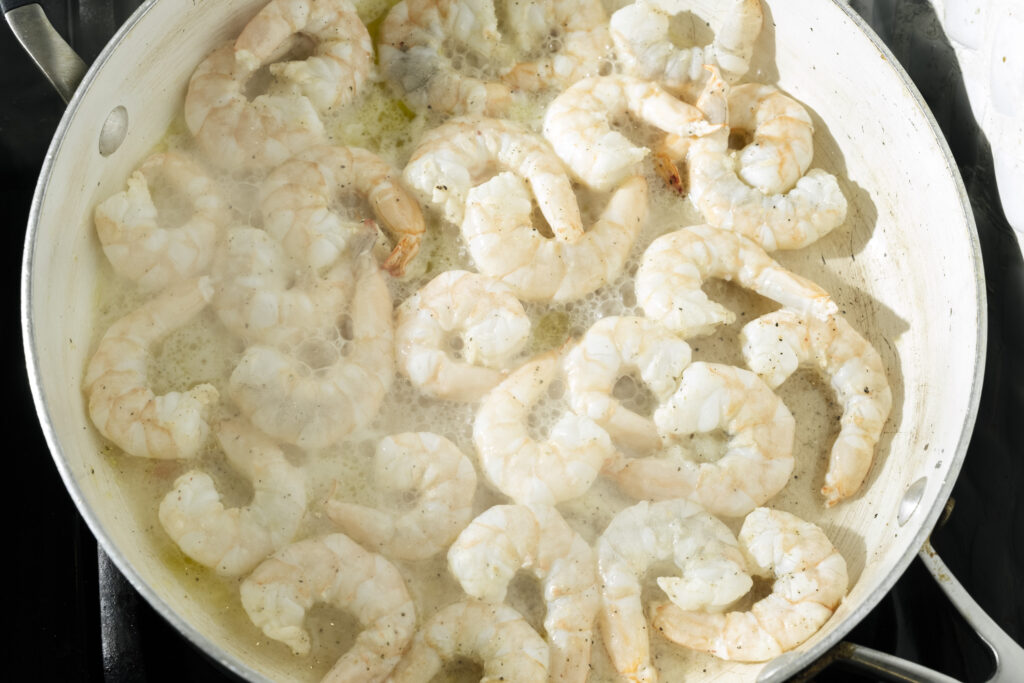
Fill a kettle with water and bring to a boil. Meanwhile, marinate the shrimp in the lemon juice, 2 tablespoons olive oil, 1 teaspoon salt, and 1 teaspoon freshly ground black pepper and set it aside.
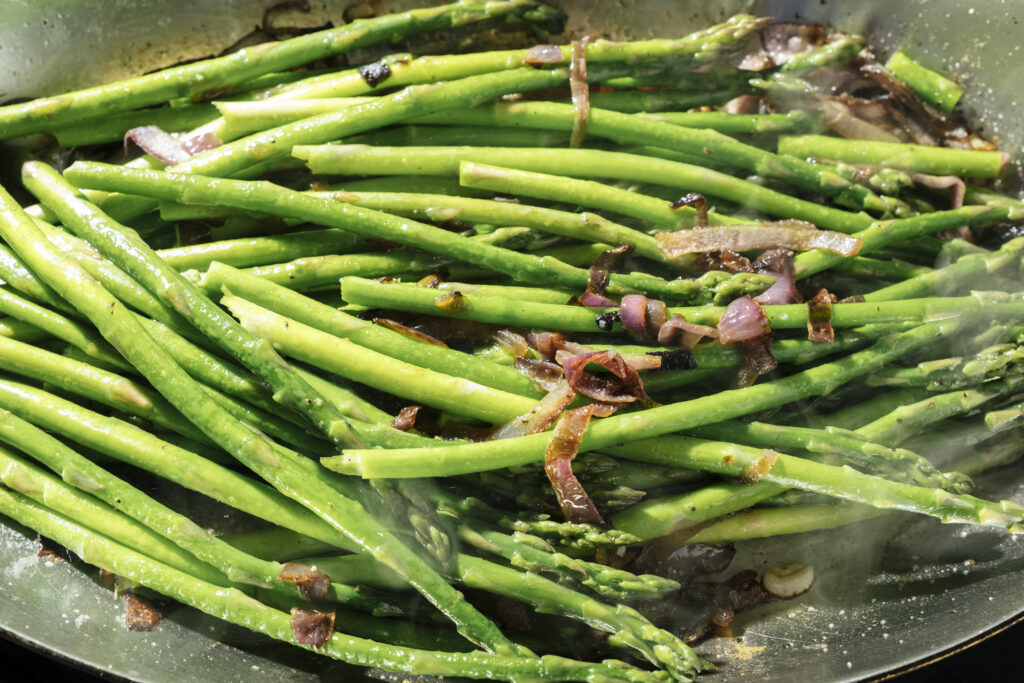
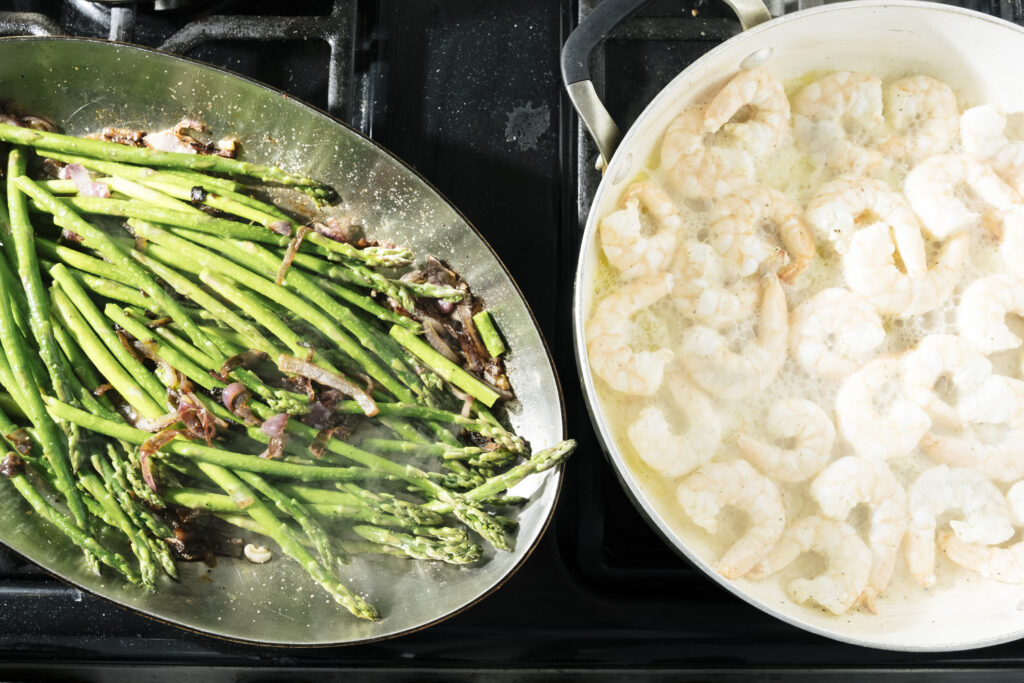
Heat 2 tablespoons olive oil in a skillet over medium-high heat and add the sliced red onion. Cook until caramelized, 7-10 minutes. While the onion cooks, place the asparagus in a colander in the sink and pour the boiling water over it to blanch it. Immediately transfer it to the pan with the onion and saute for 5-7 minutes.
In a separate skillet, heat the remaining 1 tablespoon olive oil over medium-high heat. Transfer the shrimp to the pan and cook for 2-3 minutes on one side then flip and cook for 2-3 minutes on the other side. Be careful not to overcook the shrimp as you will wind up with rubbery bands. The shrimp will turn from grey to pink when they are finished cooking.
assembly steps
Spread a layer of harissa aioli over the socca and top with ½ cup arugula, ¼ of the asparagus and onions, and ¼ pound of the shrimp. Cut each socca in quarters (you will have 16 pieces) and serve warm or at room temperature!


chicken with capers and apricots
I really believe that sweet and salty foods balance the best of both worlds in one satisfying dish. Chicken with capers and apricots is an easy, one pot, weeknight recipe that is both sweet and salty. The chicken simmers in a luscious herby white wine sauce which is salted by the punchy capers and sweetened by the dried apricots. Of course, the apricots absorb the sauce and plump up, filled with the flavorful liquid. Chicken with capers and apricots is filled with Provençal herbs that turn a simple dish into an aromatic delight.
serves 2-3
ingredients
- 2 pounds of bone-in, skin-on chicken (mix of thighs and legs)
- 3 tablespoons salt, divided
- 3 tablespoons pepper, divided
- 1 shallot, sliced
- 1 onion, sliced
- 2 garlic cloves
- 2 tablespoons olive oil
- 1 teaspoon dried basil
- 1 teaspoon dried thyme
- 1 teaspoon dried marjoram
- 1 teaspoon dried parsley
- ½ teaspoon dried rosemary
- 1 cup dry white wine
- 3 tablespoons capers
- ½ cup dried apricots
steps
Place the chicken, skin-side down in a large pot or skillet over medium-high heat. Cook for 7-8 minutes until the skin is crispy and releases from the skillet without much effort. Flip the chicken to the underside and cook for another 7-8 minutes.
Add in the shallot and onion and stir. Let cook for 7 minutes until beginning to caramelize. Then add in the garlic dried basil, dried thyme, marjoram, parsley, and rosemary, and cook for 4 minutes. Add in the wine, capers, and apricots, making sure to evenly distribute them throughout the pan.
Cover and cook for 40 minutes on medium-low heat. Uncover and remove the chicken and cook for another 10 minutes to reduce the sauce. Serve over rice or potatoes.
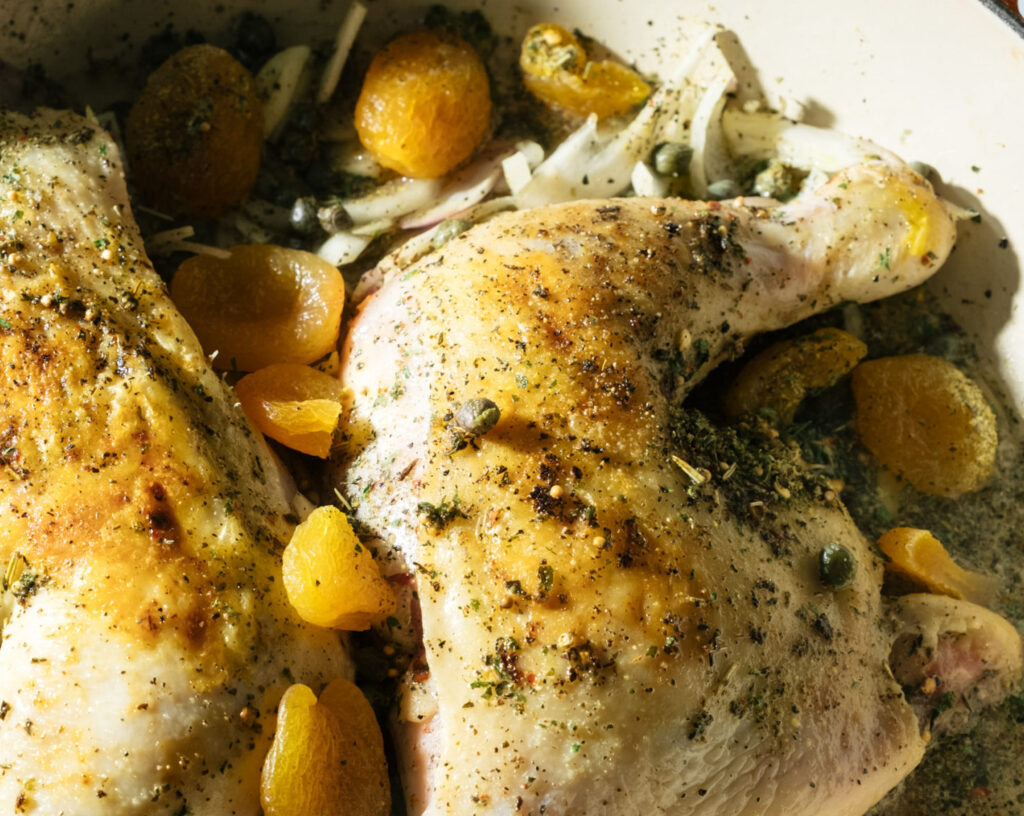
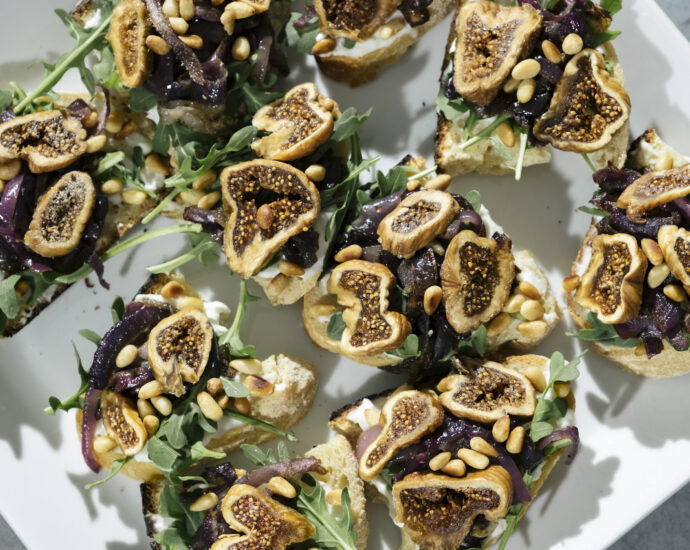
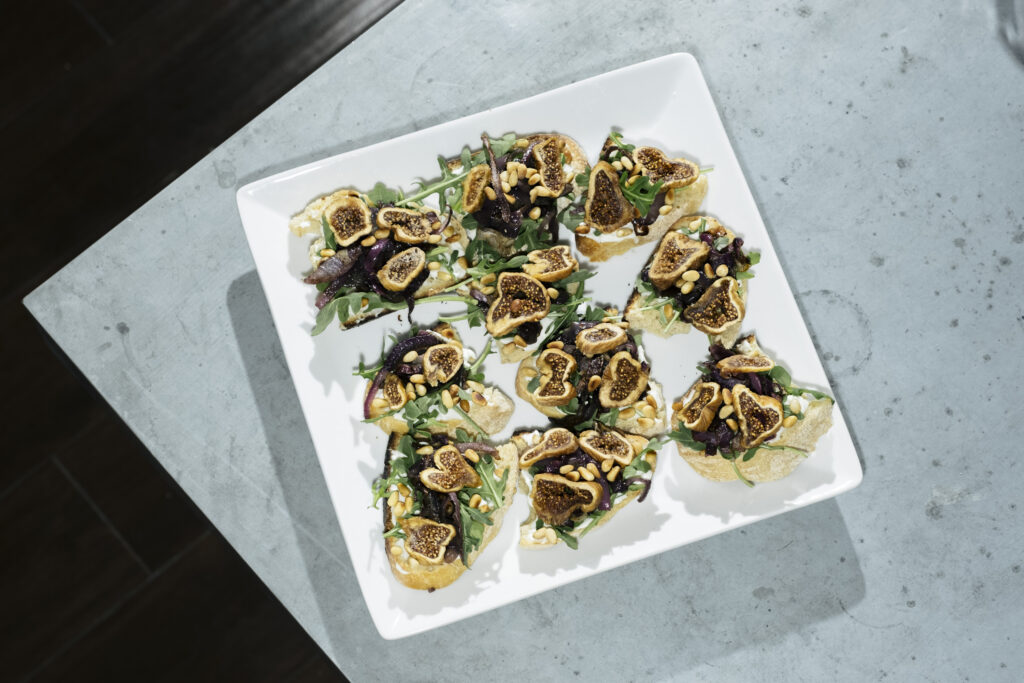
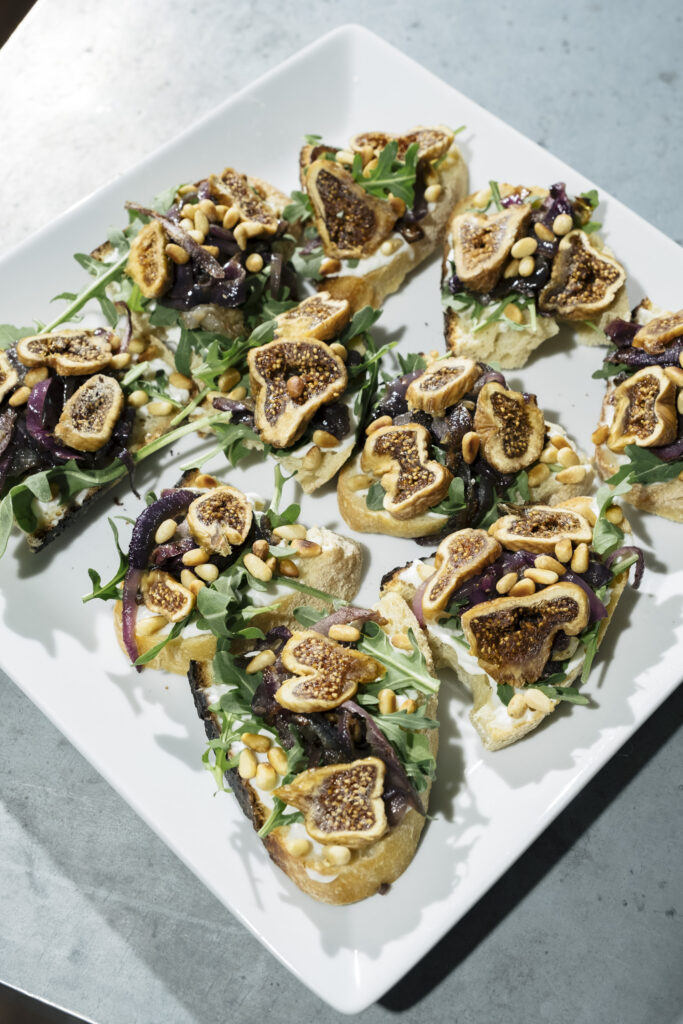
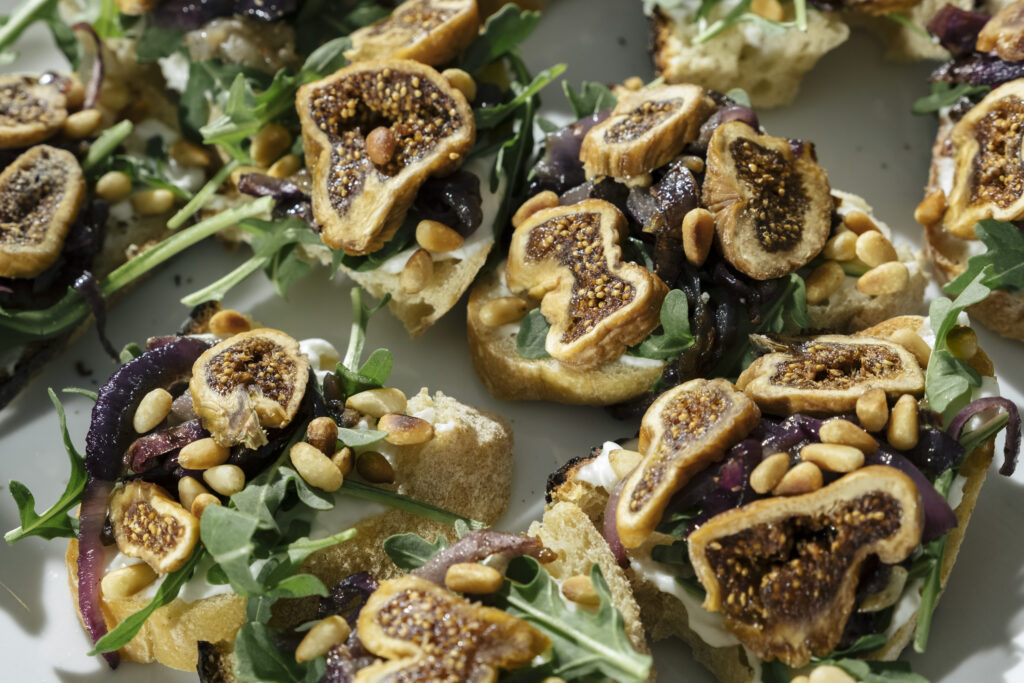
fig and labneh toast with arugula caramelized onion and pine nuts
It seems like everything finds its way onto toast these days, and that is something to celebrate. I love mixing and matching different flavor combinations and toppings, and that is what I did here with this fig and labneh toast with arugula, caramelized onion, and pine nuts.
I used dried figs because it is most definitely not fig season right now and the dried fruit adds an additional texture to the fig and labneh toast. The dried fig and caramelized red onion complement each other in a sweet and savory vibe layered on the tangy labneh and finished with peppery arugula and fragrant pine nuts. Feel free to toast your bread in batches in the toaster, but I find it is easiest to toast all of the slices at once on a sheet pan. Up to you! This fig and labneh toast with arugula, caramelized onion, and pine nuts can be served as a delicious appetizer or a full meal!
ingredients
- 4 slices sourdough bread, cut ⅓-inch thick and halved
- 1 medium red onion, sliced
- 1 tablespoon olive oil
- 1 teaspoon salt
- ½ teaspoon freshly ground black pepper
- ¼ cup labneh
- 1 cup arugula
- ½ cup dried figs, sliced
- 2 tablespoons pine nuts, toasted
steps
Preheat the oven to 350°F. Lay the slices of bread on a baking sheet lined with parchment paper and toast for 4 minutes, flip then toast for another 4 minutes.
In a large skillet, heat the olive oil over medium-high heat and all the onion, salt, and pepper. Cook for 7 minutes, stirring occasionally to redistribute the onions over the heat, until they become caramelized.
Working with one slice at a time, spread a thin layer of labneh over the bread then immediately top with arugula, dried figs, and a few pine nuts. Repeat until all of the slices have been dressed.
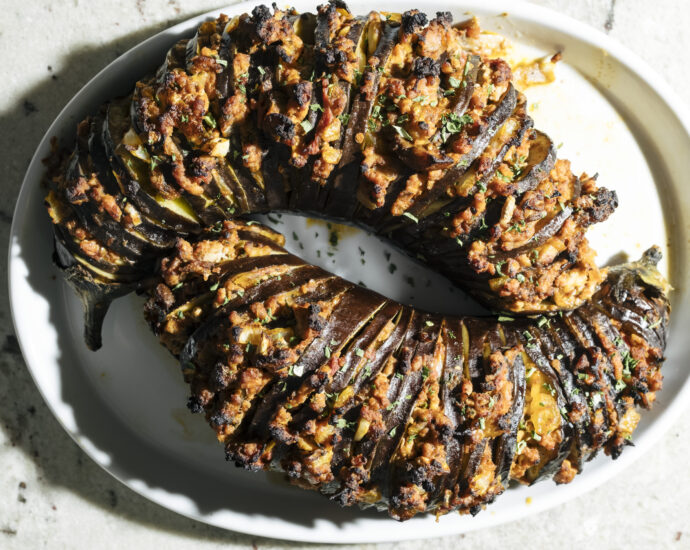
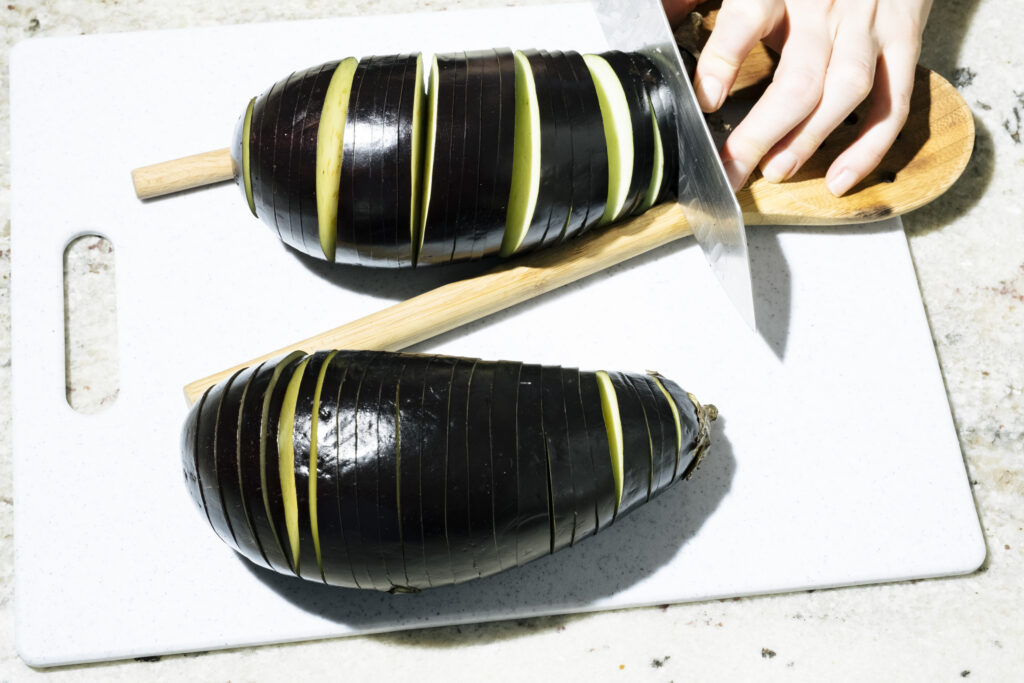
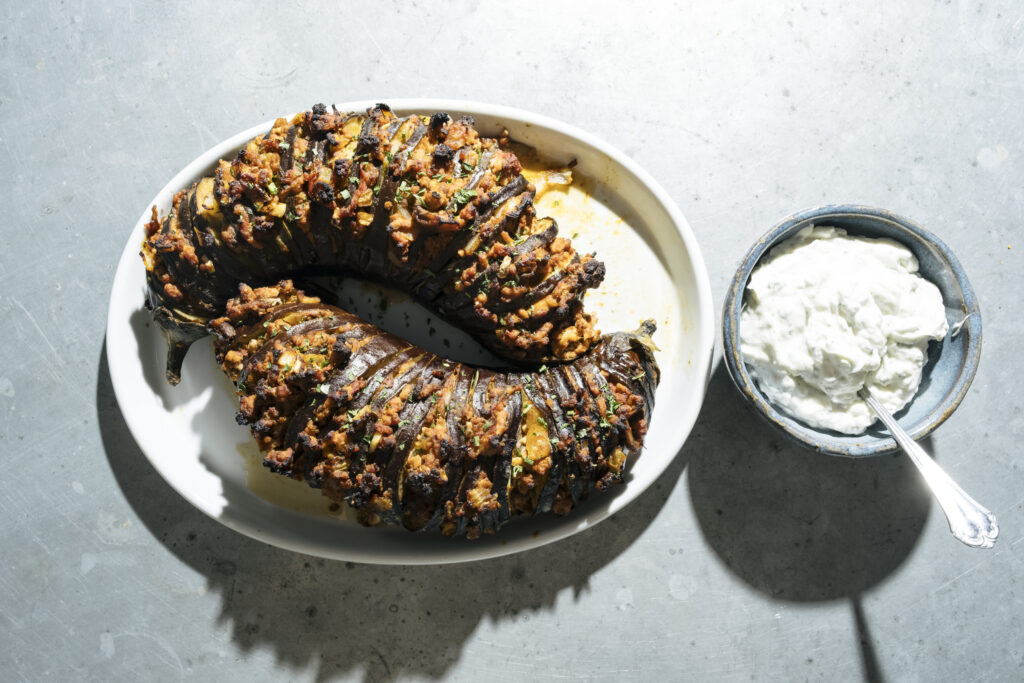
stuffed hasselback eggplant with garlic herb labneh
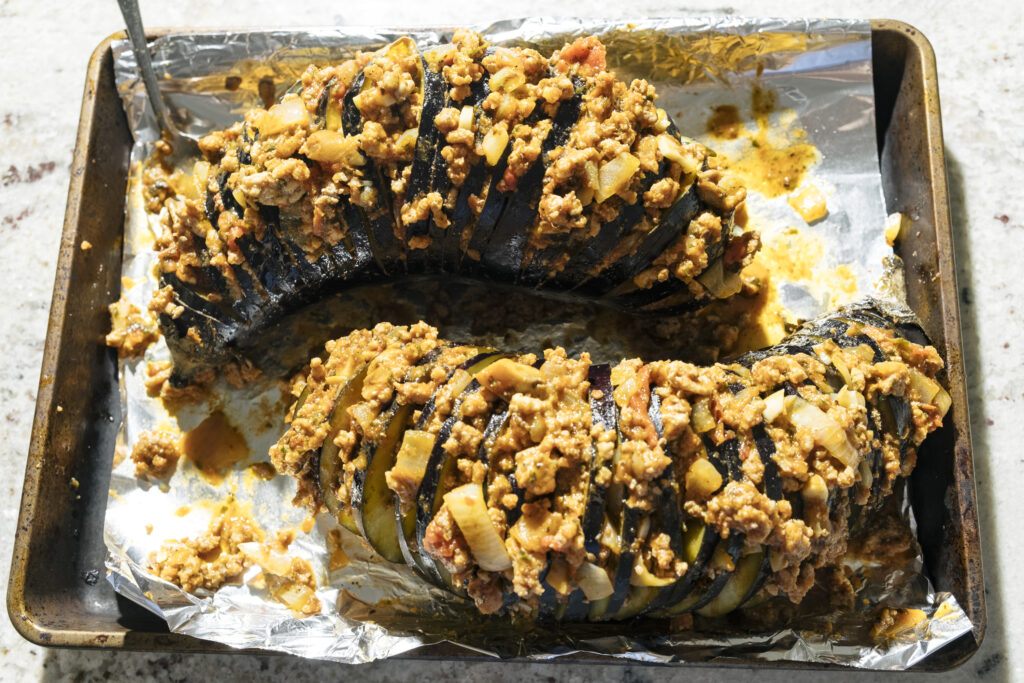
You have probably heard of or seen hasselback potatoes, which are a style of preparing potatoes born from the Hasselbacken restaurant in Sweden. The concept involves slicing the potatoes, but not all the way through, so that the bottom strip remains attacked and the top pieces splay outward, becoming crisp on the top and creamy on the inside as the potatoes bake. Here, I have taken that concept and applied it to eggplant while stuffing the gaps with a flavorful turkey tomato sauce for stuffed hasselback eggplant with garlic herb labneh.
Making hasselback eggplant is a fun and different way to switch up eggplant preparation. This stuffed hasselback eggplant is a satisfying and complete meal which I would suggest having as a main course, on its own, with rice, or with some crusty bread. The hasselback eggplant cooks through and absorbs much of the flavor from the meat sauce. I used ground turkey to keep it lighter, but feel free to use ground pork, beef, or lamb or a combination!
ingredients
for the eggplant
- 1 pound ground turkey
- 4 tablespoons olive oil, divided
- 1 medium onion, diced
- 2 garlic cloves, minced
- 2 medium eggplants
- 2 teaspoons salt, divided
- 1 teaspoon freshly ground black pepper, divided
- 1 cup tomato sauce
- 2 teaspoons aleppo pepper
- 1 teaspoon crushed red pepper
- 2 teaspoons parsley (dried or fresh is fine), divided
- 2 tablespoons pine nuts, toasted
for the labneh
- 1 cup (8 ounces) labneh
- ¼ cup lemon juice
- 1 garlic clove, grated
- 1 teaspoon parsley
- 1 teaspoon chives
- ½ teaspoon salt
- 1/ teaspoon freshly grated black pepper
eggplant steps
Preheat the oven to 425°F.
Heat a skillet over medium-high and add the turkey. Cook until browned, about 7 minutes. Don’t worry about undercooking here as the turkey will continue cooking later in the oven.
As the turkey browns, place a wooden spoon alongside the front and back of an eggplant, lengthwise (see photo) and cut ¼ inch pieces horizontally along the eggplant. The wooden spoons will prevent from cutting all the way through the eggplant so that there will be a strip still attached at the bottom. This is the hasselback style. Repeat with the second eggplant then drizzle the insides of each with the remaining 2 tablespoons of olive oil and season with 1 teaspoon of salt and ½ of the freshly ground black pepper.
Meanwhile, remove the turkey from the pan, place it in a medium bowl, and set it aside. Add the olive oil to the pan that the turkey cooked in then add the onions and cook for about 4 minutes until they begin to brown. Add the garlic and cook for another 4 minutes. Return the cooked turkey to the pan and add the tomato sauce. Mix in the aleppo pepper, crushed red pepper, salt, black pepper, and 1 teaspoon of the parsley. Then add the pine nuts.
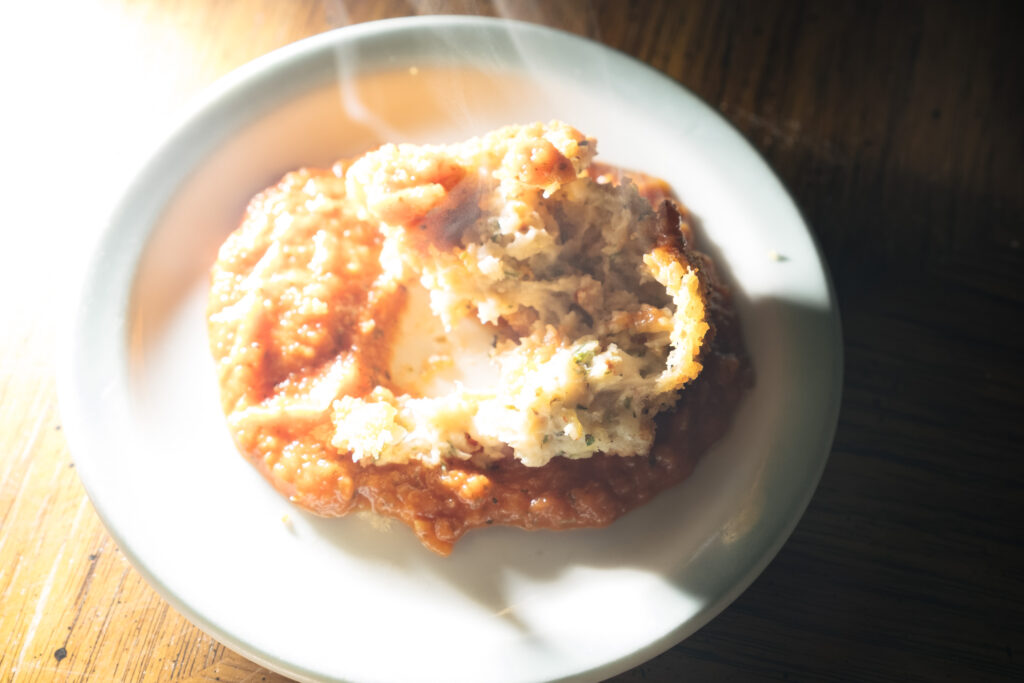
Spoon small amounts of the meat sauce in between the sliced eggplant until it is evenly distributed.
Bake for 45 minutes until the eggplant is tender. Sprinkle with the remaining teaspoon of parsley.
labneh steps
Combine the labneh and lemon juice and mix until smooth. Add in the grated garlic parsley and chives and mix then add the salt and freshly ground pepper.
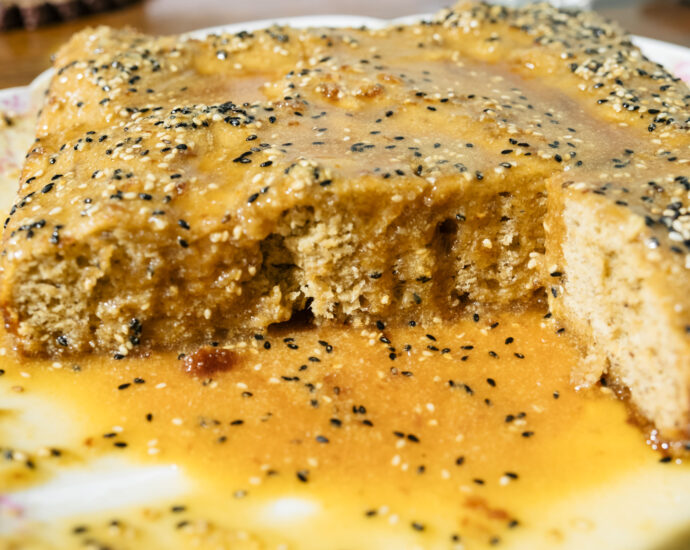
banana cake with rum tahini caramel
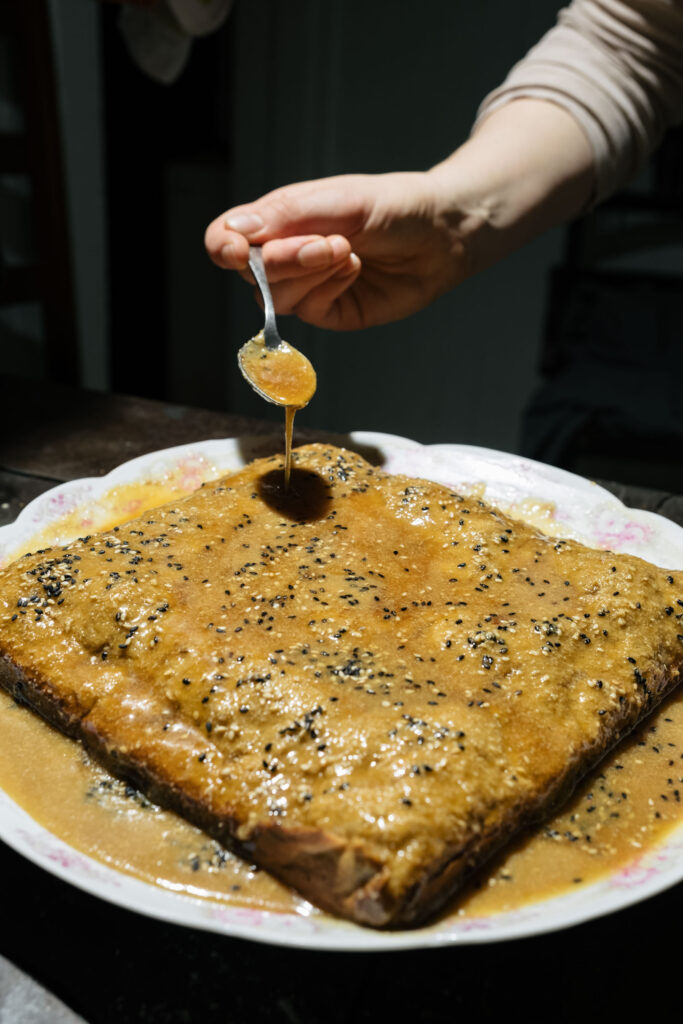
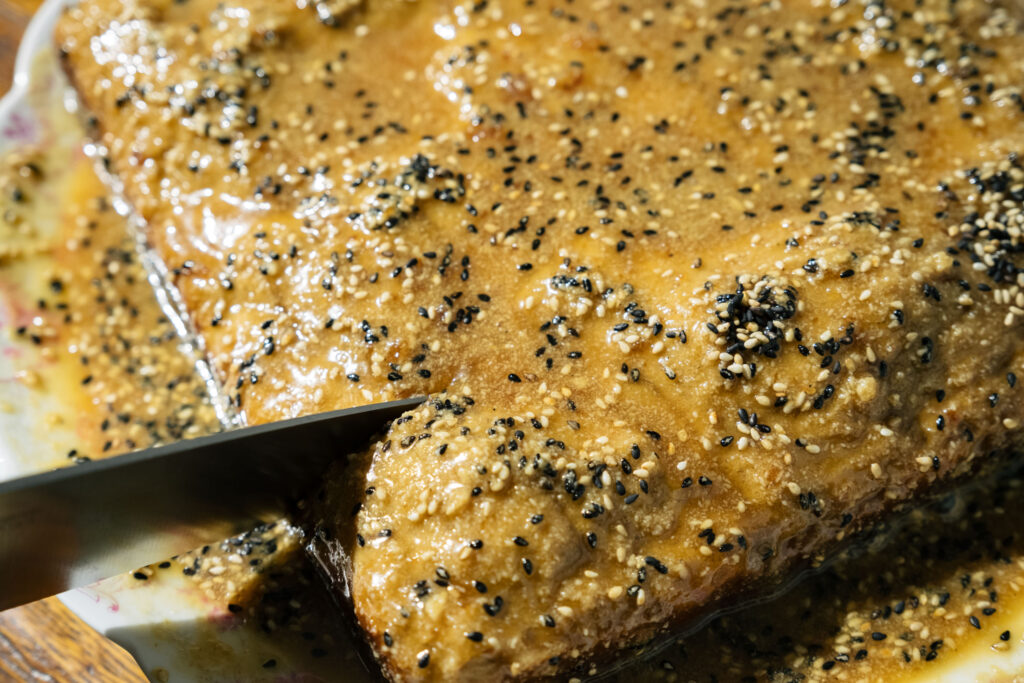
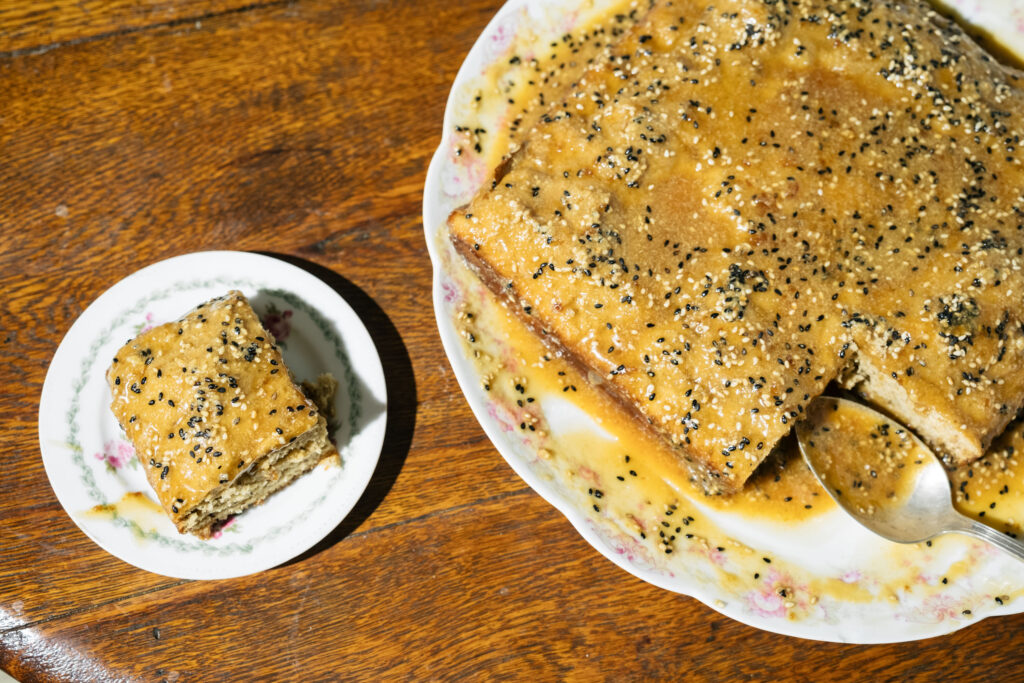
Bananas and rum are, in my opinion, a great culinary love match. Have you ever noticed that when bananas get super old and overly ripe they exude an alcohol-like aroma? That is the sugar alcohols releasing from the fruit which, the more ripe it is, lend it even more sweetness. This banana cake with rum tahini caramel has only 2 tablespoons of added sugar in the cake itself since a) the bananas themselves are so sweet, and b) it is doused in caramel sauce.
I like to plate the cake then pour the caramel over the top and essentially baste it, but you can also pour the caramel over individual servings. The longer the cake absorbs the caramel, the more rich and flavorful it will be. You could eat this banana cake with rum tahini caramel for breakfast or pair it with some whipped cream or ice cream for a decadent dessert.
ingredients
for the cake
- 2 cups all-purpose flour
- 1 teaspoon baking soda
- 1 teaspoon baking powder
- ½ teaspoon kosher salt
- 4 medium-large bananas
- ½ cup neutral oil
- 2 tablespoons sugar
- 2 large eggs
- 1 teaspoon vanilla extract
for the rum tahini caramel
- ½ cup sugar
- ⅓ cup water
- ¼ cup tahini
- 2 tablespoons rum
for the garnish
- ½ cup sesame seeds (I used a mix of black + white)
cake steps
Preheat the oven to 350°F and grease and line a square baking pan with parchment paper.
In a medium-sized bowl, mix together the flour, baking soda, baking powder, and salt and set aside. Cream together the bananas, oil, sugar until light and fluffy. Add in the eggs, one at a time, and the vanilla until smoothly combined. Slowly add in the flour mixture until a smooth batter has formed.
Bake for 45 minutes until golden.
rum tahini caramel steps
Once the cake is finished baking, heat the sugar on medium until it begins to melt, swirling it around without mixing, about 7-9 minutes. Using a wooden spoon or rubber spatula, very slowly mix in the water, then the tahini, then the rum. Cook until it begins to bubble then turn off the heat.
assembly steps
Let the cake cool slightly and using a toothpick or skewer, make small indents in the top of the cake. Pour the caramel over the cake, either in the pan or on a plate, and allow the caramel to trickle in. Top with sesame seeds and continue spooning any caramel that dripped off the sides onto the top of the cake (essentially basting it).

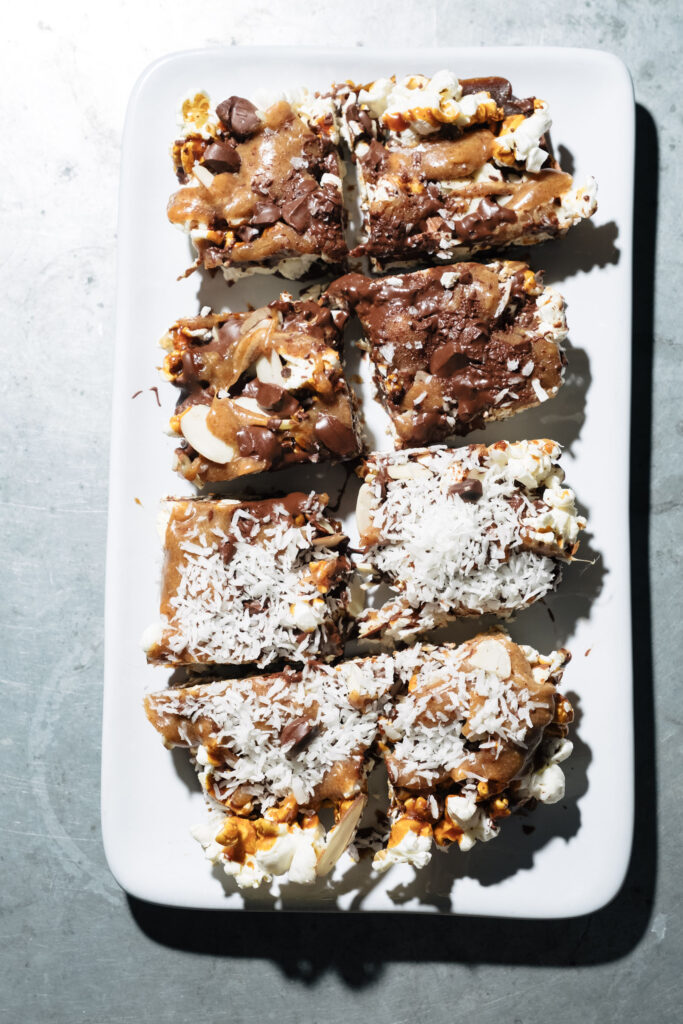
popcorn dream bars
Popcorn dream bars are an homage to the classic dream bar, also known as the 7-layer-bar, with popcorn in place of the graham cracker crumbs. Dream bars are, in my mind, timeless and beloved. I wanted to combine them with another love of mine: popcorn.
These popcorn dream bars are kind of like fancy gourmet popcorn in bar form. Growing up, I loved having gourmet popcorn tins each year around the holidays. There is something so festive and nostalgic about them, and I still get excited whenever I see them! Popcorn dream bars are cozy and flavorful and super easy to whip up.
This recipe for popcorn dream bars includes two types of caramel, but fear not because they are fairly standard and quick to whip up! Feel free to experiment with additional spices or flavors for these bars, but this recipe is a reliable starting point! Popcorn dream bars will always deliver.
ingredients
for the caramel
- ½ cup (1 stick) butter
- ½ cup granulated sugar
for the almond butter caramel
- 2 tablespoons granulated sugar
- 2 tablespoons almond butter
- 1 tablespoon water
for the popcorn + assembly
- 2 cups of popped popcorn (I prefer to pop it in refined coconut oil as I find it accentuates the flavor and is also delicious!)
- ½ cup semisweet or bittersweet chocolate, chopped
- ¼ cup sliced almonds
- ¼ cup shredded coconut
steps
Line a 13 x 9 baking dish with parchment paper. Cover with a layer of popcorn and flatten as evenly as possible.
Make the caramel: melt the butter in a pot and add sugar. Heat to 300°F using a candy thermometer, stirring constantly. Immediately drizzle over popcorn.
Sprinkle chopped chocolate over caramel, reserving some for the top, followed by sliced almonds.
Make the almond butter caramel: place almond butter, sugar, and water in the pot that you made the classic caramel in. Mix constantly until it begins to thicken which will happen fairly quickly, in a matter of 3 minutes or so. Drizzle over the bars then add the remaining chocolate and the coconut.
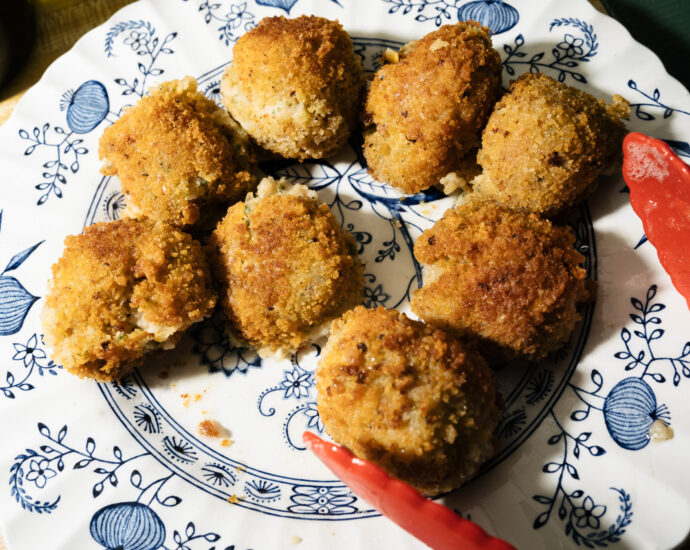
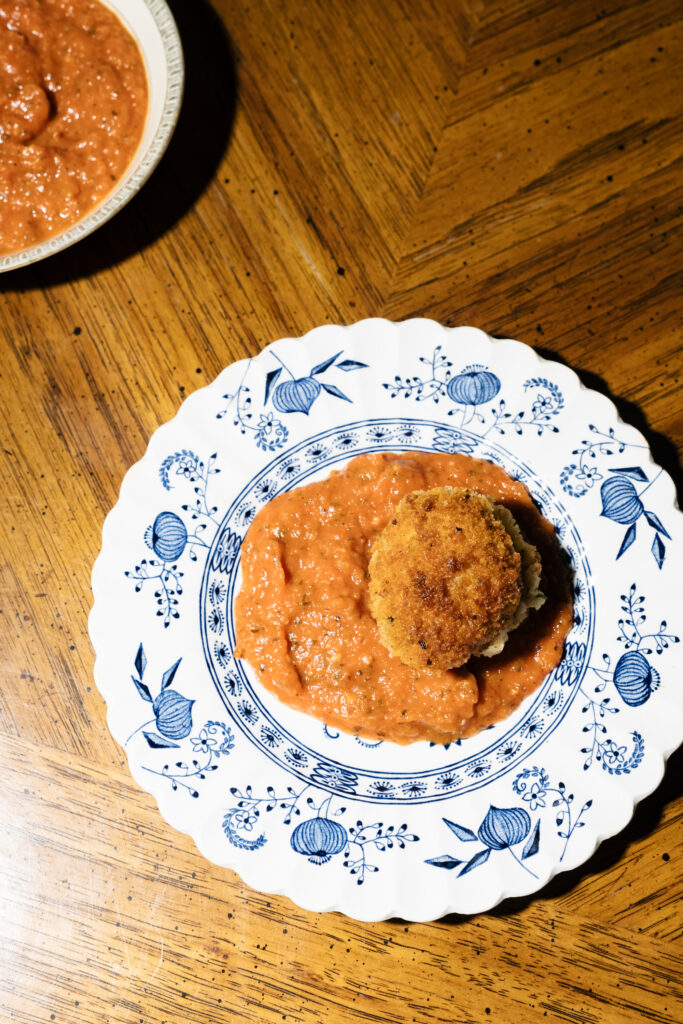
spicy white bean croquettes
I have been craving arancini so much, first of all because they are delicious, second because I associate them with parties, and parties are certainly missing these days. This recipe for spicy white bean croquettes offers that familiar arancini vibe using a different medium. Spicy white bean croquettes are a nice treat and change of pace.
White beans, blended with herbs, spices, egg, and parmesan cheese, create a creamy contrast to the crispy, crunchy exterior. Serve these spicy white beans croquettes with marinara sauce for a yummy snack or pair them with a salad for a full meal!
makes about 9 large croquettes
ingredients
- 1 can white (cannellini, great northern, navy) beans, drained and rinsed
- ½ teaspoon salt
- ½ teaspoon freshly ground black pepper
- 1 teaspoon crushed red pepper
- 1 teaspoon lemon zest
- 2 teaspoons parsley
- ½ teaspoon oregano
- ½ teaspoon basil
- ½ cup grated parmesan cheese
- 1-2 cups neutral oil (the amount will vary depending on the size of your cooking vessel)
- ¼ cup all-purpose flour
- 1 egg, beaten
- ½ cup breadcrumbs
- 1 cup marinara sauce, for dipping
steps
Place the rinsed beans in a large bowl and mash with a potato masher until smooth. Add the salt, pepper, crushed red pepper, and lemon zest and mix with a spatula or spoon. Mix in the parsley, oregano and basil, then add the parmesan cheese.
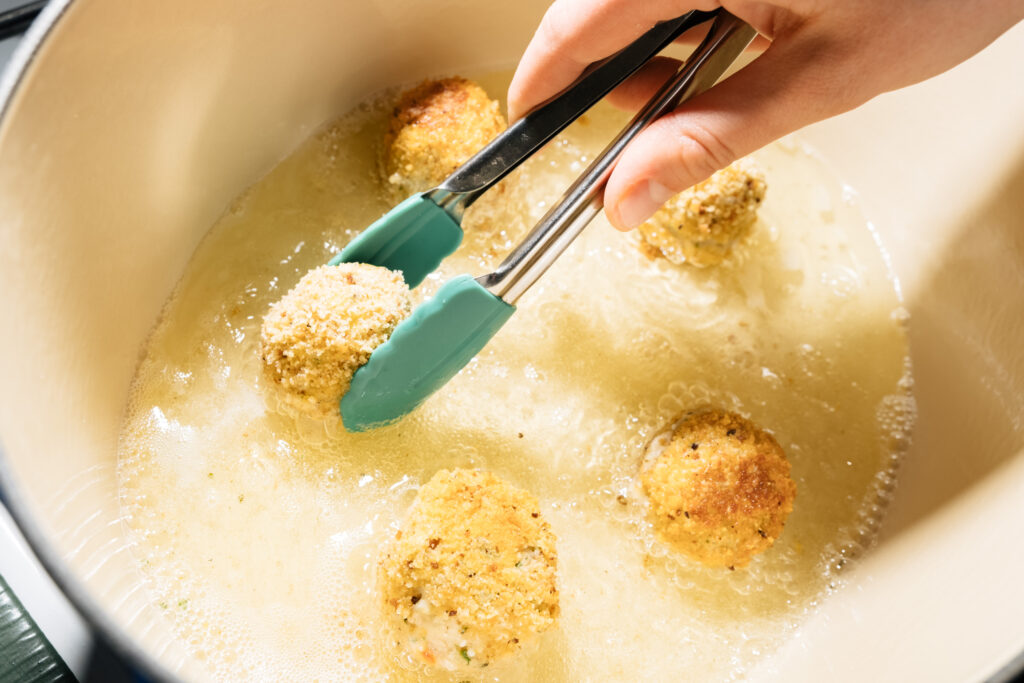
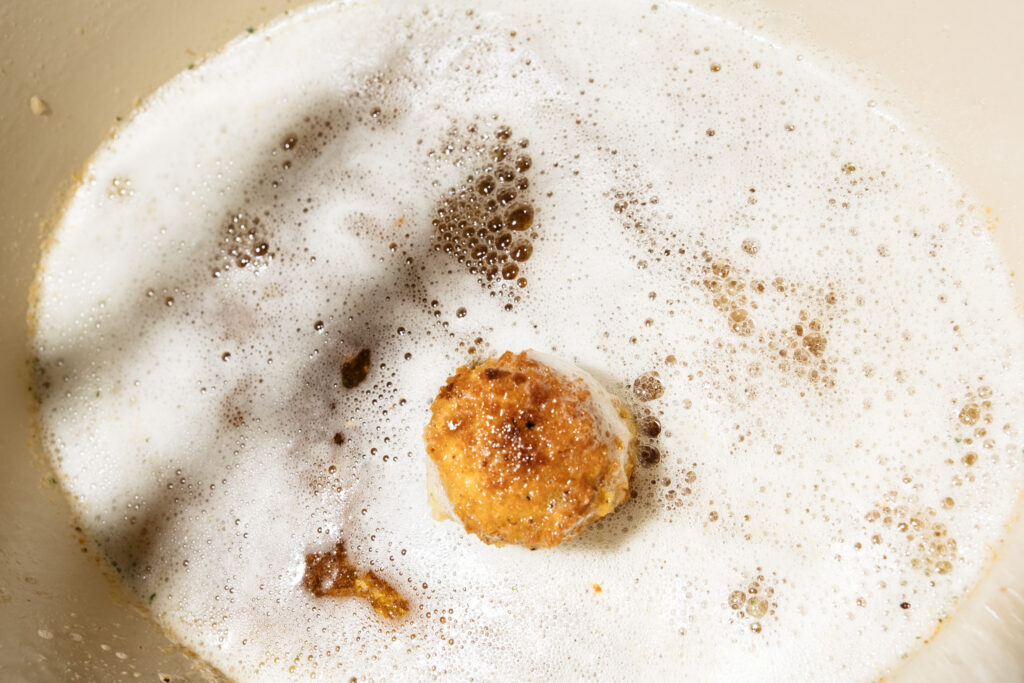
Meanwhile, heat the oil over medium-high heat. I cooked these in a 6 ¾ quart dutch oven, so it took about 2 cups of oil to fill it an inch high, but you can use any heavy-bottomed pot or cast iron skillet. Depending on its size, you may need more or less oil, but measuring out the oil exactly is not critical, just fill it enough so that about half of the croquette is covered when placed in the pan.
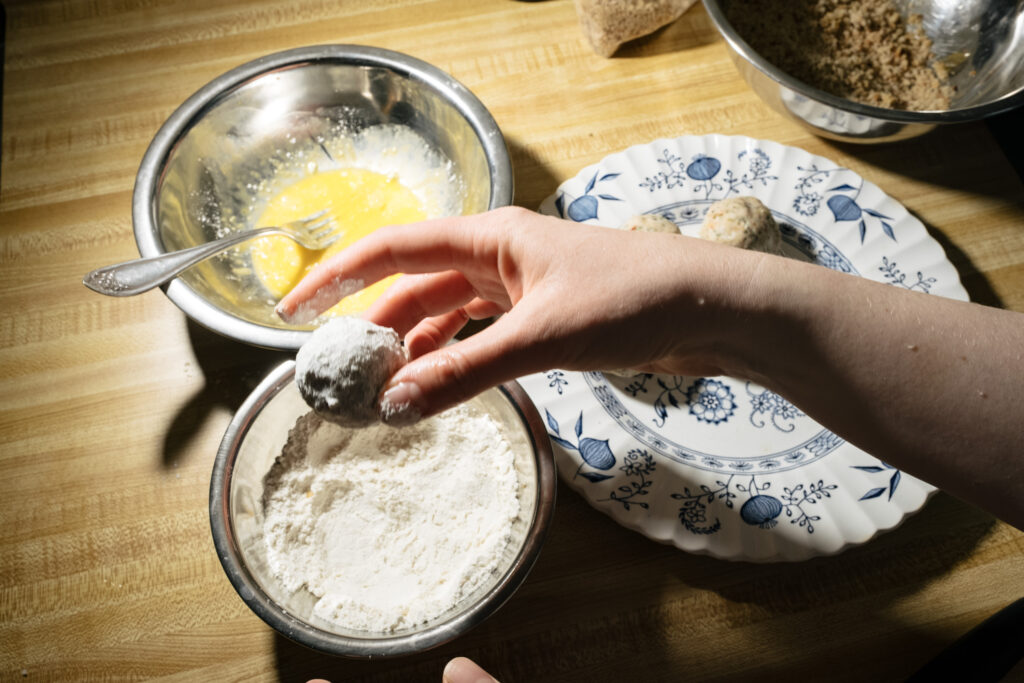
Once the oil has been heating for 5-7 minutes, it is time to prepare the croquettes. Measure out two tablespoons of the mixture, roll it into a ball, and set it aside. Repeat until all of the bean mixture has been rolled into balls. One at a time, coat each ball in flour, then egg, then bread crumbs, then place it in the pan. Be careful not to overcrowd the pan as this will cool the oil and prevent the croquettes from properly crisping.
Cook each croquette for 4-5 minutes on one side then flip it and cook for another 4 minutes. Feel free to turn it onto the other sides to achieve a thoroughly crips + golden texture. Serve hot with marinara sauce.

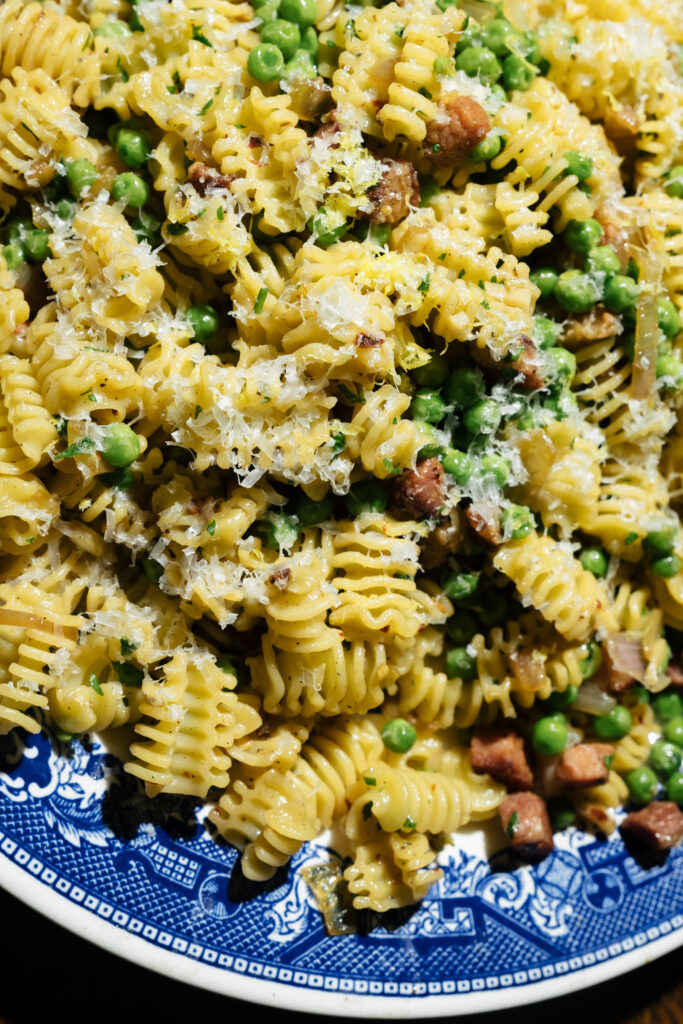
pasta pancetta e piselli (pasta with pancetta and peas)
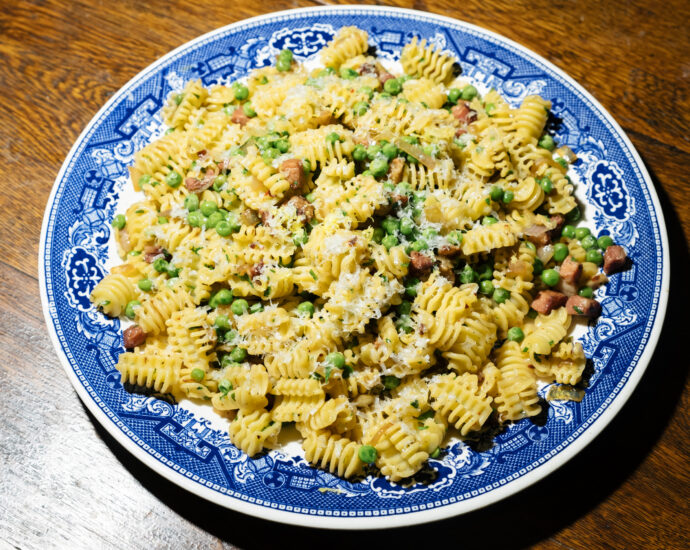
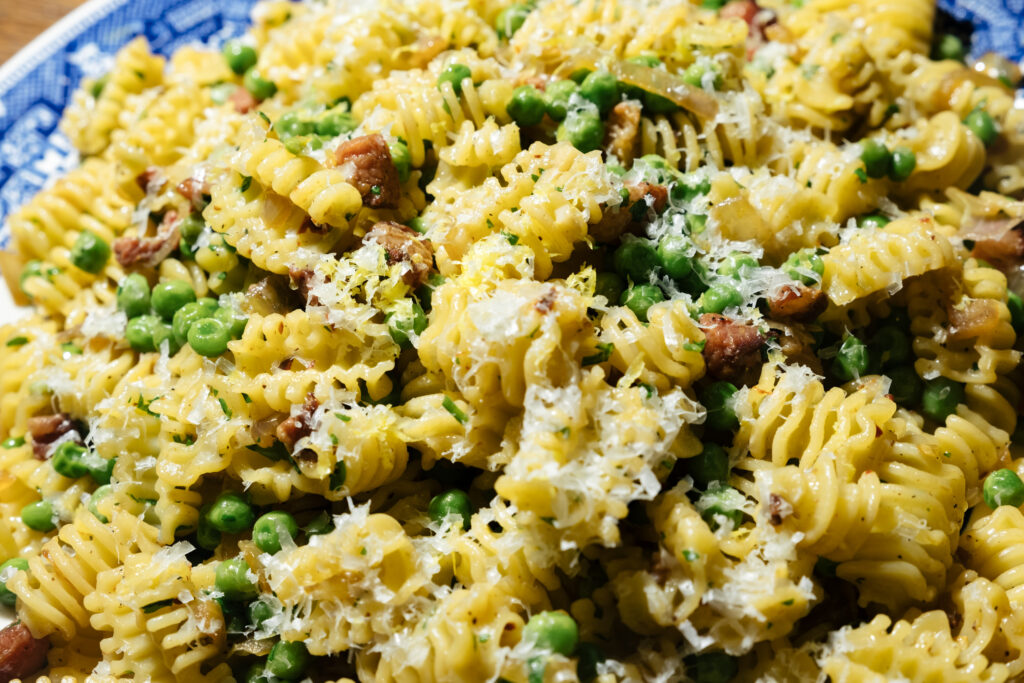
Pasta pancetta e piselli is the sort of meal that you can throw together in a matter of minutes when you have had a super busy day and return home, exhausted, to find no fresh groceries. Keep these staples on hand at all times and confidently know that you will be minutes away from a delicious and satisfying meal any time of day. The burst of green from the frozen peas joins with the pancetta’s rich flavor and a sprinkling of parmesan cheese to complete the dish. Pasta pancetta e piselli is a consistent and reliable pantry-reliant recipe.
Serves 4-6
ingredients
for the pasta and sauce
- 16 ounces (1 pound) pasta like radiatori or fusilli
- 8 ounces pancetta, cubed
- 1 shallot, diced
- 1 onion, diced
- 2 garlic cloves, minced
- ¼ teaspoon crushed red pepper
- 12 ounces frozen peas
for the garnish
- 1 tablespoon lemon zest
- ¼ cup grated parmesan cheese
steps
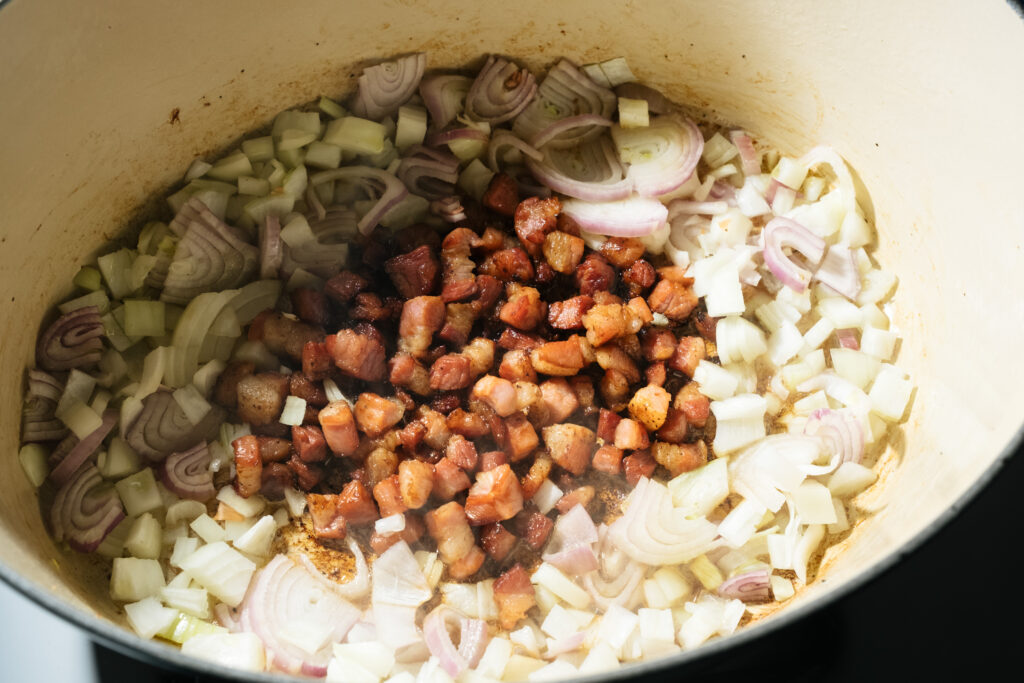
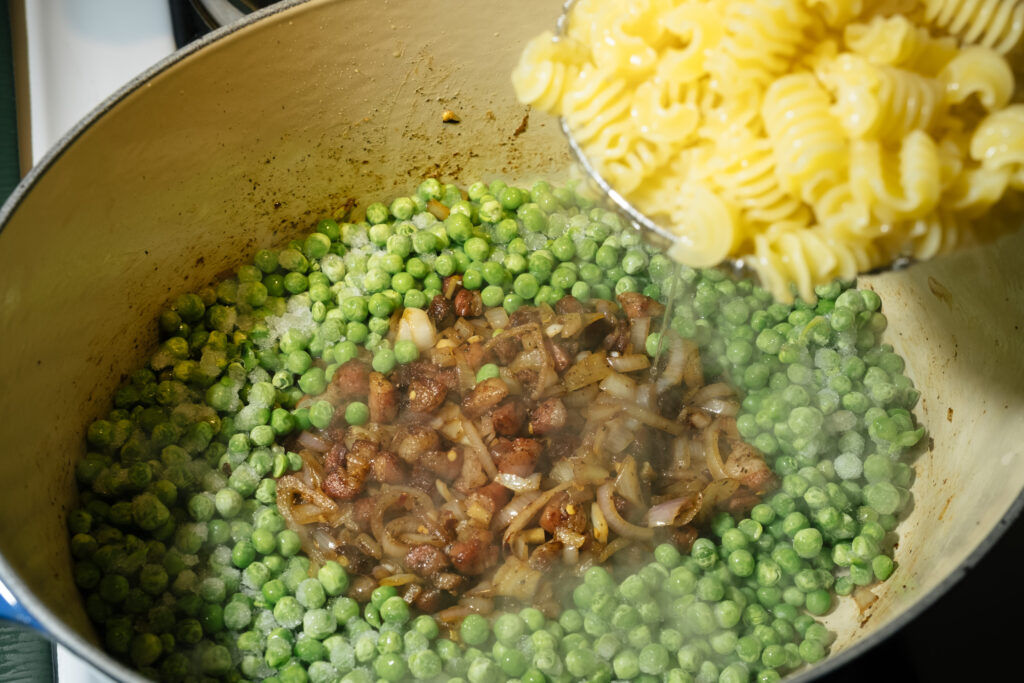
Bring a large pot of salted water to a boil. Cook the pancetta in a large skillet on medium-high heat until crisp and golden, about 7 minutes. Add the shallot and onion and cook for 4 minutes. Then add the garlic and cook for another 4 minutes. Add the crushed red pepper and cook. Add the peas and stir to evenly distribute.
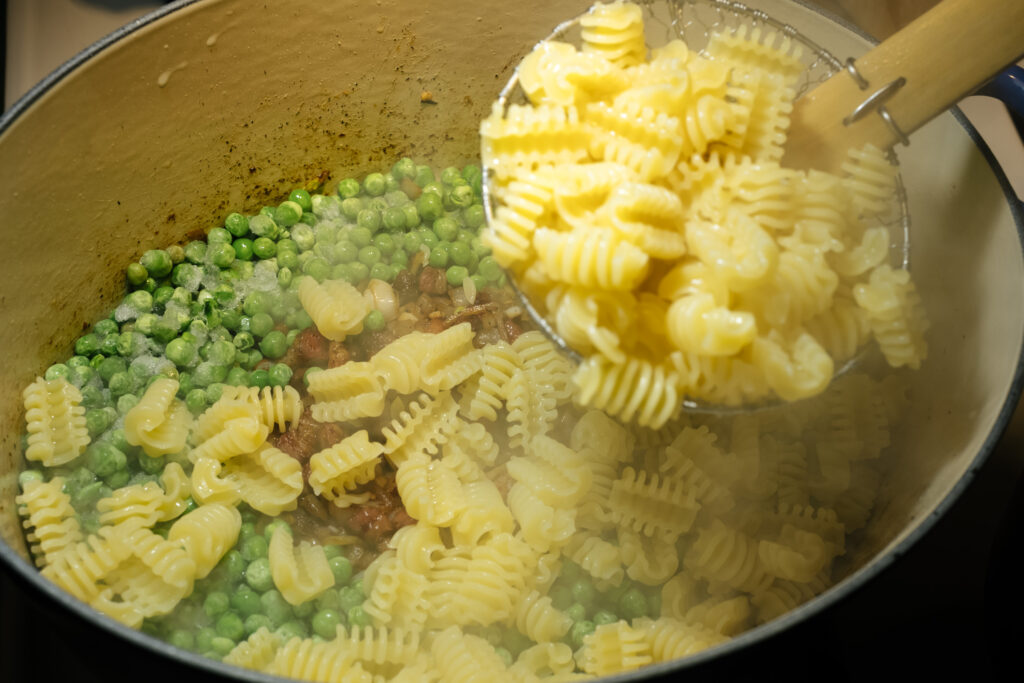
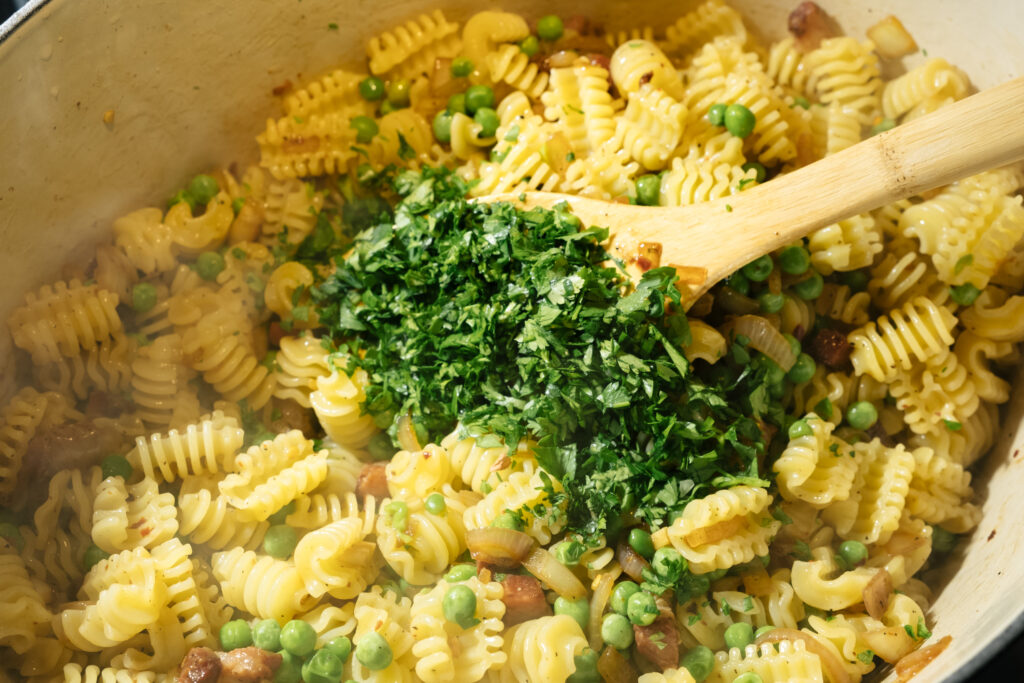
Meanwhile, add the pasta to the boiling water and cook until just under al-dente, around 6-7 minutes. Strain and transfer to the dutch oven and mix until all ingredients are evenly combined. Slowly mix in the parsley. Turn off the heat and grate lemon zest over top along with parmesan cheese.